In Chrome or Edge, open Game / Configuration management. Under Add game configuration, enter a name, choose the type from the dropdown, then select Read game folder and choose the folder containing speed.exe. Initial preparation can take several minutes. No external GUI or prepared configuration folder is required. Game files are not uploaded.
Supported worlds and baseline
The original Rockport world is supported. W2C events require the matching W2C world. The baseline is captured when the cache is prepared. After changing world files or textures, back up your editing JSON before updating the configuration from the same game folder. Game files are not uploaded.
Update a configuration from the game folder
Select the configuration in Configuration management and press Update configuration. Updating starts immediately when the remembered game folder is accessible. You are asked to select the folder containing speed.exe only if the location is missing or unavailable. Edits and the configuration ID are retained. Add a separate configuration when the world or road layout differs.
Reopen or switch configurations
Reopening or switching configurations restores the saved game-folder link and folder name only. It does not scan the folder or import events. Each configuration keeps its own event list.
When geometry is prepared
Editor 3D preview data is prepared when a configuration is added or updated. EventLoader automatically builds game geometry from the receiving installation when needed before the target event starts. No geometry export from the editor is required.
2. Select or create an event
Event selection and top-bar actions
Import events explicitly from Configuration management → Read events from game. The editor uses the linked folder and asks you to select it if access is unavailable. You can also import another game/event folder or a shared ZIP. Import checks file contents and map compatibility while preserving UUIDs and placements. Importing from another source does not change this configuration’s linked game folder.
Correct native events and delete added events
To correct a native event, use Project → This course → Correct native event. Deletion affects the browser list; it does not uninstall files already written to the game. Undo deletion restores the last deletion.
3. Navigate the 3D view
3D camera controls and tool help
Tools are on the left, the 3D view is central, and Event, Selection and Validation are on the right. Hover or keyboard-focus a tool for illustrated help. Left-drag empty space to orbit, right-drag to pan, and scroll to zoom. PageUp/PageDown adjusts height; hold Shift for a larger step. Top view and Focus selection are also available.
Visible labels and display layers
Visible labels toggles text by category. Display layers toggles world geometry, roads, gate volumes, objects and the grid. Hiding labels never removes placed objects. Label preferences are stored in this browser.
4. Required gates and shortcuts
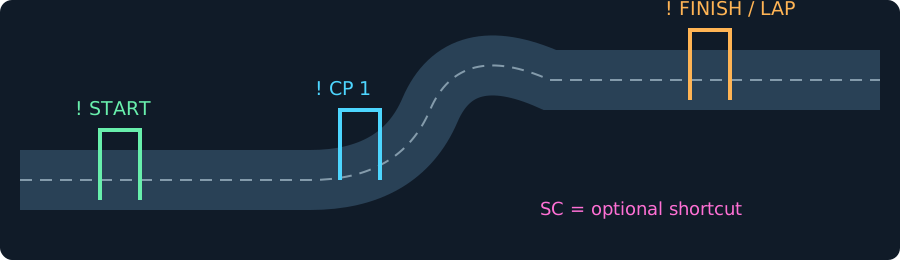
Gate key: START = starting grid; FINISH/LAP = finish or lap line; CP = required checkpoint; SC = optional shortcut.
Gate types, colors and required markers
Green START, orange FINISH/LAP and cyan CP carry a small ! badge. Pink SC is an optional shortcut, not a checkpoint. Reset gates are red. Tool colors match the labels.
Place, orient and order gates
Choose a placement tool and click the road. Select an object and adjust it with 3D handles or numeric position, rotation and size. Face it along the route and cover the road width. Reorder CPs with Order up/down. Start and finish map icons are automatic.
Circuits starting on a branch
For a circuit starting on a branch, check both the initial entry and the merge on later laps. Start and lap line can be separate. Alternatives and shortcuts must not skip checkpoints.
5. Routes, barriers and AI
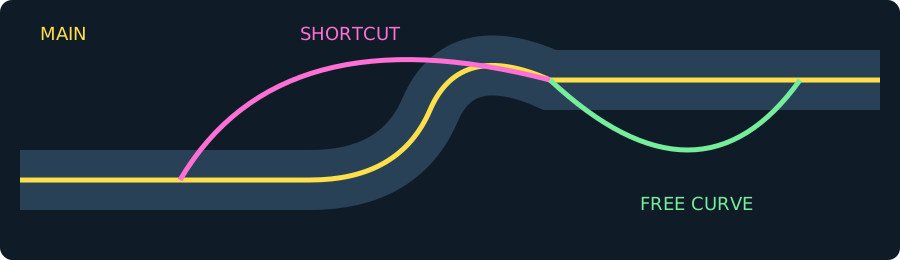
Route diagram: yellow MAIN is the main route, pink SHORTCUT is a shortcut, and green FREE CURVE is Fill / AI optimization. Secondary routes, exclusions, walls and right-panel settings are explained separately below.
Main route (yellow)
Trace the blue road lines defined by the game to select the main route. Complete the route. Placed gates determine its direction automatically. This route appears on the map.
Secondary route (orange)
Trace the blue road lines defined by the game to select a secondary route. Connect it to the yellow main route. Placed gates determine its direction automatically. This route appears on the map.
Shortcut (pink)
Trace the blue road lines to define an optional shortcut for NeoAI. Placed gates determine its direction automatically. Shortcuts do not appear on the map. Placing shortcut gates as well is recommended.
Fill / AI optimization (green)
Use this for routes without blue road lines. The curve inherits its role from the connected route. Draw it in place of the corresponding colored route to optimize the NeoAI driving line.
AI discouraged (brown): exclude from route choices
Exclude routes from NeoAI route choices. No connection to the main route is required. These lines do not appear on the map.
Barrier walls: block a path
Click to place one barrier wall, or drag to place a continuous run. Edit individual walls after confirming. Check their facing and orientation. A wall crossing a blue road line prevents NeoAI from choosing that path.
AI obstacle markers: assist avoidance
Effective, but still being tuned. Place over indestructible objects such as central dividers that AI struggles to avoid, giving it more time to anticipate avoidance. This does not guarantee complete control.
Replace the race map
Generate a dedicated race map by drawing the configured routes onto the extracted world map.
Guide NeoAI with map lines
Guide AI along the configured routes. When enabled, Event Loader’s NeoAI controls the vehicles instead of the original game AI. When disabled, the original game AI controls them.
Select cars similar to the player
Set the vehicle regulations: select rival cars with a similar price range and performance to the player’s car. When disabled, selection follows the blacklist rank.
Objects and passage order reviewed
Optional self-check switch. It has no effect on the game.
6. Race-specific editing
Speedtrap: measurement points
Speedtrap uses the speed trap tool. Measurement points are separate from CPs, up to 16, with a count card on the left. Select points to edit radius and order.
Tollbooth: toll locations and bonus time
In Tollbooth mode, click a 3D tollbooth candidate and assign Start, timed Passage or Finish. Check order and bonus time in the list. Use free passage-point placement where no native tollbooth exists.
Lap Knockout: participants and laps
Lap Knockout eliminates one racer per lap; four participants require at least three laps. Check participants and laps. Drag and other modes expose their own settings.
7. Properties and cutscenes
Select Arms Race (prototype)
Select Arms Race under Combat mode in Event Properties. Sprint, Circuit, Lap Knockout and Speed Trap can be used as the racing rules. Compatible Event Loader, MWArsenal and ArmsAssist are required. Without them, the editor disables the option and the game does not register the event.
Select Hot Pursuit (prototype)
Maximum eight racers. Pursuit starts individually after 25% race progress, with up to two chase cars per racer. Roadblocks and helicopters are separate. With survival-reward builds, any genuine finish is a clear and reward equals configured cash x survivors / finish position. A racer destroying Cross at heat 5 or higher restores 15% HP to surviving racers, and finished AI keep fleeing. Event Properties shows the rules supported by the connected MOD builds. Older supported builds do not gain these new rules.
Hot Pursuit requirements and settings
Connect the game folder containing MWArsenal and the validated Hot Pursuit builds of Event Loader and ArmsAssist. Older builds leave the option disabled. Choose Sprint or Speedtrap rules, starting heat, ammunition and cutscene. Police are always enabled.
Health, crash retirement and retry
Human and AI racers have 300 HP. EMP deals 25 damage, Spike 50 and Shockwave 15. An AI racer at zero HP retires through the native crash outcome while the remaining racers continue. A player at zero HP enters the native losing results screen with Restart available. Restart resets event health and ammunition. Arrests retain the native arrest scene.
Starting ammunition per weapon
Specify starting ammunition per weapon. Leave a field blank to use the ArmsAssist INI; zero disables that weapon. Specified counts are refilled at the start and on restart, and AI racers receive the same counts. Player equipment and INIs are preserved. Temporary event ammunition is released on exit.
Normal race behavior
Normal races lock weapons and hide the weapon HUD even with police enabled. Explicitly select a weapon-enabled event mode to use weapons. Drift Race remains unavailable.
Edit and apply event properties
Top-bar Properties and Open event properties on the right open the same dialog. Set name, ID, blacklist rank, type, participants, reward, traffic and police, then Apply. Cancel restores the state from when the dialog opened.
Select a cutscene and inspect its preview
Hover a scene or navigate with arrow keys for its image and grid diagram. Some Carbon previews show an actor pose with a layout diagram. Camera-only scenes are marked as having no actor. Slot 1 is the player. Scenes with a different participant count cannot be selected.
Starting-grid layout preview
The 3D grid follows the selected scene's countdown layout and road surface. Automatic and original-MW modes show an estimate; the final layout is chosen in game. Check that it fits the road.
Required resources for additional cutscenes
Additional scenes require resources converted locally from legitimate Carbon/Underground 2 files. Preview images alone cannot play a scene. Missing assets or unsuitable runtime conditions fall back to the original presentation.
8. Map card and rendering
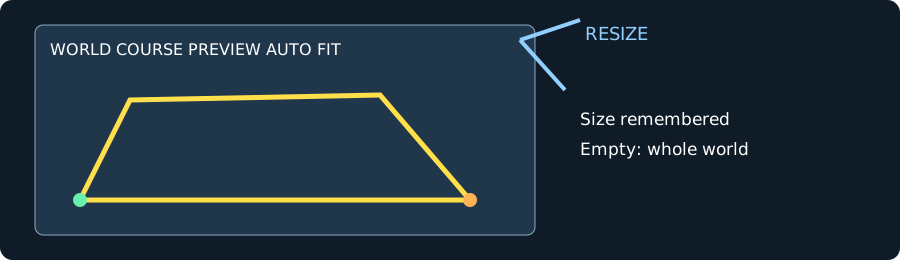
Lower-left map card: switch its content with the tabs and resize the card with its top-right handle.
Lower-left map card: tabs and auto fit
Switch between World, Course map and After-edit preview at the lower left. World automatically fits placed objects, or the whole world when empty. Toggle Auto fit for whole-world bounds. Reset clears additional pan and zoom.
Map-card size and rendering properties
Drag the top-right handle to resize freely, or focus it and use arrow keys. Size is restored next time. Rendering properties controls VRAM budget, resolution and loading concurrency. The budget is not a guarantee of available VRAM.
9. Validate, save and install
Validation, warning markers and copying errors
Use Validation to check passage order, connections and foldbacks. Select a gap ! marker or issue to focus it. Error-card contents can be copied. Ctrl+Z undoes; Ctrl+Y redoes.
Browser storage and editing JSON backups
Save in browser stores edits in the current configuration. For an editable backup, use Configuration management / Save all editing data to download JSON. Storage and folder permissions are not shared between browsers or origins. Storage and cache details shows usage and persistent-storage status. Use Import all editing data to restore saved JSON. Events without a matching entry are added. When an existing event would change, a warning lists its name. Cancel leaves all events unchanged.
Export to game and ZIP installation
In Event export, choose Export current event or Export all saved events. After generation, select Save generated ZIP. Close the game and launchers, then copy the scripts folder from the ZIP into the folder containing speed.exe. The ZIP contains event data only, with no ASI modules or installer. Direct writing is available under advanced options on the same screen.
Post-install checks and configuration fingerprint mismatches
After installation, playtest start, checkpoints, finish, exit and re-entry. Do not redistribute game files or converted scene resources. Close and reopen the app if old UI remains. For fingerprint mismatches, back up edits and update the configuration from the same game.
Options menu and bug reports
The upper-right … menu contains language, app installation and support. Include event name, reproduction steps and copied error details when reporting a problem. You do not need to send the entire game.
Recover from an unresponsive worker or failed generation
Export generation has a ten-minute response limit; configuration preparation has a fifteen-minute limit. A timeout terminates the worker; transfer failures can also be retried. Existing game files and configurations are not updated before generation/preparation succeeds.
10. Required mods and installation order
Normal-event prerequisites
Normal events require a supported English 1.3 speed.exe, an ASI loader and Event Loader. Preserve Japanese assets, existing INIs and saves. Do not install the same ASI both in the game root and scripts.
NeoAI and NFRR
Current NeoAI combines control inside Event Loader with the vehicle-scope adapter from a compatible NFRR. Native-AI events do not require NFRR. Performance matching also uses compatible NFRR calibration for the selected configuration.
Combat modes, expanded grids and HUD
Arms Race, Gauntlet and Hot Pursuit require compatible Event Loader and ArmsAssist plus a separately installed MWArsenal and its assets. Use compatible Limit Breaker for more than four participants and the suite HUD fixes for HP/HUD coexistence. MWArsenal alone does not register these modes.
Installation and verification order
Close the game and launchers and install required mods separately. Copy the scripts folder from the editor ZIP into the game, or use direct writing under advanced export options. Check start, checkpoints, finish, retry, exit and the next event.
11. Game data and recorded SFX
Local resources and distributable files
The editor extracts world, map and model data locally. Do not add configuration caches, source executables, BUN files, audio banks, profiles or Shadow/vault to event distribution ZIPs. Users install the required mods and world separately. Bug reporting is a separate action with reviewed submission content.
Replacement audio included with ArmsAssist
The current ArmsAssist distribution package includes four replacement SFX under scripts/MWArmsAssist: Drop.wav, PlayerDrop.wav, Lock_by_police.wav and repair-complete.wav. Use the sound files supplied with that package.
Check the package files
Use manifest.json in the package to verify the included files and their SHA-256 values. Before replacing sound files in an existing installation, close the game and back up the current files. Sound banks and unused SFX are not included.
12. Local conversion of additional cutscenes
Conversion prerequisites and availability
Convert scenes locally from your legitimate Carbon/UG2 files. Current development scripts depend on verified input paths and versions; a general one-click converter is not yet available. Thumbnails alone cannot play a scene.
Verify the original files
Inputs include the selected NIS, matching GLOBAL camera assets and verified camera descriptions; UG2 also uses EvtTrk. Read only the required files, preserve the source game and record sizes/SHA256. Convert normal race intros without mixing in story-only scenes.
Convert and validate each scene
In the development tree tools/CarbonIntro, Carbon uses prepare_variants and export_variant; UG2 uses prepare_ug2_one, prepare_ug2_batch and the matching export_ug2 scripts. Validate actors, car layout, camera and GO timing separately. Do not add actor assets to camera-only scenes.
Install into your own game
Install only the runtimeFiles listed by runtime_manifest under scripts/EventLoader/CustomCutscenes/scene-ID. camera.cic, cars.cic, actor-clock.bin, scene-timing.bin and other files must match that scene manifest. Exclude camera.raw, original BUN/EXE files and research NPZ files.
Keep scene decoding and recording distinct
Scene audio is a separate step. Validate a confirmed PCM16 WAV and audio-timing.bin together with scene_audio. Current limits are mono/stereo, 8–96 kHz, 60 seconds and 8 MiB. export_scene_wav decodes a local ABK; it does not record audio. Do not claim original-audio fidelity for unidentified samples.
Selection and gameplay checks
Select a scene matching the participant count and playtest intro-to-GO, cancel, retry and transition to another event. Missing assets fall back to the original MW intro. Do not include converted source-game assets in general event distributions.
Öffnen Sie in Chrome oder Edge die Spiel-/Konfigurationsverwaltung. Geben Sie unter „Spielkonfiguration hinzufügen“ einen Namen ein, wählen Sie den Typ aus der Dropdown-Liste aus, wählen Sie dann „Spielordner lesen“ und wählen Sie den Ordner mit speed.exe. Die erste Vorbereitung kann mehrere Minuten dauern. Es ist keine externe GUI oder vorbereiteter Konfigurationsordner erforderlich. Spieldateien werden nicht hochgeladen.
Supported worlds and baseline
The original Rockport world is supported. W2C events require the matching W2C world. The baseline is captured when the cache is prepared. After changing world files or textures, back up your editing JSON before updating the configuration from the same game folder. Game files are not uploaded.
Update a configuration from the game folder
Wählen Sie die Konfiguration in der Konfigurationsverwaltung aus und klicken Sie auf Konfiguration aktualisieren. Die Aktualisierung beginnt sofort, wenn auf den gespeicherten Spielordner zugegriffen werden kann. Sie werden nur dann aufgefordert, den Ordner auszuwählen, der speed.exe enthält, wenn der Speicherort fehlt oder nicht verfügbar ist. Änderungen und die Konfigurations-ID bleiben erhalten. Fügen Sie eine separate Konfiguration hinzu, wenn die Welt oder das Straßenlayout unterschiedlich ist.
Konfigurationen erneut öffnen oder wechseln
Beim erneuten Öffnen oder Wechseln einer Konfiguration werden nur die gespeicherte Verknüpfung zum Spieleordner und dessen Name wiederhergestellt. Der Ordner wird nicht durchsucht und es werden keine Events importiert. Jede Konfiguration hat eine eigene Eventliste.
Wenn die Geometrie vorbereitet wird
Vorschaudaten des Editors 3D werden vorbereitet, wenn eine Konfiguration hinzugefügt oder aktualisiert wird. EventLoader erstellt bei Bedarf automatisch die Spielgeometrie aus der empfangenden Installation, bevor das Zielereignis beginnt. Es ist kein Geometrieexport aus dem Editor erforderlich.
2. Select or create an event
Event selection and top-bar actions
Importiere Events ausdrücklich über Konfigurationsverwaltung → Events aus dem Spiel laden. Der Editor verwendet den verknüpften Ordner und fordert dich zur Auswahl auf, falls er nicht zugänglich ist. Du kannst auch einen anderen Spiel- oder Eventordner oder ein freigegebenes ZIP importieren. Beim Import werden Dateiinhalte und Kartenkompatibilität geprüft; UUIDs und Platzierungen bleiben erhalten. Ein Import aus einer anderen Quelle ändert den verknüpften Spieleordner dieser Konfiguration nicht.
Correct native events and delete added events
To correct a native event, use Project → This course → Correct native event. Deletion affects the browser list; it does not uninstall files already written to the game. Undo deletion restores the last deletion.
3. Navigate the 3D view
3D camera controls and tool help
Tools are on the left, the 3D view is central, and Event, Selection and Validation are on the right. Hover or keyboard-focus a tool for illustrated help. Left-drag empty space to orbit, right-drag to pan, and scroll to zoom. PageUp/PageDown adjusts height; hold Shift for a larger step. Top view and Focus selection are also available.
Visible labels and display layers
Visible labels toggles text by category. Display layers toggles world geometry, roads, gate volumes, objects and the grid. Hiding labels never removes placed objects. Label preferences are stored in this browser.
4. Required gates and shortcuts
Gate key: START = starting grid; FINISH/LAP = finish or lap line; CP = required checkpoint; SC = optional shortcut.
Gate types, colors and required markers
Green START, orange FINISH/LAP and cyan CP carry a small ! badge. Pink SC is an optional shortcut, not a checkpoint. Reset gates are red. Tool colors match the labels.
Place, orient and order gates
Choose a placement tool and click the road. Select an object and adjust it with 3D handles or numeric position, rotation and size. Face it along the route and cover the road width. Reorder CPs with Order up/down. Start and finish map icons are automatic.
Circuits starting on a branch
For a circuit starting on a branch, check both the initial entry and the merge on later laps. Start and lap line can be separate. Alternatives and shortcuts must not skip checkpoints.
5. Routes, barriers and AI
Route diagram: yellow MAIN is the main route, pink SHORTCUT is a shortcut, and green FREE CURVE is Fill / AI optimization. Secondary routes, exclusions, walls and right-panel settings are explained separately below.
Main route (yellow)
Trace the blue road lines defined by the game to select the main route. Complete the route. Placed gates determine its direction automatically. This route appears on the map.
Secondary route (orange)
Trace the blue road lines defined by the game to select a secondary route. Connect it to the yellow main route. Placed gates determine its direction automatically. This route appears on the map.
Shortcut (pink)
Trace the blue road lines to define an optional shortcut for NeoAI. Placed gates determine its direction automatically. Shortcuts do not appear on the map. Placing shortcut gates as well is recommended.
Fill / AI optimization (green)
Use this for routes without blue road lines. The curve inherits its role from the connected route. Draw it in place of the corresponding colored route to optimize the NeoAI driving line.
AI discouraged (brown): exclude from route choices
Exclude routes from NeoAI route choices. No connection to the main route is required. These lines do not appear on the map.
Barrier walls: block a path
Click to place one barrier wall, or drag to place a continuous run. Edit individual walls after confirming. Check their facing and orientation. A wall crossing a blue road line prevents NeoAI from choosing that path.
AI obstacle markers: assist avoidance
Effective, but still being tuned. Place over indestructible objects such as central dividers that AI struggles to avoid, giving it more time to anticipate avoidance. This does not guarantee complete control.
Replace the race map
Generate a dedicated race map by drawing the configured routes onto the extracted world map.
Guide NeoAI with map lines
Guide AI along the configured routes. When enabled, Event Loader’s NeoAI controls the vehicles instead of the original game AI. When disabled, the original game AI controls them.
Select cars similar to the player
Set the vehicle regulations: select rival cars with a similar price range and performance to the player’s car. When disabled, selection follows the blacklist rank.
Objects and passage order reviewed
Optional self-check switch. It has no effect on the game.
6. Race-specific editing
Speedtrap: measurement points
Speedtrap uses the speed trap tool. Measurement points are separate from CPs, up to 16, with a count card on the left. Select points to edit radius and order.
Tollbooth: toll locations and bonus time
In Tollbooth mode, click a 3D tollbooth candidate and assign Start, timed Passage or Finish. Check order and bonus time in the list. Use free passage-point placement where no native tollbooth exists.
Lap Knockout: participants and laps
Lap Knockout eliminates one racer per lap; four participants require at least three laps. Check participants and laps. Drag and other modes expose their own settings.
7. Properties and cutscenes
Select Arms Race (prototype)
Select Arms Race under Combat mode in Event Properties. Sprint, Circuit, Lap Knockout and Speed Trap can be used as the racing rules. Compatible Event Loader, MWArsenal and ArmsAssist are required. Without them, the editor disables the option and the game does not register the event.
Select Hot Pursuit (prototype)
Maximum eight racers. Pursuit starts individually after 25% race progress, with up to two chase cars per racer. Roadblocks and helicopters are separate. With survival-reward builds, any genuine finish is a clear and reward equals configured cash x survivors / finish position. A racer destroying Cross at heat 5 or higher restores 15% HP to surviving racers, and finished AI keep fleeing. Event Properties shows the rules supported by the connected MOD builds. Older supported builds do not gain these new rules.
Hot Pursuit requirements and settings
Connect the game folder containing MWArsenal and the validated Hot Pursuit builds of Event Loader and ArmsAssist. Older builds leave the option disabled. Choose Sprint or Speedtrap rules, starting heat, ammunition and cutscene. Police are always enabled.
Health, crash retirement and retry
Human and AI racers have 300 HP. EMP deals 25 damage, Spike 50 and Shockwave 15. An AI racer at zero HP retires through the native crash outcome while the remaining racers continue. A player at zero HP enters the native losing results screen with Restart available. Restart resets event health and ammunition. Arrests retain the native arrest scene.
Starting ammunition per weapon
Specify starting ammunition per weapon. Leave a field blank to use the ArmsAssist INI; zero disables that weapon. Specified counts are refilled at the start and on restart, and AI racers receive the same counts. Player equipment and INIs are preserved. Temporary event ammunition is released on exit.
Normal race behavior
Normal races lock weapons and hide the weapon HUD even with police enabled. Explicitly select a weapon-enabled event mode to use weapons. Drift Race remains unavailable.
Edit and apply event properties
Top-bar Properties and Open event properties on the right open the same dialog. Set name, ID, blacklist rank, type, participants, reward, traffic and police, then Apply. Cancel restores the state from when the dialog opened.
Select a cutscene and inspect its preview
Hover a scene or navigate with arrow keys for its image and grid diagram. Some Carbon previews show an actor pose with a layout diagram. Camera-only scenes are marked as having no actor. Slot 1 is the player. Scenes with a different participant count cannot be selected.
Starting-grid layout preview
The 3D grid follows the selected scene's countdown layout and road surface. Automatic and original-MW modes show an estimate; the final layout is chosen in game. Check that it fits the road.
Required resources for additional cutscenes
Additional scenes require resources converted locally from legitimate Carbon/Underground 2 files. Preview images alone cannot play a scene. Missing assets or unsuitable runtime conditions fall back to the original presentation.
8. Map card and rendering
Lower-left map card: switch its content with the tabs and resize the card with its top-right handle.
Lower-left map card: tabs and auto fit
Switch between World, Course map and After-edit preview at the lower left. World automatically fits placed objects, or the whole world when empty. Toggle Auto fit for whole-world bounds. Reset clears additional pan and zoom.
Map-card size and rendering properties
Drag the top-right handle to resize freely, or focus it and use arrow keys. Size is restored next time. Rendering properties controls VRAM budget, resolution and loading concurrency. The budget is not a guarantee of available VRAM.
9. Validate, save and install
Validation, warning markers and copying errors
Use Validation to check passage order, connections and foldbacks. Select a gap ! marker or issue to focus it. Error-card contents can be copied. Ctrl+Z undoes; Ctrl+Y redoes.
Browser storage and editing JSON backups
Beim Speichern im Browser werden Änderungen in der aktuellen Konfiguration gespeichert. Für eine bearbeitbare Sicherung verwenden Sie Konfigurationsverwaltung/Alle Bearbeitungsdaten speichern, um JSON herunterzuladen. Speicher- und Ordnerberechtigungen werden nicht zwischen Browsern oder Ursprüngen geteilt. Speicher- und Cache-Details zeigen die Nutzung und den Status des persistenten Speichers. Verwenden Sie „Alle Bearbeitungsdaten importieren“, um gespeicherte JSON wiederherzustellen. Ereignisse ohne passenden Eintrag werden hinzugefügt. Wenn sich ein vorhandenes Ereignis ändern würde, wird in einer Warnung der Name aufgeführt. Durch Abbrechen bleiben alle Ereignisse unverändert.
Export to game and ZIP installation
Wählen Sie im Ereignisexport die Option „Aktuelles Ereignis exportieren“ oder „Alle gespeicherten Ereignisse exportieren“. Wählen Sie nach der Generierung die Option „Generiertes ZIP speichern“ aus. Schließen Sie das Spiel und die Launcher und kopieren Sie dann den Skriptordner von ZIP in den Ordner mit speed.exe. Der ZIP enthält nur Ereignisdaten, keine ASI-Module oder Installationsprogramme. Direktes Schreiben ist unter den erweiterten Optionen auf demselben Bildschirm verfügbar.
Post-install checks and configuration fingerprint mismatches
After installation, playtest start, checkpoints, finish, exit and re-entry. Do not redistribute game files or converted scene resources. Close and reopen the app if old UI remains. For fingerprint mismatches, back up edits and update the configuration from the same game.
Options menu and bug reports
The upper-right … menu contains language, app installation and support. Include event name, reproduction steps and copied error details when reporting a problem. You do not need to send the entire game.
Recover from an unresponsive worker or failed generation
Export generation has a ten-minute response limit; configuration preparation has a fifteen-minute limit. A timeout terminates the worker; transfer failures can also be retried. Existing game files and configurations are not updated before generation/preparation succeeds.
10. Required mods and installation order
Normal-event prerequisites
Normal events require a supported English 1.3 speed.exe, an ASI loader and Event Loader. Preserve Japanese assets, existing INIs and saves. Do not install the same ASI both in the game root and scripts.
NeoAI and NFRR
Current NeoAI combines control inside Event Loader with the vehicle-scope adapter from a compatible NFRR. Native-AI events do not require NFRR. Performance matching also uses compatible NFRR calibration for the selected configuration.
Combat modes, expanded grids and HUD
Arms Race, Gauntlet and Hot Pursuit require compatible Event Loader and ArmsAssist plus a separately installed MWArsenal and its assets. Use compatible Limit Breaker for more than four participants and the suite HUD fixes for HP/HUD coexistence. MWArsenal alone does not register these modes.
Installation and verification order
Schließen Sie das Spiel und die Launcher und installieren Sie die erforderlichen Mods separat. Kopieren Sie den Skriptordner aus dem Editor ZIP in das Spiel oder verwenden Sie das direkte Schreiben unter den erweiterten Exportoptionen. Überprüfen Sie Start, Kontrollpunkte, Ziel, Wiederholung, Ausgang und das nächste Ereignis.
11. Game data and recorded SFX
Local resources and distributable files
The editor extracts world, map and model data locally. Do not add configuration caches, source executables, BUN files, audio banks, profiles or Shadow/vault to event distribution ZIPs. Users install the required mods and world separately. Bug reporting is a separate action with reviewed submission content.
Ersatzsounds im ArmsAssist-Paket
Paketdateien prüfen
Das ArmsAssist-Verteilungspaket enthält vier Ersatzsounds in scripts/MWArmsAssist: Drop.wav, PlayerDrop.wav, Lock_by_police.wav und repair-complete.wav. Verwende die Dateien aus diesem Paket. Ältere Angaben, die sie als NFSHP-Quellton, Spielaufnahme oder Originalton bezeichneten, beschreiben das aktuelle Ersatzset nicht korrekt.
Die Dateiliste und Prüfdaten findest du in manifest.json im Paket. Beende das Spiel und sichere die aktuellen Dateien, bevor du Sounds in einer vorhandenen Installation ersetzt. Soundbanks und ungenutzte SFX sind nicht enthalten.
12. Local conversion of additional cutscenes
Conversion prerequisites and availability
Convert scenes locally from your legitimate Carbon/UG2 files. Current development scripts depend on verified input paths and versions; a general one-click converter is not yet available. Thumbnails alone cannot play a scene.
Verify the original files
Inputs include the selected NIS, matching GLOBAL camera assets and verified camera descriptions; UG2 also uses EvtTrk. Read only the required files, preserve the source game and record sizes/SHA256. Convert normal race intros without mixing in story-only scenes.
Convert and validate each scene
In the development tree tools/CarbonIntro, Carbon uses prepare_variants and export_variant; UG2 uses prepare_ug2_one, prepare_ug2_batch and the matching export_ug2 scripts. Validate actors, car layout, camera and GO timing separately. Do not add actor assets to camera-only scenes.
Install into your own game
Install only the runtimeFiles listed by runtime_manifest under scripts/EventLoader/CustomCutscenes/scene-ID. camera.cic, cars.cic, actor-clock.bin, scene-timing.bin and other files must match that scene manifest. Exclude camera.raw, original BUN/EXE files and research NPZ files.
Keep scene decoding and recording distinct
Scene audio is a separate step. Validate a confirmed PCM16 WAV and audio-timing.bin together with scene_audio. Current limits are mono/stereo, 8–96 kHz, 60 seconds and 8 MiB. export_scene_wav decodes a local ABK; it does not record audio. Do not claim original-audio fidelity for unidentified samples.
Selection and gameplay checks
Select a scene matching the participant count and playtest intro-to-GO, cancel, retry and transition to another event. Missing assets fall back to the original MW intro. Do not include converted source-game assets in general event distributions.
Dans Chrome ou Edge, ouvrez la gestion des jeux/configurations. Sous Ajouter une configuration de jeu, saisissez un nom, choisissez le type dans la liste déroulante, puis sélectionnez Lire le dossier du jeu et choisissez le dossier contenant speed.exe. La préparation initiale peut prendre plusieurs minutes. Aucune interface graphique externe ou dossier de configuration préparé n'est requis. Les fichiers du jeu ne sont pas téléchargés.
Supported worlds and baseline
The original Rockport world is supported. W2C events require the matching W2C world. The baseline is captured when the cache is prepared. After changing world files or textures, back up your editing JSON before updating the configuration from the same game folder. Game files are not uploaded.
Update a configuration from the game folder
Sélectionnez la configuration dans Gestion des configurations et appuyez sur Mettre à jour la configuration. La mise à jour démarre immédiatement lorsque le dossier de jeu mémorisé est accessible. Il vous est demandé de sélectionner le dossier contenant speed.exe uniquement si l'emplacement est manquant ou indisponible. Les modifications et l’ID de configuration sont conservés. Ajoutez une configuration distincte lorsque le monde ou le tracé des routes diffère.
Rouvrir ou changer de configuration
Lorsque vous rouvrez ou changez de configuration, seul le lien enregistré vers le dossier du jeu et son nom sont restaurés. Le dossier n'est pas analysé et aucun événement n'est importé. Chaque configuration conserve sa propre liste d'événements.
Lorsque la géométrie est préparée
Les données d'aperçu de l'éditeur 3D sont préparées lorsqu'une configuration est ajoutée ou mise à jour. EventLoader crée automatiquement la géométrie du jeu à partir de l'installation de réception lorsque cela est nécessaire avant le début de l'événement cible. Aucune exportation de géométrie depuis l'éditeur n'est requise.
2. Select or create an event
Event selection and top-bar actions
Importez explicitement les événements via Gestion des configurations → Lire les événements du jeu. L'éditeur utilise le dossier lié et vous demande de le sélectionner s'il n'est pas accessible. Vous pouvez aussi importer un autre dossier de jeu ou d'événements, ou une archive ZIP partagée. L'import vérifie le contenu des fichiers et la compatibilité de la carte, tout en conservant les UUID et les emplacements. Un import depuis une autre source ne modifie pas le dossier de jeu lié à cette configuration.
Correct native events and delete added events
To correct a native event, use Project → This course → Correct native event. Deletion affects the browser list; it does not uninstall files already written to the game. Undo deletion restores the last deletion.
3. Navigate the 3D view
3D camera controls and tool help
Tools are on the left, the 3D view is central, and Event, Selection and Validation are on the right. Hover or keyboard-focus a tool for illustrated help. Left-drag empty space to orbit, right-drag to pan, and scroll to zoom. PageUp/PageDown adjusts height; hold Shift for a larger step. Top view and Focus selection are also available.
Visible labels and display layers
Visible labels toggles text by category. Display layers toggles world geometry, roads, gate volumes, objects and the grid. Hiding labels never removes placed objects. Label preferences are stored in this browser.
4. Required gates and shortcuts
Gate key: START = starting grid; FINISH/LAP = finish or lap line; CP = required checkpoint; SC = optional shortcut.
Gate types, colors and required markers
Green START, orange FINISH/LAP and cyan CP carry a small ! badge. Pink SC is an optional shortcut, not a checkpoint. Reset gates are red. Tool colors match the labels.
Place, orient and order gates
Choose a placement tool and click the road. Select an object and adjust it with 3D handles or numeric position, rotation and size. Face it along the route and cover the road width. Reorder CPs with Order up/down. Start and finish map icons are automatic.
Circuits starting on a branch
For a circuit starting on a branch, check both the initial entry and the merge on later laps. Start and lap line can be separate. Alternatives and shortcuts must not skip checkpoints.
5. Routes, barriers and AI
Route diagram: yellow MAIN is the main route, pink SHORTCUT is a shortcut, and green FREE CURVE is Fill / AI optimization. Secondary routes, exclusions, walls and right-panel settings are explained separately below.
Main route (yellow)
Trace the blue road lines defined by the game to select the main route. Complete the route. Placed gates determine its direction automatically. This route appears on the map.
Secondary route (orange)
Trace the blue road lines defined by the game to select a secondary route. Connect it to the yellow main route. Placed gates determine its direction automatically. This route appears on the map.
Shortcut (pink)
Trace the blue road lines to define an optional shortcut for NeoAI. Placed gates determine its direction automatically. Shortcuts do not appear on the map. Placing shortcut gates as well is recommended.
Fill / AI optimization (green)
Use this for routes without blue road lines. The curve inherits its role from the connected route. Draw it in place of the corresponding colored route to optimize the NeoAI driving line.
AI discouraged (brown): exclude from route choices
Exclude routes from NeoAI route choices. No connection to the main route is required. These lines do not appear on the map.
Barrier walls: block a path
Click to place one barrier wall, or drag to place a continuous run. Edit individual walls after confirming. Check their facing and orientation. A wall crossing a blue road line prevents NeoAI from choosing that path.
AI obstacle markers: assist avoidance
Effective, but still being tuned. Place over indestructible objects such as central dividers that AI struggles to avoid, giving it more time to anticipate avoidance. This does not guarantee complete control.
Replace the race map
Generate a dedicated race map by drawing the configured routes onto the extracted world map.
Guide NeoAI with map lines
Guide AI along the configured routes. When enabled, Event Loader’s NeoAI controls the vehicles instead of the original game AI. When disabled, the original game AI controls them.
Select cars similar to the player
Set the vehicle regulations: select rival cars with a similar price range and performance to the player’s car. When disabled, selection follows the blacklist rank.
Objects and passage order reviewed
Optional self-check switch. It has no effect on the game.
6. Race-specific editing
Speedtrap: measurement points
Speedtrap uses the speed trap tool. Measurement points are separate from CPs, up to 16, with a count card on the left. Select points to edit radius and order.
Tollbooth: toll locations and bonus time
In Tollbooth mode, click a 3D tollbooth candidate and assign Start, timed Passage or Finish. Check order and bonus time in the list. Use free passage-point placement where no native tollbooth exists.
Lap Knockout: participants and laps
Lap Knockout eliminates one racer per lap; four participants require at least three laps. Check participants and laps. Drag and other modes expose their own settings.
7. Properties and cutscenes
Select Arms Race (prototype)
Select Arms Race under Combat mode in Event Properties. Sprint, Circuit, Lap Knockout and Speed Trap can be used as the racing rules. Compatible Event Loader, MWArsenal and ArmsAssist are required. Without them, the editor disables the option and the game does not register the event.
Select Hot Pursuit (prototype)
Maximum eight racers. Pursuit starts individually after 25% race progress, with up to two chase cars per racer. Roadblocks and helicopters are separate. With survival-reward builds, any genuine finish is a clear and reward equals configured cash x survivors / finish position. A racer destroying Cross at heat 5 or higher restores 15% HP to surviving racers, and finished AI keep fleeing. Event Properties shows the rules supported by the connected MOD builds. Older supported builds do not gain these new rules.
Hot Pursuit requirements and settings
Connect the game folder containing MWArsenal and the validated Hot Pursuit builds of Event Loader and ArmsAssist. Older builds leave the option disabled. Choose Sprint or Speedtrap rules, starting heat, ammunition and cutscene. Police are always enabled.
Health, crash retirement and retry
Human and AI racers have 300 HP. EMP deals 25 damage, Spike 50 and Shockwave 15. An AI racer at zero HP retires through the native crash outcome while the remaining racers continue. A player at zero HP enters the native losing results screen with Restart available. Restart resets event health and ammunition. Arrests retain the native arrest scene.
Starting ammunition per weapon
Specify starting ammunition per weapon. Leave a field blank to use the ArmsAssist INI; zero disables that weapon. Specified counts are refilled at the start and on restart, and AI racers receive the same counts. Player equipment and INIs are preserved. Temporary event ammunition is released on exit.
Normal race behavior
Normal races lock weapons and hide the weapon HUD even with police enabled. Explicitly select a weapon-enabled event mode to use weapons. Drift Race remains unavailable.
Edit and apply event properties
Top-bar Properties and Open event properties on the right open the same dialog. Set name, ID, blacklist rank, type, participants, reward, traffic and police, then Apply. Cancel restores the state from when the dialog opened.
Select a cutscene and inspect its preview
Hover a scene or navigate with arrow keys for its image and grid diagram. Some Carbon previews show an actor pose with a layout diagram. Camera-only scenes are marked as having no actor. Slot 1 is the player. Scenes with a different participant count cannot be selected.
Starting-grid layout preview
The 3D grid follows the selected scene's countdown layout and road surface. Automatic and original-MW modes show an estimate; the final layout is chosen in game. Check that it fits the road.
Required resources for additional cutscenes
Additional scenes require resources converted locally from legitimate Carbon/Underground 2 files. Preview images alone cannot play a scene. Missing assets or unsuitable runtime conditions fall back to the original presentation.
8. Map card and rendering
Lower-left map card: switch its content with the tabs and resize the card with its top-right handle.
Lower-left map card: tabs and auto fit
Switch between World, Course map and After-edit preview at the lower left. World automatically fits placed objects, or the whole world when empty. Toggle Auto fit for whole-world bounds. Reset clears additional pan and zoom.
Map-card size and rendering properties
Drag the top-right handle to resize freely, or focus it and use arrow keys. Size is restored next time. Rendering properties controls VRAM budget, resolution and loading concurrency. The budget is not a guarantee of available VRAM.
9. Validate, save and install
Validation, warning markers and copying errors
Use Validation to check passage order, connections and foldbacks. Select a gap ! marker or issue to focus it. Error-card contents can be copied. Ctrl+Z undoes; Ctrl+Y redoes.
Browser storage and editing JSON backups
L'enregistrement dans le navigateur stocke les modifications dans la configuration actuelle. Pour une sauvegarde modifiable, utilisez Gestion de la configuration / Enregistrer toutes les données d'édition pour télécharger JSON. Les autorisations de stockage et de dossier ne sont pas partagées entre les navigateurs ou les origines. Les détails du stockage et du cache affichent l’utilisation et l’état du stockage persistant. Utilisez Importer toutes les données d'édition pour restaurer le JSON enregistré. Les événements sans entrée correspondante sont ajoutés. Lorsqu'un événement existant change, un avertissement indique son nom. Annuler laisse tous les événements inchangés.
Export to game and ZIP installation
Dans Exportation d'événements, choisissez Exporter l'événement en cours ou Exporter tous les événements enregistrés. Après la génération, sélectionnez Enregistrer le ZIP généré. Fermez le jeu et les lanceurs, puis copiez le dossier des scripts du ZIP dans le dossier contenant le speed.exe. Le ZIP contient uniquement des données d'événement, sans modules ni installateur ASI. L'écriture directe est disponible dans les options avancées sur le même écran.
Post-install checks and configuration fingerprint mismatches
After installation, playtest start, checkpoints, finish, exit and re-entry. Do not redistribute game files or converted scene resources. Close and reopen the app if old UI remains. For fingerprint mismatches, back up edits and update the configuration from the same game.
Options menu and bug reports
The upper-right … menu contains language, app installation and support. Include event name, reproduction steps and copied error details when reporting a problem. You do not need to send the entire game.
Recover from an unresponsive worker or failed generation
Export generation has a ten-minute response limit; configuration preparation has a fifteen-minute limit. A timeout terminates the worker; transfer failures can also be retried. Existing game files and configurations are not updated before generation/preparation succeeds.
10. Required mods and installation order
Normal-event prerequisites
Normal events require a supported English 1.3 speed.exe, an ASI loader and Event Loader. Preserve Japanese assets, existing INIs and saves. Do not install the same ASI both in the game root and scripts.
NeoAI and NFRR
Current NeoAI combines control inside Event Loader with the vehicle-scope adapter from a compatible NFRR. Native-AI events do not require NFRR. Performance matching also uses compatible NFRR calibration for the selected configuration.
Combat modes, expanded grids and HUD
Arms Race, Gauntlet and Hot Pursuit require compatible Event Loader and ArmsAssist plus a separately installed MWArsenal and its assets. Use compatible Limit Breaker for more than four participants and the suite HUD fixes for HP/HUD coexistence. MWArsenal alone does not register these modes.
Installation and verification order
Fermez le jeu et les lanceurs et installez les mods requis séparément. Copiez le dossier des scripts de l'éditeur ZIP dans le jeu ou utilisez l'écriture directe dans les options d'exportation avancées. Vérifiez le départ, les points de contrôle, l'arrivée, réessayez, la sortie et l'événement suivant.
11. Game data and recorded SFX
Local resources and distributable files
The editor extracts world, map and model data locally. Do not add configuration caches, source executables, BUN files, audio banks, profiles or Shadow/vault to event distribution ZIPs. Users install the required mods and world separately. Bug reporting is a separate action with reviewed submission content.
Sons de remplacement inclus avec ArmsAssist
Vérifier les fichiers du package
Le package de distribution ArmsAssist inclut quatre effets de remplacement dans scripts/MWArmsAssist : Drop.wav, PlayerDrop.wav, Lock_by_police.wav et repair-complete.wav. Utilisez les fichiers fournis avec ce package. Les anciennes descriptions les présentant comme des sons sources de NFSHP, des enregistrements audio du jeu ou des sons originaux ne décrivent pas correctement l'ensemble de remplacement actuel.
Consultez manifest.json dans le package pour connaître la liste des fichiers inclus et les données de vérification. Avant de remplacer des sons dans une installation existante, fermez le jeu et sauvegardez les fichiers actuels. Les banques de sons et les SFX inutilisés ne sont pas inclus.
12. Local conversion of additional cutscenes
Conversion prerequisites and availability
Convert scenes locally from your legitimate Carbon/UG2 files. Current development scripts depend on verified input paths and versions; a general one-click converter is not yet available. Thumbnails alone cannot play a scene.
Verify the original files
Inputs include the selected NIS, matching GLOBAL camera assets and verified camera descriptions; UG2 also uses EvtTrk. Read only the required files, preserve the source game and record sizes/SHA256. Convert normal race intros without mixing in story-only scenes.
Convert and validate each scene
In the development tree tools/CarbonIntro, Carbon uses prepare_variants and export_variant; UG2 uses prepare_ug2_one, prepare_ug2_batch and the matching export_ug2 scripts. Validate actors, car layout, camera and GO timing separately. Do not add actor assets to camera-only scenes.
Install into your own game
Install only the runtimeFiles listed by runtime_manifest under scripts/EventLoader/CustomCutscenes/scene-ID. camera.cic, cars.cic, actor-clock.bin, scene-timing.bin and other files must match that scene manifest. Exclude camera.raw, original BUN/EXE files and research NPZ files.
Keep scene decoding and recording distinct
Scene audio is a separate step. Validate a confirmed PCM16 WAV and audio-timing.bin together with scene_audio. Current limits are mono/stereo, 8–96 kHz, 60 seconds and 8 MiB. export_scene_wav decodes a local ABK; it does not record audio. Do not claim original-audio fidelity for unidentified samples.
Selection and gameplay checks
Select a scene matching the participant count and playtest intro-to-GO, cancel, retry and transition to another event. Missing assets fall back to the original MW intro. Do not include converted source-game assets in general event distributions.
In Chrome o Edge, apri Gestione gioco/configurazione. In Aggiungi configurazione gioco, inserisci un nome, scegli il tipo dal menu a discesa, quindi seleziona Leggi cartella gioco e scegli la cartella contenente speed.exe. La preparazione iniziale può richiedere diversi minuti. Non è richiesta alcuna GUI esterna o cartella di configurazione preparata. I file di gioco non vengono caricati.
Supported worlds and baseline
The original Rockport world is supported. W2C events require the matching W2C world. The baseline is captured when the cache is prepared. After changing world files or textures, back up your editing JSON before updating the configuration from the same game folder. Game files are not uploaded.
Update a configuration from the game folder
Selezionare la configurazione in Gestione configurazione e premere Aggiorna configurazione. L'aggiornamento inizia immediatamente quando la cartella del gioco ricordata è accessibile. Ti verrà chiesto di selezionare la cartella contenente speed.exe solo se la posizione manca o non è disponibile. Le modifiche e l'ID di configurazione vengono mantenuti. Aggiungi una configurazione separata quando il mondo o il layout della strada sono diversi.
Riaprire o cambiare configurazione
Quando riapri o cambi configurazione, viene ripristinato solo il collegamento salvato alla cartella del gioco e il relativo nome. La cartella non viene esaminata e gli eventi non vengono importati. Ogni configurazione mantiene il proprio elenco di eventi.
Quando viene preparata la geometria
I dati di anteprima dell'editor 3D vengono preparati quando una configurazione viene aggiunta o aggiornata. EventLoader crea automaticamente la geometria del gioco dall'installazione ricevente quando necessario prima dell'inizio dell'evento di destinazione. Non è richiesta l'esportazione della geometria dall'editor.
2. Select or create an event
Event selection and top-bar actions
Importa gli eventi esplicitamente da Gestione configurazione → Leggi eventi dal gioco. L'editor usa la cartella collegata e chiede di selezionarla se non è accessibile. Puoi anche importare un'altra cartella di gioco o eventi, oppure un archivio ZIP condiviso. L'importazione verifica il contenuto dei file e la compatibilità della mappa, mantenendo UUID e posizionamenti. L'importazione da un'altra origine non modifica la cartella di gioco collegata a questa configurazione.
Correct native events and delete added events
To correct a native event, use Project → This course → Correct native event. Deletion affects the browser list; it does not uninstall files already written to the game. Undo deletion restores the last deletion.
3. Navigate the 3D view
3D camera controls and tool help
Tools are on the left, the 3D view is central, and Event, Selection and Validation are on the right. Hover or keyboard-focus a tool for illustrated help. Left-drag empty space to orbit, right-drag to pan, and scroll to zoom. PageUp/PageDown adjusts height; hold Shift for a larger step. Top view and Focus selection are also available.
Visible labels and display layers
Visible labels toggles text by category. Display layers toggles world geometry, roads, gate volumes, objects and the grid. Hiding labels never removes placed objects. Label preferences are stored in this browser.
4. Required gates and shortcuts
Gate key: START = starting grid; FINISH/LAP = finish or lap line; CP = required checkpoint; SC = optional shortcut.
Gate types, colors and required markers
Green START, orange FINISH/LAP and cyan CP carry a small ! badge. Pink SC is an optional shortcut, not a checkpoint. Reset gates are red. Tool colors match the labels.
Place, orient and order gates
Choose a placement tool and click the road. Select an object and adjust it with 3D handles or numeric position, rotation and size. Face it along the route and cover the road width. Reorder CPs with Order up/down. Start and finish map icons are automatic.
Circuits starting on a branch
For a circuit starting on a branch, check both the initial entry and the merge on later laps. Start and lap line can be separate. Alternatives and shortcuts must not skip checkpoints.
5. Routes, barriers and AI
Route diagram: yellow MAIN is the main route, pink SHORTCUT is a shortcut, and green FREE CURVE is Fill / AI optimization. Secondary routes, exclusions, walls and right-panel settings are explained separately below.
Main route (yellow)
Trace the blue road lines defined by the game to select the main route. Complete the route. Placed gates determine its direction automatically. This route appears on the map.
Secondary route (orange)
Trace the blue road lines defined by the game to select a secondary route. Connect it to the yellow main route. Placed gates determine its direction automatically. This route appears on the map.
Shortcut (pink)
Trace the blue road lines to define an optional shortcut for NeoAI. Placed gates determine its direction automatically. Shortcuts do not appear on the map. Placing shortcut gates as well is recommended.
Fill / AI optimization (green)
Use this for routes without blue road lines. The curve inherits its role from the connected route. Draw it in place of the corresponding colored route to optimize the NeoAI driving line.
AI discouraged (brown): exclude from route choices
Exclude routes from NeoAI route choices. No connection to the main route is required. These lines do not appear on the map.
Barrier walls: block a path
Click to place one barrier wall, or drag to place a continuous run. Edit individual walls after confirming. Check their facing and orientation. A wall crossing a blue road line prevents NeoAI from choosing that path.
AI obstacle markers: assist avoidance
Effective, but still being tuned. Place over indestructible objects such as central dividers that AI struggles to avoid, giving it more time to anticipate avoidance. This does not guarantee complete control.
Replace the race map
Generate a dedicated race map by drawing the configured routes onto the extracted world map.
Guide NeoAI with map lines
Guide AI along the configured routes. When enabled, Event Loader’s NeoAI controls the vehicles instead of the original game AI. When disabled, the original game AI controls them.
Select cars similar to the player
Set the vehicle regulations: select rival cars with a similar price range and performance to the player’s car. When disabled, selection follows the blacklist rank.
Objects and passage order reviewed
Optional self-check switch. It has no effect on the game.
6. Race-specific editing
Speedtrap: measurement points
Speedtrap uses the speed trap tool. Measurement points are separate from CPs, up to 16, with a count card on the left. Select points to edit radius and order.
Tollbooth: toll locations and bonus time
In Tollbooth mode, click a 3D tollbooth candidate and assign Start, timed Passage or Finish. Check order and bonus time in the list. Use free passage-point placement where no native tollbooth exists.
Lap Knockout: participants and laps
Lap Knockout eliminates one racer per lap; four participants require at least three laps. Check participants and laps. Drag and other modes expose their own settings.
7. Properties and cutscenes
Select Arms Race (prototype)
Select Arms Race under Combat mode in Event Properties. Sprint, Circuit, Lap Knockout and Speed Trap can be used as the racing rules. Compatible Event Loader, MWArsenal and ArmsAssist are required. Without them, the editor disables the option and the game does not register the event.
Select Hot Pursuit (prototype)
Maximum eight racers. Pursuit starts individually after 25% race progress, with up to two chase cars per racer. Roadblocks and helicopters are separate. With survival-reward builds, any genuine finish is a clear and reward equals configured cash x survivors / finish position. A racer destroying Cross at heat 5 or higher restores 15% HP to surviving racers, and finished AI keep fleeing. Event Properties shows the rules supported by the connected MOD builds. Older supported builds do not gain these new rules.
Hot Pursuit requirements and settings
Connect the game folder containing MWArsenal and the validated Hot Pursuit builds of Event Loader and ArmsAssist. Older builds leave the option disabled. Choose Sprint or Speedtrap rules, starting heat, ammunition and cutscene. Police are always enabled.
Health, crash retirement and retry
Human and AI racers have 300 HP. EMP deals 25 damage, Spike 50 and Shockwave 15. An AI racer at zero HP retires through the native crash outcome while the remaining racers continue. A player at zero HP enters the native losing results screen with Restart available. Restart resets event health and ammunition. Arrests retain the native arrest scene.
Starting ammunition per weapon
Specify starting ammunition per weapon. Leave a field blank to use the ArmsAssist INI; zero disables that weapon. Specified counts are refilled at the start and on restart, and AI racers receive the same counts. Player equipment and INIs are preserved. Temporary event ammunition is released on exit.
Normal race behavior
Normal races lock weapons and hide the weapon HUD even with police enabled. Explicitly select a weapon-enabled event mode to use weapons. Drift Race remains unavailable.
Edit and apply event properties
Top-bar Properties and Open event properties on the right open the same dialog. Set name, ID, blacklist rank, type, participants, reward, traffic and police, then Apply. Cancel restores the state from when the dialog opened.
Select a cutscene and inspect its preview
Hover a scene or navigate with arrow keys for its image and grid diagram. Some Carbon previews show an actor pose with a layout diagram. Camera-only scenes are marked as having no actor. Slot 1 is the player. Scenes with a different participant count cannot be selected.
Starting-grid layout preview
The 3D grid follows the selected scene's countdown layout and road surface. Automatic and original-MW modes show an estimate; the final layout is chosen in game. Check that it fits the road.
Required resources for additional cutscenes
Additional scenes require resources converted locally from legitimate Carbon/Underground 2 files. Preview images alone cannot play a scene. Missing assets or unsuitable runtime conditions fall back to the original presentation.
8. Map card and rendering
Lower-left map card: switch its content with the tabs and resize the card with its top-right handle.
Lower-left map card: tabs and auto fit
Switch between World, Course map and After-edit preview at the lower left. World automatically fits placed objects, or the whole world when empty. Toggle Auto fit for whole-world bounds. Reset clears additional pan and zoom.
Map-card size and rendering properties
Drag the top-right handle to resize freely, or focus it and use arrow keys. Size is restored next time. Rendering properties controls VRAM budget, resolution and loading concurrency. The budget is not a guarantee of available VRAM.
9. Validate, save and install
Validation, warning markers and copying errors
Use Validation to check passage order, connections and foldbacks. Select a gap ! marker or issue to focus it. Error-card contents can be copied. Ctrl+Z undoes; Ctrl+Y redoes.
Browser storage and editing JSON backups
Salva nel browser memorizza le modifiche nella configurazione corrente. Per un backup modificabile, utilizzare Gestione configurazione/Salva tutti i dati di modifica per scaricare JSON. Le autorizzazioni per l'archiviazione e le cartelle non sono condivise tra browser o origini. I dettagli sull'archiviazione e sulla cache mostrano l'utilizzo e lo stato dell'archiviazione persistente. Utilizzare Importa tutti i dati di modifica per ripristinare JSON salvato. Vengono aggiunti gli eventi senza una voce corrispondente. Quando un evento esistente cambia, un avviso ne elenca il nome. Annulla lascia tutti gli eventi invariati.
Export to game and ZIP installation
In Esportazione eventi, scegli Esporta evento corrente o Esporta tutti gli eventi salvati. Dopo la generazione, seleziona Salva generato ZIP. Chiudi il gioco e i launcher, quindi copia la cartella degli script dallo ZIP nella cartella contenente speed.exe. ZIP contiene solo dati evento, senza moduli ASI o programma di installazione. La scrittura diretta è disponibile nelle opzioni avanzate nella stessa schermata.
Post-install checks and configuration fingerprint mismatches
After installation, playtest start, checkpoints, finish, exit and re-entry. Do not redistribute game files or converted scene resources. Close and reopen the app if old UI remains. For fingerprint mismatches, back up edits and update the configuration from the same game.
Options menu and bug reports
The upper-right … menu contains language, app installation and support. Include event name, reproduction steps and copied error details when reporting a problem. You do not need to send the entire game.
Recover from an unresponsive worker or failed generation
Export generation has a ten-minute response limit; configuration preparation has a fifteen-minute limit. A timeout terminates the worker; transfer failures can also be retried. Existing game files and configurations are not updated before generation/preparation succeeds.
10. Required mods and installation order
Normal-event prerequisites
Normal events require a supported English 1.3 speed.exe, an ASI loader and Event Loader. Preserve Japanese assets, existing INIs and saves. Do not install the same ASI both in the game root and scripts.
NeoAI and NFRR
Current NeoAI combines control inside Event Loader with the vehicle-scope adapter from a compatible NFRR. Native-AI events do not require NFRR. Performance matching also uses compatible NFRR calibration for the selected configuration.
Combat modes, expanded grids and HUD
Arms Race, Gauntlet and Hot Pursuit require compatible Event Loader and ArmsAssist plus a separately installed MWArsenal and its assets. Use compatible Limit Breaker for more than four participants and the suite HUD fixes for HP/HUD coexistence. MWArsenal alone does not register these modes.
Installation and verification order
Chiudi il gioco e i launcher e installa le mod richieste separatamente. Copia la cartella degli script dall'editor ZIP nel gioco o utilizza la scrittura diretta nelle opzioni di esportazione avanzate. Controlla partenza, checkpoint, arrivo, riprova, uscita e l'evento successivo.
11. Game data and recorded SFX
Local resources and distributable files
The editor extracts world, map and model data locally. Do not add configuration caches, source executables, BUN files, audio banks, profiles or Shadow/vault to event distribution ZIPs. Users install the required mods and world separately. Bug reporting is a separate action with reviewed submission content.
Audio sostitutivi inclusi in ArmsAssist
Controllare i file del pacchetto
Il pacchetto di distribuzione di ArmsAssist include quattro effetti sostitutivi in scripts/MWArmsAssist: Drop.wav, PlayerDrop.wav, Lock_by_police.wav e repair-complete.wav. Usa i file forniti con il pacchetto. Le descrizioni precedenti che li indicavano come audio sorgente NFSHP, registrazioni audio del gioco o audio originale non descrivono correttamente l’attuale set sostitutivo.
Consulta manifest.json nel pacchetto per l’elenco dei file distribuiti e i dati di verifica. Prima di sostituire i suoni in un’installazione esistente, chiudi il gioco e fai una copia di sicurezza dei file attuali. Non sono inclusi banchi audio o SFX inutilizzati.
12. Local conversion of additional cutscenes
Conversion prerequisites and availability
Convert scenes locally from your legitimate Carbon/UG2 files. Current development scripts depend on verified input paths and versions; a general one-click converter is not yet available. Thumbnails alone cannot play a scene.
Verify the original files
Inputs include the selected NIS, matching GLOBAL camera assets and verified camera descriptions; UG2 also uses EvtTrk. Read only the required files, preserve the source game and record sizes/SHA256. Convert normal race intros without mixing in story-only scenes.
Convert and validate each scene
In the development tree tools/CarbonIntro, Carbon uses prepare_variants and export_variant; UG2 uses prepare_ug2_one, prepare_ug2_batch and the matching export_ug2 scripts. Validate actors, car layout, camera and GO timing separately. Do not add actor assets to camera-only scenes.
Install into your own game
Install only the runtimeFiles listed by runtime_manifest under scripts/EventLoader/CustomCutscenes/scene-ID. camera.cic, cars.cic, actor-clock.bin, scene-timing.bin and other files must match that scene manifest. Exclude camera.raw, original BUN/EXE files and research NPZ files.
Keep scene decoding and recording distinct
Scene audio is a separate step. Validate a confirmed PCM16 WAV and audio-timing.bin together with scene_audio. Current limits are mono/stereo, 8–96 kHz, 60 seconds and 8 MiB. export_scene_wav decodes a local ABK; it does not record audio. Do not claim original-audio fidelity for unidentified samples.
Selection and gameplay checks
Select a scene matching the participant count and playtest intro-to-GO, cancel, retry and transition to another event. Missing assets fall back to the original MW intro. Do not include converted source-game assets in general event distributions.
En Chrome o Edge, abra Gestión de Juego/Configuración. En Agregar configuración de juego, ingresa un nombre, elige el tipo en el menú desplegable, luego selecciona Leer carpeta del juego y elige la carpeta que contiene speed.exe. La preparación inicial puede tardar varios minutos. No se requiere GUI externa ni carpeta de configuración preparada. Los archivos del juego no se cargan.
Supported worlds and baseline
The original Rockport world is supported. W2C events require the matching W2C world. The baseline is captured when the cache is prepared. After changing world files or textures, back up your editing JSON before updating the configuration from the same game folder. Game files are not uploaded.
Update a configuration from the game folder
Seleccione la configuración en Gestión de configuración y presione Actualizar configuración. La actualización comienza inmediatamente cuando se puede acceder a la carpeta del juego recordado. Se le pedirá que seleccione la carpeta que contiene speed.exe solo si la ubicación falta o no está disponible. Se conservan las ediciones y el ID de configuración. Agregue una configuración separada cuando el mundo o el diseño de la carretera difieran.
Volver a abrir o cambiar configuraciones
Al volver a abrir o cambiar de configuración, solo se restaura el vínculo guardado a la carpeta del juego y su nombre. No se analiza la carpeta ni se importan eventos. Cada configuración conserva su propia lista de eventos.
Cuando se prepara la geometría
Los datos de vista previa del editor 3D se preparan cuando se agrega o actualiza una configuración. EventLoader crea automáticamente la geometría del juego a partir de la instalación receptora cuando es necesario antes de que comience el evento de destino. No se requiere exportación de geometría desde el editor.
2. Select or create an event
Event selection and top-bar actions
Importa eventos de forma explícita desde Administración de configuraciones → Leer eventos del juego. El editor usa la carpeta vinculada y te pide seleccionarla si no está disponible. También puedes importar otra carpeta de juego o de eventos, o un ZIP compartido. La importación comprueba el contenido de los archivos y la compatibilidad del mapa, y conserva los UUID y las ubicaciones. Importar desde otra fuente no cambia la carpeta de juego vinculada a esta configuración.
Correct native events and delete added events
To correct a native event, use Project → This course → Correct native event. Deletion affects the browser list; it does not uninstall files already written to the game. Undo deletion restores the last deletion.
3. Navigate the 3D view
3D camera controls and tool help
Tools are on the left, the 3D view is central, and Event, Selection and Validation are on the right. Hover or keyboard-focus a tool for illustrated help. Left-drag empty space to orbit, right-drag to pan, and scroll to zoom. PageUp/PageDown adjusts height; hold Shift for a larger step. Top view and Focus selection are also available.
Visible labels and display layers
Visible labels toggles text by category. Display layers toggles world geometry, roads, gate volumes, objects and the grid. Hiding labels never removes placed objects. Label preferences are stored in this browser.
4. Required gates and shortcuts
Gate key: START = starting grid; FINISH/LAP = finish or lap line; CP = required checkpoint; SC = optional shortcut.
Gate types, colors and required markers
Green START, orange FINISH/LAP and cyan CP carry a small ! badge. Pink SC is an optional shortcut, not a checkpoint. Reset gates are red. Tool colors match the labels.
Place, orient and order gates
Choose a placement tool and click the road. Select an object and adjust it with 3D handles or numeric position, rotation and size. Face it along the route and cover the road width. Reorder CPs with Order up/down. Start and finish map icons are automatic.
Circuits starting on a branch
For a circuit starting on a branch, check both the initial entry and the merge on later laps. Start and lap line can be separate. Alternatives and shortcuts must not skip checkpoints.
5. Routes, barriers and AI
Route diagram: yellow MAIN is the main route, pink SHORTCUT is a shortcut, and green FREE CURVE is Fill / AI optimization. Secondary routes, exclusions, walls and right-panel settings are explained separately below.
Main route (yellow)
Trace the blue road lines defined by the game to select the main route. Complete the route. Placed gates determine its direction automatically. This route appears on the map.
Secondary route (orange)
Trace the blue road lines defined by the game to select a secondary route. Connect it to the yellow main route. Placed gates determine its direction automatically. This route appears on the map.
Shortcut (pink)
Trace the blue road lines to define an optional shortcut for NeoAI. Placed gates determine its direction automatically. Shortcuts do not appear on the map. Placing shortcut gates as well is recommended.
Fill / AI optimization (green)
Use this for routes without blue road lines. The curve inherits its role from the connected route. Draw it in place of the corresponding colored route to optimize the NeoAI driving line.
AI discouraged (brown): exclude from route choices
Exclude routes from NeoAI route choices. No connection to the main route is required. These lines do not appear on the map.
Barrier walls: block a path
Click to place one barrier wall, or drag to place a continuous run. Edit individual walls after confirming. Check their facing and orientation. A wall crossing a blue road line prevents NeoAI from choosing that path.
AI obstacle markers: assist avoidance
Effective, but still being tuned. Place over indestructible objects such as central dividers that AI struggles to avoid, giving it more time to anticipate avoidance. This does not guarantee complete control.
Replace the race map
Generate a dedicated race map by drawing the configured routes onto the extracted world map.
Guide NeoAI with map lines
Guide AI along the configured routes. When enabled, Event Loader’s NeoAI controls the vehicles instead of the original game AI. When disabled, the original game AI controls them.
Select cars similar to the player
Set the vehicle regulations: select rival cars with a similar price range and performance to the player’s car. When disabled, selection follows the blacklist rank.
Objects and passage order reviewed
Optional self-check switch. It has no effect on the game.
6. Race-specific editing
Speedtrap: measurement points
Speedtrap uses the speed trap tool. Measurement points are separate from CPs, up to 16, with a count card on the left. Select points to edit radius and order.
Tollbooth: toll locations and bonus time
In Tollbooth mode, click a 3D tollbooth candidate and assign Start, timed Passage or Finish. Check order and bonus time in the list. Use free passage-point placement where no native tollbooth exists.
Lap Knockout: participants and laps
Lap Knockout eliminates one racer per lap; four participants require at least three laps. Check participants and laps. Drag and other modes expose their own settings.
7. Properties and cutscenes
Select Arms Race (prototype)
Select Arms Race under Combat mode in Event Properties. Sprint, Circuit, Lap Knockout and Speed Trap can be used as the racing rules. Compatible Event Loader, MWArsenal and ArmsAssist are required. Without them, the editor disables the option and the game does not register the event.
Select Hot Pursuit (prototype)
Maximum eight racers. Pursuit starts individually after 25% race progress, with up to two chase cars per racer. Roadblocks and helicopters are separate. With survival-reward builds, any genuine finish is a clear and reward equals configured cash x survivors / finish position. A racer destroying Cross at heat 5 or higher restores 15% HP to surviving racers, and finished AI keep fleeing. Event Properties shows the rules supported by the connected MOD builds. Older supported builds do not gain these new rules.
Hot Pursuit requirements and settings
Connect the game folder containing MWArsenal and the validated Hot Pursuit builds of Event Loader and ArmsAssist. Older builds leave the option disabled. Choose Sprint or Speedtrap rules, starting heat, ammunition and cutscene. Police are always enabled.
Health, crash retirement and retry
Human and AI racers have 300 HP. EMP deals 25 damage, Spike 50 and Shockwave 15. An AI racer at zero HP retires through the native crash outcome while the remaining racers continue. A player at zero HP enters the native losing results screen with Restart available. Restart resets event health and ammunition. Arrests retain the native arrest scene.
Starting ammunition per weapon
Specify starting ammunition per weapon. Leave a field blank to use the ArmsAssist INI; zero disables that weapon. Specified counts are refilled at the start and on restart, and AI racers receive the same counts. Player equipment and INIs are preserved. Temporary event ammunition is released on exit.
Normal race behavior
Normal races lock weapons and hide the weapon HUD even with police enabled. Explicitly select a weapon-enabled event mode to use weapons. Drift Race remains unavailable.
Edit and apply event properties
Top-bar Properties and Open event properties on the right open the same dialog. Set name, ID, blacklist rank, type, participants, reward, traffic and police, then Apply. Cancel restores the state from when the dialog opened.
Select a cutscene and inspect its preview
Hover a scene or navigate with arrow keys for its image and grid diagram. Some Carbon previews show an actor pose with a layout diagram. Camera-only scenes are marked as having no actor. Slot 1 is the player. Scenes with a different participant count cannot be selected.
Starting-grid layout preview
The 3D grid follows the selected scene's countdown layout and road surface. Automatic and original-MW modes show an estimate; the final layout is chosen in game. Check that it fits the road.
Required resources for additional cutscenes
Additional scenes require resources converted locally from legitimate Carbon/Underground 2 files. Preview images alone cannot play a scene. Missing assets or unsuitable runtime conditions fall back to the original presentation.
8. Map card and rendering
Lower-left map card: switch its content with the tabs and resize the card with its top-right handle.
Lower-left map card: tabs and auto fit
Switch between World, Course map and After-edit preview at the lower left. World automatically fits placed objects, or the whole world when empty. Toggle Auto fit for whole-world bounds. Reset clears additional pan and zoom.
Map-card size and rendering properties
Drag the top-right handle to resize freely, or focus it and use arrow keys. Size is restored next time. Rendering properties controls VRAM budget, resolution and loading concurrency. The budget is not a guarantee of available VRAM.
9. Validate, save and install
Validation, warning markers and copying errors
Use Validation to check passage order, connections and foldbacks. Select a gap ! marker or issue to focus it. Error-card contents can be copied. Ctrl+Z undoes; Ctrl+Y redoes.
Browser storage and editing JSON backups
Guardar en el navegador almacena las ediciones en la configuración actual. Para una copia de seguridad editable, use Gestión de configuración/Guardar todos los datos de edición para descargar JSON. Los permisos de almacenamiento y carpetas no se comparten entre navegadores u orígenes. Los detalles de almacenamiento y caché muestran el uso y el estado del almacenamiento persistente. Utilice Importar todos los datos de edición para restaurar el JSON guardado. Se agregan eventos sin una entrada coincidente. Cuando un evento existente cambia, una advertencia muestra su nombre. Cancelar deja todos los eventos sin cambios.
Export to game and ZIP installation
En Exportación de eventos, elija Exportar evento actual o Exportar todos los eventos guardados. Después de la generación, seleccione Guardar ZIP generado. Cierra el juego y los lanzadores, luego copia la carpeta de scripts del ZIP a la carpeta que contiene speed.exe. El ZIP contiene únicamente datos de eventos, sin módulos ni instalador ASI. La escritura directa está disponible en opciones avanzadas en la misma pantalla.
Post-install checks and configuration fingerprint mismatches
After installation, playtest start, checkpoints, finish, exit and re-entry. Do not redistribute game files or converted scene resources. Close and reopen the app if old UI remains. For fingerprint mismatches, back up edits and update the configuration from the same game.
Options menu and bug reports
The upper-right … menu contains language, app installation and support. Include event name, reproduction steps and copied error details when reporting a problem. You do not need to send the entire game.
Recover from an unresponsive worker or failed generation
Export generation has a ten-minute response limit; configuration preparation has a fifteen-minute limit. A timeout terminates the worker; transfer failures can also be retried. Existing game files and configurations are not updated before generation/preparation succeeds.
10. Required mods and installation order
Normal-event prerequisites
Normal events require a supported English 1.3 speed.exe, an ASI loader and Event Loader. Preserve Japanese assets, existing INIs and saves. Do not install the same ASI both in the game root and scripts.
NeoAI and NFRR
Current NeoAI combines control inside Event Loader with the vehicle-scope adapter from a compatible NFRR. Native-AI events do not require NFRR. Performance matching also uses compatible NFRR calibration for the selected configuration.
Combat modes, expanded grids and HUD
Arms Race, Gauntlet and Hot Pursuit require compatible Event Loader and ArmsAssist plus a separately installed MWArsenal and its assets. Use compatible Limit Breaker for more than four participants and the suite HUD fixes for HP/HUD coexistence. MWArsenal alone does not register these modes.
Installation and verification order
Cierra el juego y los lanzadores e instala las modificaciones necesarias por separado. Copie la carpeta de scripts del editor ZIP al juego o utilice la escritura directa en las opciones de exportación avanzadas. Verifique el inicio, los puntos de control, la finalización, el reintento, la salida y el próximo evento.
11. Game data and recorded SFX
Local resources and distributable files
The editor extracts world, map and model data locally. Do not add configuration caches, source executables, BUN files, audio banks, profiles or Shadow/vault to event distribution ZIPs. Users install the required mods and world separately. Bug reporting is a separate action with reviewed submission content.
Audio de reemplazo incluido con ArmsAssist
Revisar los archivos del paquete
El paquete de distribución de ArmsAssist incluye cuatro efectos de reemplazo en scripts/MWArmsAssist: Drop.wav, PlayerDrop.wav, Lock_by_police.wav y repair-complete.wav. Usa los archivos incluidos en ese paquete. Las descripciones anteriores que los identificaban como audio fuente de NFSHP, grabaciones de audio del juego o audio original no describen correctamente el conjunto de reemplazo actual.
Consulta manifest.json dentro del paquete para ver la lista de archivos incluidos y los datos de verificación. Antes de reemplazar sonidos en una instalación existente, cierra el juego y respalda los archivos actuales. No se incluyen bancos de sonido ni SFX sin usar.
12. Local conversion of additional cutscenes
Conversion prerequisites and availability
Convert scenes locally from your legitimate Carbon/UG2 files. Current development scripts depend on verified input paths and versions; a general one-click converter is not yet available. Thumbnails alone cannot play a scene.
Verify the original files
Inputs include the selected NIS, matching GLOBAL camera assets and verified camera descriptions; UG2 also uses EvtTrk. Read only the required files, preserve the source game and record sizes/SHA256. Convert normal race intros without mixing in story-only scenes.
Convert and validate each scene
In the development tree tools/CarbonIntro, Carbon uses prepare_variants and export_variant; UG2 uses prepare_ug2_one, prepare_ug2_batch and the matching export_ug2 scripts. Validate actors, car layout, camera and GO timing separately. Do not add actor assets to camera-only scenes.
Install into your own game
Install only the runtimeFiles listed by runtime_manifest under scripts/EventLoader/CustomCutscenes/scene-ID. camera.cic, cars.cic, actor-clock.bin, scene-timing.bin and other files must match that scene manifest. Exclude camera.raw, original BUN/EXE files and research NPZ files.
Keep scene decoding and recording distinct
Scene audio is a separate step. Validate a confirmed PCM16 WAV and audio-timing.bin together with scene_audio. Current limits are mono/stereo, 8–96 kHz, 60 seconds and 8 MiB. export_scene_wav decodes a local ABK; it does not record audio. Do not claim original-audio fidelity for unidentified samples.
Selection and gameplay checks
Select a scene matching the participant count and playtest intro-to-GO, cancel, retry and transition to another event. Missing assets fall back to the original MW intro. Do not include converted source-game assets in general event distributions.
En Chrome o Edge, abra Gestión de Juego/Configuración. En Agregar configuración de juego, ingresa un nombre, elige el tipo en el menú desplegable, luego selecciona Leer carpeta del juego y elige la carpeta que contiene speed.exe. La preparación inicial puede tardar varios minutos. No se requiere GUI externa ni carpeta de configuración preparada. Los archivos del juego no se cargan.
Supported worlds and baseline
The original Rockport world is supported. W2C events require the matching W2C world. The baseline is captured when the cache is prepared. After changing world files or textures, back up your editing JSON before updating the configuration from the same game folder. Game files are not uploaded.
Update a configuration from the game folder
Seleccione la configuración en Gestión de configuración y presione Actualizar configuración. La actualización comienza inmediatamente cuando se puede acceder a la carpeta del juego recordado. Se le pedirá que seleccione la carpeta que contiene speed.exe solo si falta la ubicación o no está disponible. Se conservan las ediciones y el ID de configuración. Agregue una configuración separada cuando el mundo o el diseño de la carretera difieran.
Volver a abrir o cambiar configuraciones
Al volver a abrir o cambiar de configuración, solo se restaura el vínculo guardado a la carpeta del juego y su nombre. No se analiza la carpeta ni se importan eventos. Cada configuración conserva su propia lista de eventos.
Cuando se prepara la geometría
Los datos de vista previa del editor 3D se preparan cuando se agrega o actualiza una configuración. EventLoader crea automáticamente la geometría del juego a partir de la instalación receptora cuando es necesario antes de que comience el evento de destino. No se requiere exportación de geometría desde el editor.
2. Select or create an event
Event selection and top-bar actions
Importa eventos de forma explícita desde Administración de configuraciones → Leer eventos del juego. El editor usa la carpeta vinculada y te pide seleccionarla si no está disponible. También puedes importar otra carpeta de juego o de eventos, o un ZIP compartido. La importación comprueba el contenido de los archivos y la compatibilidad del mapa, y conserva los UUID y las ubicaciones. Importar desde otra fuente no cambia la carpeta de juego vinculada a esta configuración.
Correct native events and delete added events
To correct a native event, use Project → This course → Correct native event. Deletion affects the browser list; it does not uninstall files already written to the game. Undo deletion restores the last deletion.
3. Navigate the 3D view
3D camera controls and tool help
Tools are on the left, the 3D view is central, and Event, Selection and Validation are on the right. Hover or keyboard-focus a tool for illustrated help. Left-drag empty space to orbit, right-drag to pan, and scroll to zoom. PageUp/PageDown adjusts height; hold Shift for a larger step. Top view and Focus selection are also available.
Visible labels and display layers
Visible labels toggles text by category. Display layers toggles world geometry, roads, gate volumes, objects and the grid. Hiding labels never removes placed objects. Label preferences are stored in this browser.
4. Required gates and shortcuts
Gate key: START = starting grid; FINISH/LAP = finish or lap line; CP = required checkpoint; SC = optional shortcut.
Gate types, colors and required markers
Green START, orange FINISH/LAP and cyan CP carry a small ! badge. Pink SC is an optional shortcut, not a checkpoint. Reset gates are red. Tool colors match the labels.
Place, orient and order gates
Choose a placement tool and click the road. Select an object and adjust it with 3D handles or numeric position, rotation and size. Face it along the route and cover the road width. Reorder CPs with Order up/down. Start and finish map icons are automatic.
Circuits starting on a branch
For a circuit starting on a branch, check both the initial entry and the merge on later laps. Start and lap line can be separate. Alternatives and shortcuts must not skip checkpoints.
5. Routes, barriers and AI
Route diagram: yellow MAIN is the main route, pink SHORTCUT is a shortcut, and green FREE CURVE is Fill / AI optimization. Secondary routes, exclusions, walls and right-panel settings are explained separately below.
Main route (yellow)
Trace the blue road lines defined by the game to select the main route. Complete the route. Placed gates determine its direction automatically. This route appears on the map.
Secondary route (orange)
Trace the blue road lines defined by the game to select a secondary route. Connect it to the yellow main route. Placed gates determine its direction automatically. This route appears on the map.
Shortcut (pink)
Trace the blue road lines to define an optional shortcut for NeoAI. Placed gates determine its direction automatically. Shortcuts do not appear on the map. Placing shortcut gates as well is recommended.
Fill / AI optimization (green)
Use this for routes without blue road lines. The curve inherits its role from the connected route. Draw it in place of the corresponding colored route to optimize the NeoAI driving line.
AI discouraged (brown): exclude from route choices
Exclude routes from NeoAI route choices. No connection to the main route is required. These lines do not appear on the map.
Barrier walls: block a path
Click to place one barrier wall, or drag to place a continuous run. Edit individual walls after confirming. Check their facing and orientation. A wall crossing a blue road line prevents NeoAI from choosing that path.
AI obstacle markers: assist avoidance
Effective, but still being tuned. Place over indestructible objects such as central dividers that AI struggles to avoid, giving it more time to anticipate avoidance. This does not guarantee complete control.
Replace the race map
Generate a dedicated race map by drawing the configured routes onto the extracted world map.
Guide NeoAI with map lines
Guide AI along the configured routes. When enabled, Event Loader’s NeoAI controls the vehicles instead of the original game AI. When disabled, the original game AI controls them.
Select cars similar to the player
Set the vehicle regulations: select rival cars with a similar price range and performance to the player’s car. When disabled, selection follows the blacklist rank.
Objects and passage order reviewed
Optional self-check switch. It has no effect on the game.
6. Race-specific editing
Speedtrap: measurement points
Speedtrap uses the speed trap tool. Measurement points are separate from CPs, up to 16, with a count card on the left. Select points to edit radius and order.
Tollbooth: toll locations and bonus time
In Tollbooth mode, click a 3D tollbooth candidate and assign Start, timed Passage or Finish. Check order and bonus time in the list. Use free passage-point placement where no native tollbooth exists.
Lap Knockout: participants and laps
Lap Knockout eliminates one racer per lap; four participants require at least three laps. Check participants and laps. Drag and other modes expose their own settings.
7. Properties and cutscenes
Select Arms Race (prototype)
Select Arms Race under Combat mode in Event Properties. Sprint, Circuit, Lap Knockout and Speed Trap can be used as the racing rules. Compatible Event Loader, MWArsenal and ArmsAssist are required. Without them, the editor disables the option and the game does not register the event.
Select Hot Pursuit (prototype)
Maximum eight racers. Pursuit starts individually after 25% race progress, with up to two chase cars per racer. Roadblocks and helicopters are separate. With survival-reward builds, any genuine finish is a clear and reward equals configured cash x survivors / finish position. A racer destroying Cross at heat 5 or higher restores 15% HP to surviving racers, and finished AI keep fleeing. Event Properties shows the rules supported by the connected MOD builds. Older supported builds do not gain these new rules.
Hot Pursuit requirements and settings
Connect the game folder containing MWArsenal and the validated Hot Pursuit builds of Event Loader and ArmsAssist. Older builds leave the option disabled. Choose Sprint or Speedtrap rules, starting heat, ammunition and cutscene. Police are always enabled.
Health, crash retirement and retry
Human and AI racers have 300 HP. EMP deals 25 damage, Spike 50 and Shockwave 15. An AI racer at zero HP retires through the native crash outcome while the remaining racers continue. A player at zero HP enters the native losing results screen with Restart available. Restart resets event health and ammunition. Arrests retain the native arrest scene.
Starting ammunition per weapon
Specify starting ammunition per weapon. Leave a field blank to use the ArmsAssist INI; zero disables that weapon. Specified counts are refilled at the start and on restart, and AI racers receive the same counts. Player equipment and INIs are preserved. Temporary event ammunition is released on exit.
Normal race behavior
Normal races lock weapons and hide the weapon HUD even with police enabled. Explicitly select a weapon-enabled event mode to use weapons. Drift Race remains unavailable.
Edit and apply event properties
Top-bar Properties and Open event properties on the right open the same dialog. Set name, ID, blacklist rank, type, participants, reward, traffic and police, then Apply. Cancel restores the state from when the dialog opened.
Select a cutscene and inspect its preview
Hover a scene or navigate with arrow keys for its image and grid diagram. Some Carbon previews show an actor pose with a layout diagram. Camera-only scenes are marked as having no actor. Slot 1 is the player. Scenes with a different participant count cannot be selected.
Starting-grid layout preview
The 3D grid follows the selected scene's countdown layout and road surface. Automatic and original-MW modes show an estimate; the final layout is chosen in game. Check that it fits the road.
Required resources for additional cutscenes
Additional scenes require resources converted locally from legitimate Carbon/Underground 2 files. Preview images alone cannot play a scene. Missing assets or unsuitable runtime conditions fall back to the original presentation.
8. Map card and rendering
Lower-left map card: switch its content with the tabs and resize the card with its top-right handle.
Lower-left map card: tabs and auto fit
Switch between World, Course map and After-edit preview at the lower left. World automatically fits placed objects, or the whole world when empty. Toggle Auto fit for whole-world bounds. Reset clears additional pan and zoom.
Map-card size and rendering properties
Drag the top-right handle to resize freely, or focus it and use arrow keys. Size is restored next time. Rendering properties controls VRAM budget, resolution and loading concurrency. The budget is not a guarantee of available VRAM.
9. Validate, save and install
Validation, warning markers and copying errors
Use Validation to check passage order, connections and foldbacks. Select a gap ! marker or issue to focus it. Error-card contents can be copied. Ctrl+Z undoes; Ctrl+Y redoes.
Browser storage and editing JSON backups
Guardar en el navegador almacena las ediciones en la configuración actual. Para una copia de seguridad editable, use Gestión de configuración/Guardar todos los datos de edición para descargar JSON. Los permisos de almacenamiento y carpetas no se comparten entre navegadores u orígenes. Los detalles de almacenamiento y caché muestran el uso y el estado del almacenamiento persistente. Utilice Importar todos los datos de edición para restaurar el JSON guardado. Se agregan eventos sin una entrada coincidente. Cuando un evento existente cambia, una advertencia muestra su nombre. Cancelar deja todos los eventos sin cambios.
Export to game and ZIP installation
En Exportación de eventos, elija Exportar evento actual o Exportar todos los eventos guardados. Después de la generación, seleccione Guardar ZIP generado. Cierra el juego y los lanzadores, luego copia la carpeta de scripts del ZIP a la carpeta que contiene speed.exe. El ZIP contiene únicamente datos de eventos, sin módulos ni instalador ASI. La escritura directa está disponible en opciones avanzadas en la misma pantalla.
Post-install checks and configuration fingerprint mismatches
After installation, playtest start, checkpoints, finish, exit and re-entry. Do not redistribute game files or converted scene resources. Close and reopen the app if old UI remains. For fingerprint mismatches, back up edits and update the configuration from the same game.
Options menu and bug reports
The upper-right … menu contains language, app installation and support. Include event name, reproduction steps and copied error details when reporting a problem. You do not need to send the entire game.
Recover from an unresponsive worker or failed generation
Export generation has a ten-minute response limit; configuration preparation has a fifteen-minute limit. A timeout terminates the worker; transfer failures can also be retried. Existing game files and configurations are not updated before generation/preparation succeeds.
10. Required mods and installation order
Normal-event prerequisites
Normal events require a supported English 1.3 speed.exe, an ASI loader and Event Loader. Preserve Japanese assets, existing INIs and saves. Do not install the same ASI both in the game root and scripts.
NeoAI and NFRR
Current NeoAI combines control inside Event Loader with the vehicle-scope adapter from a compatible NFRR. Native-AI events do not require NFRR. Performance matching also uses compatible NFRR calibration for the selected configuration.
Combat modes, expanded grids and HUD
Arms Race, Gauntlet and Hot Pursuit require compatible Event Loader and ArmsAssist plus a separately installed MWArsenal and its assets. Use compatible Limit Breaker for more than four participants and the suite HUD fixes for HP/HUD coexistence. MWArsenal alone does not register these modes.
Installation and verification order
Cierra el juego y los lanzadores e instala las modificaciones necesarias por separado. Copie la carpeta de scripts del editor ZIP al juego o utilice la escritura directa en las opciones de exportación avanzadas. Verifique el inicio, los puntos de control, la finalización, el reintento, la salida y el próximo evento.
11. Game data and recorded SFX
Local resources and distributable files
The editor extracts world, map and model data locally. Do not add configuration caches, source executables, BUN files, audio banks, profiles or Shadow/vault to event distribution ZIPs. Users install the required mods and world separately. Bug reporting is a separate action with reviewed submission content.
Audio de reemplazo incluido con ArmsAssist
Revisar los archivos del paquete
El paquete de distribución de ArmsAssist incluye cuatro efectos de reemplazo en scripts/MWArmsAssist: Drop.wav, PlayerDrop.wav, Lock_by_police.wav y repair-complete.wav. Usa los archivos incluidos en ese paquete. Las descripciones anteriores que los identificaban como audio fuente de NFSHP, grabaciones de audio del juego o audio original no describen correctamente el conjunto de reemplazo actual.
Consulta manifest.json dentro del paquete para ver la lista de archivos incluidos y los datos de verificación. Antes de reemplazar sonidos en una instalación existente, cierra el juego y respalda los archivos actuales. No se incluyen bancos de sonido ni SFX sin usar.
12. Local conversion of additional cutscenes
Conversion prerequisites and availability
Convert scenes locally from your legitimate Carbon/UG2 files. Current development scripts depend on verified input paths and versions; a general one-click converter is not yet available. Thumbnails alone cannot play a scene.
Verify the original files
Inputs include the selected NIS, matching GLOBAL camera assets and verified camera descriptions; UG2 also uses EvtTrk. Read only the required files, preserve the source game and record sizes/SHA256. Convert normal race intros without mixing in story-only scenes.
Convert and validate each scene
In the development tree tools/CarbonIntro, Carbon uses prepare_variants and export_variant; UG2 uses prepare_ug2_one, prepare_ug2_batch and the matching export_ug2 scripts. Validate actors, car layout, camera and GO timing separately. Do not add actor assets to camera-only scenes.
Install into your own game
Install only the runtimeFiles listed by runtime_manifest under scripts/EventLoader/CustomCutscenes/scene-ID. camera.cic, cars.cic, actor-clock.bin, scene-timing.bin and other files must match that scene manifest. Exclude camera.raw, original BUN/EXE files and research NPZ files.
Keep scene decoding and recording distinct
Scene audio is a separate step. Validate a confirmed PCM16 WAV and audio-timing.bin together with scene_audio. Current limits are mono/stereo, 8–96 kHz, 60 seconds and 8 MiB. export_scene_wav decodes a local ABK; it does not record audio. Do not claim original-audio fidelity for unidentified samples.
Selection and gameplay checks
Select a scene matching the participant count and playtest intro-to-GO, cancel, retry and transition to another event. Missing assets fall back to the original MW intro. Do not include converted source-game assets in general event distributions.
Open in Chrome of Edge Spel-/configuratiebeheer. Voer onder Gameconfiguratie toevoegen een naam in, kies het type in de vervolgkeuzelijst, selecteer vervolgens Gamemap lezen en kies de map met speed.exe. De eerste voorbereiding kan enkele minuten duren. Er is geen externe GUI of voorbereide configuratiemap vereist. Spelbestanden worden niet geüpload.
Supported worlds and baseline
The original Rockport world is supported. W2C events require the matching W2C world. The baseline is captured when the cache is prepared. After changing world files or textures, back up your editing JSON before updating the configuration from the same game folder. Game files are not uploaded.
Update a configuration from the game folder
Selecteer de configuratie in Configuratiebeheer en druk op Configuratie bijwerken. Het updaten begint onmiddellijk wanneer de onthouden gamemap toegankelijk is. U wordt alleen gevraagd de map met speed.exe te selecteren als de locatie ontbreekt of niet beschikbaar is. Bewerkingen en de configuratie-ID blijven behouden. Voeg een aparte configuratie toe als de wereld- of wegindeling verschilt.
Configuraties opnieuw openen of wisselen
Bij het opnieuw openen of wisselen van configuratie wordt alleen de opgeslagen koppeling met de gamemap en de mapnaam hersteld. De map wordt niet gescand en er worden geen evenementen geïmporteerd. Elke configuratie heeft een eigen evenementenlijst.
Wanneer de geometrie is voorbereid
Editor 3D voorbeeldgegevens worden voorbereid wanneer een configuratie wordt toegevoegd of bijgewerkt. EventLoader bouwt indien nodig automatisch de spelgeometrie op vanaf de ontvangende installatie voordat de doelgebeurtenis begint. Er is geen geometrie-export vanuit de editor vereist.
2. Select or create an event
Event selection and top-bar actions
Importeer evenementen expliciet via Configuratiebeheer → Gebeurtenissen uit game lezen. De editor gebruikt de gekoppelde map en vraagt je deze opnieuw te selecteren als die niet toegankelijk is. Je kunt ook een andere game- of evenementenmap of een gedeelde ZIP importeren. De import controleert de bestandsinhoud en kaartcompatibiliteit en behoudt UUID's en plaatsingen. Importeren vanuit een andere bron verandert de gekoppelde gamemap van deze configuratie niet.
Correct native events and delete added events
To correct a native event, use Project → This course → Correct native event. Deletion affects the browser list; it does not uninstall files already written to the game. Undo deletion restores the last deletion.
3. Navigate the 3D view
3D camera controls and tool help
Tools are on the left, the 3D view is central, and Event, Selection and Validation are on the right. Hover or keyboard-focus a tool for illustrated help. Left-drag empty space to orbit, right-drag to pan, and scroll to zoom. PageUp/PageDown adjusts height; hold Shift for a larger step. Top view and Focus selection are also available.
Visible labels and display layers
Visible labels toggles text by category. Display layers toggles world geometry, roads, gate volumes, objects and the grid. Hiding labels never removes placed objects. Label preferences are stored in this browser.
4. Required gates and shortcuts
Gate key: START = starting grid; FINISH/LAP = finish or lap line; CP = required checkpoint; SC = optional shortcut.
Gate types, colors and required markers
Green START, orange FINISH/LAP and cyan CP carry a small ! badge. Pink SC is an optional shortcut, not a checkpoint. Reset gates are red. Tool colors match the labels.
Place, orient and order gates
Choose a placement tool and click the road. Select an object and adjust it with 3D handles or numeric position, rotation and size. Face it along the route and cover the road width. Reorder CPs with Order up/down. Start and finish map icons are automatic.
Circuits starting on a branch
For a circuit starting on a branch, check both the initial entry and the merge on later laps. Start and lap line can be separate. Alternatives and shortcuts must not skip checkpoints.
5. Routes, barriers and AI
Route diagram: yellow MAIN is the main route, pink SHORTCUT is a shortcut, and green FREE CURVE is Fill / AI optimization. Secondary routes, exclusions, walls and right-panel settings are explained separately below.
Main route (yellow)
Trace the blue road lines defined by the game to select the main route. Complete the route. Placed gates determine its direction automatically. This route appears on the map.
Secondary route (orange)
Trace the blue road lines defined by the game to select a secondary route. Connect it to the yellow main route. Placed gates determine its direction automatically. This route appears on the map.
Shortcut (pink)
Trace the blue road lines to define an optional shortcut for NeoAI. Placed gates determine its direction automatically. Shortcuts do not appear on the map. Placing shortcut gates as well is recommended.
Fill / AI optimization (green)
Use this for routes without blue road lines. The curve inherits its role from the connected route. Draw it in place of the corresponding colored route to optimize the NeoAI driving line.
AI discouraged (brown): exclude from route choices
Exclude routes from NeoAI route choices. No connection to the main route is required. These lines do not appear on the map.
Barrier walls: block a path
Click to place one barrier wall, or drag to place a continuous run. Edit individual walls after confirming. Check their facing and orientation. A wall crossing a blue road line prevents NeoAI from choosing that path.
AI obstacle markers: assist avoidance
Effective, but still being tuned. Place over indestructible objects such as central dividers that AI struggles to avoid, giving it more time to anticipate avoidance. This does not guarantee complete control.
Replace the race map
Generate a dedicated race map by drawing the configured routes onto the extracted world map.
Guide NeoAI with map lines
Guide AI along the configured routes. When enabled, Event Loader’s NeoAI controls the vehicles instead of the original game AI. When disabled, the original game AI controls them.
Select cars similar to the player
Set the vehicle regulations: select rival cars with a similar price range and performance to the player’s car. When disabled, selection follows the blacklist rank.
Objects and passage order reviewed
Optional self-check switch. It has no effect on the game.
6. Race-specific editing
Speedtrap: measurement points
Speedtrap uses the speed trap tool. Measurement points are separate from CPs, up to 16, with a count card on the left. Select points to edit radius and order.
Tollbooth: toll locations and bonus time
In Tollbooth mode, click a 3D tollbooth candidate and assign Start, timed Passage or Finish. Check order and bonus time in the list. Use free passage-point placement where no native tollbooth exists.
Lap Knockout: participants and laps
Lap Knockout eliminates one racer per lap; four participants require at least three laps. Check participants and laps. Drag and other modes expose their own settings.
7. Properties and cutscenes
Select Arms Race (prototype)
Select Arms Race under Combat mode in Event Properties. Sprint, Circuit, Lap Knockout and Speed Trap can be used as the racing rules. Compatible Event Loader, MWArsenal and ArmsAssist are required. Without them, the editor disables the option and the game does not register the event.
Select Hot Pursuit (prototype)
Maximum eight racers. Pursuit starts individually after 25% race progress, with up to two chase cars per racer. Roadblocks and helicopters are separate. With survival-reward builds, any genuine finish is a clear and reward equals configured cash x survivors / finish position. A racer destroying Cross at heat 5 or higher restores 15% HP to surviving racers, and finished AI keep fleeing. Event Properties shows the rules supported by the connected MOD builds. Older supported builds do not gain these new rules.
Hot Pursuit requirements and settings
Connect the game folder containing MWArsenal and the validated Hot Pursuit builds of Event Loader and ArmsAssist. Older builds leave the option disabled. Choose Sprint or Speedtrap rules, starting heat, ammunition and cutscene. Police are always enabled.
Health, crash retirement and retry
Human and AI racers have 300 HP. EMP deals 25 damage, Spike 50 and Shockwave 15. An AI racer at zero HP retires through the native crash outcome while the remaining racers continue. A player at zero HP enters the native losing results screen with Restart available. Restart resets event health and ammunition. Arrests retain the native arrest scene.
Starting ammunition per weapon
Specify starting ammunition per weapon. Leave a field blank to use the ArmsAssist INI; zero disables that weapon. Specified counts are refilled at the start and on restart, and AI racers receive the same counts. Player equipment and INIs are preserved. Temporary event ammunition is released on exit.
Normal race behavior
Normal races lock weapons and hide the weapon HUD even with police enabled. Explicitly select a weapon-enabled event mode to use weapons. Drift Race remains unavailable.
Edit and apply event properties
Top-bar Properties and Open event properties on the right open the same dialog. Set name, ID, blacklist rank, type, participants, reward, traffic and police, then Apply. Cancel restores the state from when the dialog opened.
Select a cutscene and inspect its preview
Hover a scene or navigate with arrow keys for its image and grid diagram. Some Carbon previews show an actor pose with a layout diagram. Camera-only scenes are marked as having no actor. Slot 1 is the player. Scenes with a different participant count cannot be selected.
Starting-grid layout preview
The 3D grid follows the selected scene's countdown layout and road surface. Automatic and original-MW modes show an estimate; the final layout is chosen in game. Check that it fits the road.
Required resources for additional cutscenes
Additional scenes require resources converted locally from legitimate Carbon/Underground 2 files. Preview images alone cannot play a scene. Missing assets or unsuitable runtime conditions fall back to the original presentation.
8. Map card and rendering
Lower-left map card: switch its content with the tabs and resize the card with its top-right handle.
Lower-left map card: tabs and auto fit
Switch between World, Course map and After-edit preview at the lower left. World automatically fits placed objects, or the whole world when empty. Toggle Auto fit for whole-world bounds. Reset clears additional pan and zoom.
Map-card size and rendering properties
Drag the top-right handle to resize freely, or focus it and use arrow keys. Size is restored next time. Rendering properties controls VRAM budget, resolution and loading concurrency. The budget is not a guarantee of available VRAM.
9. Validate, save and install
Validation, warning markers and copying errors
Use Validation to check passage order, connections and foldbacks. Select a gap ! marker or issue to focus it. Error-card contents can be copied. Ctrl+Z undoes; Ctrl+Y redoes.
Browser storage and editing JSON backups
Opslaan in browser slaat bewerkingen op in de huidige configuratie. Voor een bewerkbare back-up gebruikt u Configuratiebeheer / Alle bewerkingsgegevens opslaan om JSON te downloaden. Opslag- en mapmachtigingen worden niet gedeeld tussen browsers of oorsprong. Opslag- en cachegegevens tonen het gebruik en de status van permanente opslag. Gebruik Alle bewerkingsgegevens importeren om de opgeslagen JSON te herstellen. Evenementen zonder overeenkomende vermelding worden toegevoegd. Wanneer een bestaande gebeurtenis zou veranderen, wordt de naam ervan in een waarschuwing vermeld. Annuleren laat alle evenementen ongewijzigd.
Export to game and ZIP installation
Kies in Gebeurtenisexport de optie Huidige gebeurtenis exporteren of Alle opgeslagen gebeurtenissen exporteren. Na het genereren selecteert u Gegenereerde ZIP opslaan. Sluit het spel en de opstartprogramma's en kopieer vervolgens de map met scripts van de ZIP naar de map met speed.exe. De ZIP bevat alleen gebeurtenisgegevens, zonder ASI-modules of installatieprogramma. Direct schrijven is beschikbaar onder geavanceerde opties op hetzelfde scherm.
Post-install checks and configuration fingerprint mismatches
After installation, playtest start, checkpoints, finish, exit and re-entry. Do not redistribute game files or converted scene resources. Close and reopen the app if old UI remains. For fingerprint mismatches, back up edits and update the configuration from the same game.
Options menu and bug reports
The upper-right … menu contains language, app installation and support. Include event name, reproduction steps and copied error details when reporting a problem. You do not need to send the entire game.
Recover from an unresponsive worker or failed generation
Export generation has a ten-minute response limit; configuration preparation has a fifteen-minute limit. A timeout terminates the worker; transfer failures can also be retried. Existing game files and configurations are not updated before generation/preparation succeeds.
10. Required mods and installation order
Normal-event prerequisites
Normal events require a supported English 1.3 speed.exe, an ASI loader and Event Loader. Preserve Japanese assets, existing INIs and saves. Do not install the same ASI both in the game root and scripts.
NeoAI and NFRR
Current NeoAI combines control inside Event Loader with the vehicle-scope adapter from a compatible NFRR. Native-AI events do not require NFRR. Performance matching also uses compatible NFRR calibration for the selected configuration.
Combat modes, expanded grids and HUD
Arms Race, Gauntlet and Hot Pursuit require compatible Event Loader and ArmsAssist plus a separately installed MWArsenal and its assets. Use compatible Limit Breaker for more than four participants and the suite HUD fixes for HP/HUD coexistence. MWArsenal alone does not register these modes.
Installation and verification order
Sluit het spel en de launchers en installeer de vereiste mods afzonderlijk. Kopieer de scriptmap van de editor ZIP naar het spel, of gebruik direct schrijven onder geavanceerde exportopties. Controleer start, checkpoints, finish, nieuwe poging, uitgang en het volgende evenement.
11. Game data and recorded SFX
Local resources and distributable files
The editor extracts world, map and model data locally. Do not add configuration caches, source executables, BUN files, audio banks, profiles or Shadow/vault to event distribution ZIPs. Users install the required mods and world separately. Bug reporting is a separate action with reviewed submission content.
Vervangende audio in het ArmsAssist-pakket
Pakketbestanden controleren
Het ArmsAssist-distributiepakket bevat vier vervangende effecten in scripts/MWArmsAssist: Drop.wav, PlayerDrop.wav, Lock_by_police.wav en repair-complete.wav. Gebruik de bestanden die bij dit pakket horen. Eerdere omschrijvingen als NFSHP-bronaudio, opgenomen gamegeluid of originele audio beschrijven de huidige vervangende set niet correct.
Raadpleeg manifest.json in het pakket voor de bestandslijst en verificatiegegevens. Sluit de game en maak een back-up van de huidige bestanden voordat je geluiden in een bestaande installatie vervangt. Geluidsbanken en ongebruikte SFX zijn niet inbegrepen.
12. Local conversion of additional cutscenes
Conversion prerequisites and availability
Convert scenes locally from your legitimate Carbon/UG2 files. Current development scripts depend on verified input paths and versions; a general one-click converter is not yet available. Thumbnails alone cannot play a scene.
Verify the original files
Inputs include the selected NIS, matching GLOBAL camera assets and verified camera descriptions; UG2 also uses EvtTrk. Read only the required files, preserve the source game and record sizes/SHA256. Convert normal race intros without mixing in story-only scenes.
Convert and validate each scene
In the development tree tools/CarbonIntro, Carbon uses prepare_variants and export_variant; UG2 uses prepare_ug2_one, prepare_ug2_batch and the matching export_ug2 scripts. Validate actors, car layout, camera and GO timing separately. Do not add actor assets to camera-only scenes.
Install into your own game
Install only the runtimeFiles listed by runtime_manifest under scripts/EventLoader/CustomCutscenes/scene-ID. camera.cic, cars.cic, actor-clock.bin, scene-timing.bin and other files must match that scene manifest. Exclude camera.raw, original BUN/EXE files and research NPZ files.
Keep scene decoding and recording distinct
Scene audio is a separate step. Validate a confirmed PCM16 WAV and audio-timing.bin together with scene_audio. Current limits are mono/stereo, 8–96 kHz, 60 seconds and 8 MiB. export_scene_wav decodes a local ABK; it does not record audio. Do not claim original-audio fidelity for unidentified samples.
Selection and gameplay checks
Select a scene matching the participant count and playtest intro-to-GO, cancel, retry and transition to another event. Missing assets fall back to the original MW intro. Do not include converted source-game assets in general event distributions.
I Chrome eller Edge skal du åbne Spil / Konfigurationsstyring. Indtast et navn under Tilføj spilkonfiguration, vælg typen fra rullemenuen, vælg derefter Læs spilmappe og vælg mappen, der indeholder speed.exe. Den indledende forberedelse kan tage flere minutter. Der kræves ingen ekstern GUI eller forberedt konfigurationsmappe. Spilfiler uploades ikke.
Supported worlds and baseline
The original Rockport world is supported. W2C events require the matching W2C world. The baseline is captured when the cache is prepared. After changing world files or textures, back up your editing JSON before updating the configuration from the same game folder. Game files are not uploaded.
Update a configuration from the game folder
Vælg konfigurationen i Konfigurationsstyring, og tryk på Opdater konfiguration. Opdatering starter med det samme, når den huskede spilmappe er tilgængelig. Du bliver kun bedt om at vælge mappen, der indeholder speed.exe, hvis placeringen mangler eller ikke er tilgængelig. Redigeringer og konfigurations-id'et bevares. Tilføj en separat konfiguration, når verden eller vejlayoutet er anderledes.
Åbn eller skift konfiguration
Når en konfiguration åbnes igen eller vælges, gendannes kun det gemte link til spillets mappe og mappenavnet. Mappen scannes ikke, og hændelser importeres ikke. Hver konfiguration har sin egen hændelsesliste.
Når geometri er forberedt
Editor 3D forhåndsvisningsdata forberedes, når en konfiguration tilføjes eller opdateres. EventLoader bygger automatisk spilgeometri fra den modtagende installation, når det er nødvendigt, før målbegivenheden starter. Der kræves ingen geometrieksport fra editoren.
2. Select or create an event
Event selection and top-bar actions
Importér hændelser manuelt via Konfigurationsstyring → Læs hændelser fra spil. Editor bruger den tilknyttede mappe og beder dig vælge den, hvis den ikke kan tilgås. Du kan også importere en anden spil- eller hændelsesmappe eller en delt ZIP-fil. Importen kontrollerer filindhold og kortkompatibilitet og bevarer UUID'er og placeringer. Import fra en anden kilde ændrer ikke denne konfigurations tilknyttede spilmappe.
Correct native events and delete added events
To correct a native event, use Project → This course → Correct native event. Deletion affects the browser list; it does not uninstall files already written to the game. Undo deletion restores the last deletion.
3. Navigate the 3D view
3D camera controls and tool help
Tools are on the left, the 3D view is central, and Event, Selection and Validation are on the right. Hover or keyboard-focus a tool for illustrated help. Left-drag empty space to orbit, right-drag to pan, and scroll to zoom. PageUp/PageDown adjusts height; hold Shift for a larger step. Top view and Focus selection are also available.
Visible labels and display layers
Visible labels toggles text by category. Display layers toggles world geometry, roads, gate volumes, objects and the grid. Hiding labels never removes placed objects. Label preferences are stored in this browser.
4. Required gates and shortcuts
Gate key: START = starting grid; FINISH/LAP = finish or lap line; CP = required checkpoint; SC = optional shortcut.
Gate types, colors and required markers
Green START, orange FINISH/LAP and cyan CP carry a small ! badge. Pink SC is an optional shortcut, not a checkpoint. Reset gates are red. Tool colors match the labels.
Place, orient and order gates
Choose a placement tool and click the road. Select an object and adjust it with 3D handles or numeric position, rotation and size. Face it along the route and cover the road width. Reorder CPs with Order up/down. Start and finish map icons are automatic.
Circuits starting on a branch
For a circuit starting on a branch, check both the initial entry and the merge on later laps. Start and lap line can be separate. Alternatives and shortcuts must not skip checkpoints.
5. Routes, barriers and AI
Route diagram: yellow MAIN is the main route, pink SHORTCUT is a shortcut, and green FREE CURVE is Fill / AI optimization. Secondary routes, exclusions, walls and right-panel settings are explained separately below.
Main route (yellow)
Trace the blue road lines defined by the game to select the main route. Complete the route. Placed gates determine its direction automatically. This route appears on the map.
Secondary route (orange)
Trace the blue road lines defined by the game to select a secondary route. Connect it to the yellow main route. Placed gates determine its direction automatically. This route appears on the map.
Shortcut (pink)
Trace the blue road lines to define an optional shortcut for NeoAI. Placed gates determine its direction automatically. Shortcuts do not appear on the map. Placing shortcut gates as well is recommended.
Fill / AI optimization (green)
Use this for routes without blue road lines. The curve inherits its role from the connected route. Draw it in place of the corresponding colored route to optimize the NeoAI driving line.
AI discouraged (brown): exclude from route choices
Exclude routes from NeoAI route choices. No connection to the main route is required. These lines do not appear on the map.
Barrier walls: block a path
Click to place one barrier wall, or drag to place a continuous run. Edit individual walls after confirming. Check their facing and orientation. A wall crossing a blue road line prevents NeoAI from choosing that path.
AI obstacle markers: assist avoidance
Effective, but still being tuned. Place over indestructible objects such as central dividers that AI struggles to avoid, giving it more time to anticipate avoidance. This does not guarantee complete control.
Replace the race map
Generate a dedicated race map by drawing the configured routes onto the extracted world map.
Guide NeoAI with map lines
Guide AI along the configured routes. When enabled, Event Loader’s NeoAI controls the vehicles instead of the original game AI. When disabled, the original game AI controls them.
Select cars similar to the player
Set the vehicle regulations: select rival cars with a similar price range and performance to the player’s car. When disabled, selection follows the blacklist rank.
Objects and passage order reviewed
Optional self-check switch. It has no effect on the game.
6. Race-specific editing
Speedtrap: measurement points
Speedtrap uses the speed trap tool. Measurement points are separate from CPs, up to 16, with a count card on the left. Select points to edit radius and order.
Tollbooth: toll locations and bonus time
In Tollbooth mode, click a 3D tollbooth candidate and assign Start, timed Passage or Finish. Check order and bonus time in the list. Use free passage-point placement where no native tollbooth exists.
Lap Knockout: participants and laps
Lap Knockout eliminates one racer per lap; four participants require at least three laps. Check participants and laps. Drag and other modes expose their own settings.
7. Properties and cutscenes
Select Arms Race (prototype)
Select Arms Race under Combat mode in Event Properties. Sprint, Circuit, Lap Knockout and Speed Trap can be used as the racing rules. Compatible Event Loader, MWArsenal and ArmsAssist are required. Without them, the editor disables the option and the game does not register the event.
Select Hot Pursuit (prototype)
Maximum eight racers. Pursuit starts individually after 25% race progress, with up to two chase cars per racer. Roadblocks and helicopters are separate. With survival-reward builds, any genuine finish is a clear and reward equals configured cash x survivors / finish position. A racer destroying Cross at heat 5 or higher restores 15% HP to surviving racers, and finished AI keep fleeing. Event Properties shows the rules supported by the connected MOD builds. Older supported builds do not gain these new rules.
Hot Pursuit requirements and settings
Connect the game folder containing MWArsenal and the validated Hot Pursuit builds of Event Loader and ArmsAssist. Older builds leave the option disabled. Choose Sprint or Speedtrap rules, starting heat, ammunition and cutscene. Police are always enabled.
Health, crash retirement and retry
Human and AI racers have 300 HP. EMP deals 25 damage, Spike 50 and Shockwave 15. An AI racer at zero HP retires through the native crash outcome while the remaining racers continue. A player at zero HP enters the native losing results screen with Restart available. Restart resets event health and ammunition. Arrests retain the native arrest scene.
Starting ammunition per weapon
Specify starting ammunition per weapon. Leave a field blank to use the ArmsAssist INI; zero disables that weapon. Specified counts are refilled at the start and on restart, and AI racers receive the same counts. Player equipment and INIs are preserved. Temporary event ammunition is released on exit.
Normal race behavior
Normal races lock weapons and hide the weapon HUD even with police enabled. Explicitly select a weapon-enabled event mode to use weapons. Drift Race remains unavailable.
Edit and apply event properties
Top-bar Properties and Open event properties on the right open the same dialog. Set name, ID, blacklist rank, type, participants, reward, traffic and police, then Apply. Cancel restores the state from when the dialog opened.
Select a cutscene and inspect its preview
Hover a scene or navigate with arrow keys for its image and grid diagram. Some Carbon previews show an actor pose with a layout diagram. Camera-only scenes are marked as having no actor. Slot 1 is the player. Scenes with a different participant count cannot be selected.
Starting-grid layout preview
The 3D grid follows the selected scene's countdown layout and road surface. Automatic and original-MW modes show an estimate; the final layout is chosen in game. Check that it fits the road.
Required resources for additional cutscenes
Additional scenes require resources converted locally from legitimate Carbon/Underground 2 files. Preview images alone cannot play a scene. Missing assets or unsuitable runtime conditions fall back to the original presentation.
8. Map card and rendering
Lower-left map card: switch its content with the tabs and resize the card with its top-right handle.
Lower-left map card: tabs and auto fit
Switch between World, Course map and After-edit preview at the lower left. World automatically fits placed objects, or the whole world when empty. Toggle Auto fit for whole-world bounds. Reset clears additional pan and zoom.
Map-card size and rendering properties
Drag the top-right handle to resize freely, or focus it and use arrow keys. Size is restored next time. Rendering properties controls VRAM budget, resolution and loading concurrency. The budget is not a guarantee of available VRAM.
9. Validate, save and install
Validation, warning markers and copying errors
Use Validation to check passage order, connections and foldbacks. Select a gap ! marker or issue to focus it. Error-card contents can be copied. Ctrl+Z undoes; Ctrl+Y redoes.
Browser storage and editing JSON backups
Gem redigeringer i browserbutikker i den aktuelle konfiguration. For en redigerbar sikkerhedskopi, brug Konfigurationsstyring / Gem alle redigeringsdata for at downloade JSON. Lagrings- og mappetilladelser deles ikke mellem browsere eller oprindelser. Opbevarings- og cacheoplysninger viser status for brug og vedvarende lagring. Brug Importer alle redigeringsdata til at gendanne gemte JSON. Begivenheder uden en matchende post tilføjes. Når en eksisterende hændelse ændres, viser en advarsel dens navn. Annuller forlader alle begivenheder uændrede.
Export to game and ZIP installation
I Hændelseseksport skal du vælge Eksporter aktuel hændelse eller Eksporter alle gemte hændelser. Efter generering skal du vælge Gem genereret ZIP. Luk spillet og startprogrammet, og kopier derefter scripts-mappen fra ZIP til mappen, der indeholder speed.exe. ZIP indeholder kun hændelsesdata uden ASI-moduler eller installationsprogram. Direkte skrivning er tilgængelig under avancerede muligheder på samme skærm.
Post-install checks and configuration fingerprint mismatches
After installation, playtest start, checkpoints, finish, exit and re-entry. Do not redistribute game files or converted scene resources. Close and reopen the app if old UI remains. For fingerprint mismatches, back up edits and update the configuration from the same game.
Options menu and bug reports
The upper-right … menu contains language, app installation and support. Include event name, reproduction steps and copied error details when reporting a problem. You do not need to send the entire game.
Recover from an unresponsive worker or failed generation
Export generation has a ten-minute response limit; configuration preparation has a fifteen-minute limit. A timeout terminates the worker; transfer failures can also be retried. Existing game files and configurations are not updated before generation/preparation succeeds.
10. Required mods and installation order
Normal-event prerequisites
Normal events require a supported English 1.3 speed.exe, an ASI loader and Event Loader. Preserve Japanese assets, existing INIs and saves. Do not install the same ASI both in the game root and scripts.
NeoAI and NFRR
Current NeoAI combines control inside Event Loader with the vehicle-scope adapter from a compatible NFRR. Native-AI events do not require NFRR. Performance matching also uses compatible NFRR calibration for the selected configuration.
Combat modes, expanded grids and HUD
Arms Race, Gauntlet and Hot Pursuit require compatible Event Loader and ArmsAssist plus a separately installed MWArsenal and its assets. Use compatible Limit Breaker for more than four participants and the suite HUD fixes for HP/HUD coexistence. MWArsenal alone does not register these modes.
Installation and verification order
Luk spillet og launchers og installer de nødvendige mods separat. Kopier scripts-mappen fra editoren ZIP ind i spillet, eller brug direkte skrivning under avancerede eksportmuligheder. Tjek start, kontrolpunkter, slut, prøv igen, forlad og næste begivenhed.
11. Game data and recorded SFX
Local resources and distributable files
The editor extracts world, map and model data locally. Do not add configuration caches, source executables, BUN files, audio banks, profiles or Shadow/vault to event distribution ZIPs. Users install the required mods and world separately. Bug reporting is a separate action with reviewed submission content.
Erstatningslyde i ArmsAssist-pakken
Kontrollér pakkefilerne
ArmsAssist-distributionspakken indeholder fire erstatningseffekter i scripts/MWArmsAssist: Drop.wav, PlayerDrop.wav, Lock_by_police.wav og repair-complete.wav. Brug filerne fra den pågældende pakke. Tidligere beskrivelser af dem som NFSHP-lyd, optaget spil lyd eller original lyd beskriver ikke den aktuelle erstatningspakke korrekt.
Se manifest.json i pakken for listen over medfølgende filer og kontroloplysninger. Luk spillet, og sikkerhedskopiér de aktuelle filer, før du erstatter lyde i en eksisterende installation. Lydbanker og ubrugte lyde er ikke inkluderet.
12. Local conversion of additional cutscenes
Conversion prerequisites and availability
Convert scenes locally from your legitimate Carbon/UG2 files. Current development scripts depend on verified input paths and versions; a general one-click converter is not yet available. Thumbnails alone cannot play a scene.
Verify the original files
Inputs include the selected NIS, matching GLOBAL camera assets and verified camera descriptions; UG2 also uses EvtTrk. Read only the required files, preserve the source game and record sizes/SHA256. Convert normal race intros without mixing in story-only scenes.
Convert and validate each scene
In the development tree tools/CarbonIntro, Carbon uses prepare_variants and export_variant; UG2 uses prepare_ug2_one, prepare_ug2_batch and the matching export_ug2 scripts. Validate actors, car layout, camera and GO timing separately. Do not add actor assets to camera-only scenes.
Install into your own game
Install only the runtimeFiles listed by runtime_manifest under scripts/EventLoader/CustomCutscenes/scene-ID. camera.cic, cars.cic, actor-clock.bin, scene-timing.bin and other files must match that scene manifest. Exclude camera.raw, original BUN/EXE files and research NPZ files.
Keep scene decoding and recording distinct
Scene audio is a separate step. Validate a confirmed PCM16 WAV and audio-timing.bin together with scene_audio. Current limits are mono/stereo, 8–96 kHz, 60 seconds and 8 MiB. export_scene_wav decodes a local ABK; it does not record audio. Do not claim original-audio fidelity for unidentified samples.
Selection and gameplay checks
Select a scene matching the participant count and playtest intro-to-GO, cancel, retry and transition to another event. Missing assets fall back to the original MW intro. Do not include converted source-game assets in general event distributions.
I Chrome eller Edge, öppna Game / Configuration management. Ange ett namn under Lägg till spelkonfiguration, välj typen från rullgardinsmenyn, välj sedan Läs spelmapp och välj mappen som innehåller speed.exe. Den första förberedelsen kan ta flera minuter. Ingen extern GUI eller förberedd konfigurationsmapp krävs. Spelfiler laddas inte upp.
Supported worlds and baseline
The original Rockport world is supported. W2C events require the matching W2C world. The baseline is captured when the cache is prepared. After changing world files or textures, back up your editing JSON before updating the configuration from the same game folder. Game files are not uploaded.
Update a configuration from the game folder
Välj konfigurationen i Konfigurationshantering och tryck på Uppdatera konfiguration. Uppdateringen startar omedelbart när den minnesvärda spelmappen är tillgänglig. Du ombeds välja mappen som innehåller speed.exe endast om platsen saknas eller inte är tillgänglig. Redigeringar och konfigurations-ID behålls. Lägg till en separat konfiguration när världen eller väglayouten skiljer sig.
Öppna konfigurationer igen eller byt
När en konfiguration öppnas igen eller byts återställs endast den sparade länken till spelmappen och mappnamnet. Mappen genomsöks inte och händelser importeras inte. Varje konfiguration har en egen händelselista.
När geometri är förberedd
Editor 3D förhandsgranskningsdata förbereds när en konfiguration läggs till eller uppdateras. EventLoader bygger automatiskt spelgeometri från den mottagande installationen när det behövs innan målhändelsen startar. Ingen geometriexport från editorn krävs.
2. Select or create an event
Event selection and top-bar actions
Importera händelser uttryckligen via Konfigurationshantering → Läs händelser från spel. Editorn använder den länkade mappen och ber dig välja den om den inte går att komma åt. Du kan även importera en annan spel- eller händelsemapp eller en delad ZIP-fil. Importen kontrollerar filinnehåll och kartkompatibilitet och bevarar UUID:n och placeringar. Import från en annan källa ändrar inte den länkade spelmappen för den här konfigurationen.
Correct native events and delete added events
To correct a native event, use Project → This course → Correct native event. Deletion affects the browser list; it does not uninstall files already written to the game. Undo deletion restores the last deletion.
3. Navigate the 3D view
3D camera controls and tool help
Tools are on the left, the 3D view is central, and Event, Selection and Validation are on the right. Hover or keyboard-focus a tool for illustrated help. Left-drag empty space to orbit, right-drag to pan, and scroll to zoom. PageUp/PageDown adjusts height; hold Shift for a larger step. Top view and Focus selection are also available.
Visible labels and display layers
Visible labels toggles text by category. Display layers toggles world geometry, roads, gate volumes, objects and the grid. Hiding labels never removes placed objects. Label preferences are stored in this browser.
4. Required gates and shortcuts
Gate key: START = starting grid; FINISH/LAP = finish or lap line; CP = required checkpoint; SC = optional shortcut.
Gate types, colors and required markers
Green START, orange FINISH/LAP and cyan CP carry a small ! badge. Pink SC is an optional shortcut, not a checkpoint. Reset gates are red. Tool colors match the labels.
Place, orient and order gates
Choose a placement tool and click the road. Select an object and adjust it with 3D handles or numeric position, rotation and size. Face it along the route and cover the road width. Reorder CPs with Order up/down. Start and finish map icons are automatic.
Circuits starting on a branch
For a circuit starting on a branch, check both the initial entry and the merge on later laps. Start and lap line can be separate. Alternatives and shortcuts must not skip checkpoints.
5. Routes, barriers and AI
Route diagram: yellow MAIN is the main route, pink SHORTCUT is a shortcut, and green FREE CURVE is Fill / AI optimization. Secondary routes, exclusions, walls and right-panel settings are explained separately below.
Main route (yellow)
Trace the blue road lines defined by the game to select the main route. Complete the route. Placed gates determine its direction automatically. This route appears on the map.
Secondary route (orange)
Trace the blue road lines defined by the game to select a secondary route. Connect it to the yellow main route. Placed gates determine its direction automatically. This route appears on the map.
Shortcut (pink)
Trace the blue road lines to define an optional shortcut for NeoAI. Placed gates determine its direction automatically. Shortcuts do not appear on the map. Placing shortcut gates as well is recommended.
Fill / AI optimization (green)
Use this for routes without blue road lines. The curve inherits its role from the connected route. Draw it in place of the corresponding colored route to optimize the NeoAI driving line.
AI discouraged (brown): exclude from route choices
Exclude routes from NeoAI route choices. No connection to the main route is required. These lines do not appear on the map.
Barrier walls: block a path
Click to place one barrier wall, or drag to place a continuous run. Edit individual walls after confirming. Check their facing and orientation. A wall crossing a blue road line prevents NeoAI from choosing that path.
AI obstacle markers: assist avoidance
Effective, but still being tuned. Place over indestructible objects such as central dividers that AI struggles to avoid, giving it more time to anticipate avoidance. This does not guarantee complete control.
Replace the race map
Generate a dedicated race map by drawing the configured routes onto the extracted world map.
Guide NeoAI with map lines
Guide AI along the configured routes. When enabled, Event Loader’s NeoAI controls the vehicles instead of the original game AI. When disabled, the original game AI controls them.
Select cars similar to the player
Set the vehicle regulations: select rival cars with a similar price range and performance to the player’s car. When disabled, selection follows the blacklist rank.
Objects and passage order reviewed
Optional self-check switch. It has no effect on the game.
6. Race-specific editing
Speedtrap: measurement points
Speedtrap uses the speed trap tool. Measurement points are separate from CPs, up to 16, with a count card on the left. Select points to edit radius and order.
Tollbooth: toll locations and bonus time
In Tollbooth mode, click a 3D tollbooth candidate and assign Start, timed Passage or Finish. Check order and bonus time in the list. Use free passage-point placement where no native tollbooth exists.
Lap Knockout: participants and laps
Lap Knockout eliminates one racer per lap; four participants require at least three laps. Check participants and laps. Drag and other modes expose their own settings.
7. Properties and cutscenes
Select Arms Race (prototype)
Select Arms Race under Combat mode in Event Properties. Sprint, Circuit, Lap Knockout and Speed Trap can be used as the racing rules. Compatible Event Loader, MWArsenal and ArmsAssist are required. Without them, the editor disables the option and the game does not register the event.
Select Hot Pursuit (prototype)
Maximum eight racers. Pursuit starts individually after 25% race progress, with up to two chase cars per racer. Roadblocks and helicopters are separate. With survival-reward builds, any genuine finish is a clear and reward equals configured cash x survivors / finish position. A racer destroying Cross at heat 5 or higher restores 15% HP to surviving racers, and finished AI keep fleeing. Event Properties shows the rules supported by the connected MOD builds. Older supported builds do not gain these new rules.
Hot Pursuit requirements and settings
Connect the game folder containing MWArsenal and the validated Hot Pursuit builds of Event Loader and ArmsAssist. Older builds leave the option disabled. Choose Sprint or Speedtrap rules, starting heat, ammunition and cutscene. Police are always enabled.
Health, crash retirement and retry
Human and AI racers have 300 HP. EMP deals 25 damage, Spike 50 and Shockwave 15. An AI racer at zero HP retires through the native crash outcome while the remaining racers continue. A player at zero HP enters the native losing results screen with Restart available. Restart resets event health and ammunition. Arrests retain the native arrest scene.
Starting ammunition per weapon
Specify starting ammunition per weapon. Leave a field blank to use the ArmsAssist INI; zero disables that weapon. Specified counts are refilled at the start and on restart, and AI racers receive the same counts. Player equipment and INIs are preserved. Temporary event ammunition is released on exit.
Normal race behavior
Normal races lock weapons and hide the weapon HUD even with police enabled. Explicitly select a weapon-enabled event mode to use weapons. Drift Race remains unavailable.
Edit and apply event properties
Top-bar Properties and Open event properties on the right open the same dialog. Set name, ID, blacklist rank, type, participants, reward, traffic and police, then Apply. Cancel restores the state from when the dialog opened.
Select a cutscene and inspect its preview
Hover a scene or navigate with arrow keys for its image and grid diagram. Some Carbon previews show an actor pose with a layout diagram. Camera-only scenes are marked as having no actor. Slot 1 is the player. Scenes with a different participant count cannot be selected.
Starting-grid layout preview
The 3D grid follows the selected scene's countdown layout and road surface. Automatic and original-MW modes show an estimate; the final layout is chosen in game. Check that it fits the road.
Required resources for additional cutscenes
Additional scenes require resources converted locally from legitimate Carbon/Underground 2 files. Preview images alone cannot play a scene. Missing assets or unsuitable runtime conditions fall back to the original presentation.
8. Map card and rendering
Lower-left map card: switch its content with the tabs and resize the card with its top-right handle.
Lower-left map card: tabs and auto fit
Switch between World, Course map and After-edit preview at the lower left. World automatically fits placed objects, or the whole world when empty. Toggle Auto fit for whole-world bounds. Reset clears additional pan and zoom.
Map-card size and rendering properties
Drag the top-right handle to resize freely, or focus it and use arrow keys. Size is restored next time. Rendering properties controls VRAM budget, resolution and loading concurrency. The budget is not a guarantee of available VRAM.
9. Validate, save and install
Validation, warning markers and copying errors
Use Validation to check passage order, connections and foldbacks. Select a gap ! marker or issue to focus it. Error-card contents can be copied. Ctrl+Z undoes; Ctrl+Y redoes.
Browser storage and editing JSON backups
Spara redigeringar i webbläsarens butiker i den aktuella konfigurationen. För en redigerbar säkerhetskopia, använd Konfigurationshantering / Spara all redigeringsdata för att ladda ner JSON. Lagrings- och mappbehörigheter delas inte mellan webbläsare eller ursprung. Information om lagring och cache visar användning och status för beständig lagring. Använd Importera all redigeringsdata för att återställa sparad JSON. Händelser utan en matchande post läggs till. När en befintlig händelse skulle ändras, listar en varning dess namn. Avbryt lämnar alla händelser oförändrade.
Export to game and ZIP installation
I Händelseexport väljer du Exportera aktuell händelse eller Exportera alla sparade händelser. Efter generering väljer du Spara genererad ZIP. Stäng spelet och startprogrammet, kopiera sedan skriptmappen från ZIP till mappen som innehåller speed.exe. ZIP innehåller endast händelsedata, utan ASI-moduler eller installationsprogram. Direktskrivning är tillgängligt under avancerade alternativ på samma skärm.
Post-install checks and configuration fingerprint mismatches
After installation, playtest start, checkpoints, finish, exit and re-entry. Do not redistribute game files or converted scene resources. Close and reopen the app if old UI remains. For fingerprint mismatches, back up edits and update the configuration from the same game.
Options menu and bug reports
The upper-right … menu contains language, app installation and support. Include event name, reproduction steps and copied error details when reporting a problem. You do not need to send the entire game.
Recover from an unresponsive worker or failed generation
Export generation has a ten-minute response limit; configuration preparation has a fifteen-minute limit. A timeout terminates the worker; transfer failures can also be retried. Existing game files and configurations are not updated before generation/preparation succeeds.
10. Required mods and installation order
Normal-event prerequisites
Normal events require a supported English 1.3 speed.exe, an ASI loader and Event Loader. Preserve Japanese assets, existing INIs and saves. Do not install the same ASI both in the game root and scripts.
NeoAI and NFRR
Current NeoAI combines control inside Event Loader with the vehicle-scope adapter from a compatible NFRR. Native-AI events do not require NFRR. Performance matching also uses compatible NFRR calibration for the selected configuration.
Combat modes, expanded grids and HUD
Arms Race, Gauntlet and Hot Pursuit require compatible Event Loader and ArmsAssist plus a separately installed MWArsenal and its assets. Use compatible Limit Breaker for more than four participants and the suite HUD fixes for HP/HUD coexistence. MWArsenal alone does not register these modes.
Installation and verification order
Stäng spelet och startprogrammen och installera nödvändiga mods separat. Kopiera skriptmappen från editorn ZIP till spelet, eller använd direktskrivning under avancerade exportalternativ. Kontrollera start, kontrollpunkter, mål, försök igen, avsluta och nästa händelse.
11. Game data and recorded SFX
Local resources and distributable files
The editor extracts world, map and model data locally. Do not add configuration caches, source executables, BUN files, audio banks, profiles or Shadow/vault to event distribution ZIPs. Users install the required mods and world separately. Bug reporting is a separate action with reviewed submission content.
Ersättningsljud i ArmsAssist-paketet
Kontrollera paketfilerna
ArmsAssists distributionspaket innehåller fyra ersättningseffekter i scripts/MWArmsAssist: Drop.wav, PlayerDrop.wav, Lock_by_police.wav och repair-complete.wav. Använd filerna som medföljer paketet. Tidigare beskrivningar som NFSHP-källjud, inspelat spelljud eller originalljud beskriver inte den aktuella ersättningsuppsättningen korrekt.
Se manifest.json i paketet för listan över medföljande filer och verifieringsdata. Stäng spelet och säkerhetskopiera de aktuella filerna innan du ersätter ljud i en befintlig installation. Ljudbanker och oanvända SFX ingår inte.
12. Local conversion of additional cutscenes
Conversion prerequisites and availability
Convert scenes locally from your legitimate Carbon/UG2 files. Current development scripts depend on verified input paths and versions; a general one-click converter is not yet available. Thumbnails alone cannot play a scene.
Verify the original files
Inputs include the selected NIS, matching GLOBAL camera assets and verified camera descriptions; UG2 also uses EvtTrk. Read only the required files, preserve the source game and record sizes/SHA256. Convert normal race intros without mixing in story-only scenes.
Convert and validate each scene
In the development tree tools/CarbonIntro, Carbon uses prepare_variants and export_variant; UG2 uses prepare_ug2_one, prepare_ug2_batch and the matching export_ug2 scripts. Validate actors, car layout, camera and GO timing separately. Do not add actor assets to camera-only scenes.
Install into your own game
Install only the runtimeFiles listed by runtime_manifest under scripts/EventLoader/CustomCutscenes/scene-ID. camera.cic, cars.cic, actor-clock.bin, scene-timing.bin and other files must match that scene manifest. Exclude camera.raw, original BUN/EXE files and research NPZ files.
Keep scene decoding and recording distinct
Scene audio is a separate step. Validate a confirmed PCM16 WAV and audio-timing.bin together with scene_audio. Current limits are mono/stereo, 8–96 kHz, 60 seconds and 8 MiB. export_scene_wav decodes a local ABK; it does not record audio. Do not claim original-audio fidelity for unidentified samples.
Selection and gameplay checks
Select a scene matching the participant count and playtest intro-to-GO, cancel, retry and transition to another event. Missing assets fall back to the original MW intro. Do not include converted source-game assets in general event distributions.
Avaa Chrome:ssä tai Edge:ssä pelien/määritysten hallinta. Kirjoita Lisää pelin kokoonpano -kohtaan nimi, valitse tyyppi pudotusvalikosta, valitse sitten Lue pelikansio ja valitse kansio, joka sisältää speed.exe:n. Alkuvalmistelut voivat kestää useita minuutteja. Ulkoista käyttöliittymää tai valmisteltua määrityskansiota ei tarvita. Pelitiedostoja ei ladata.
Supported worlds and baseline
The original Rockport world is supported. W2C events require the matching W2C world. The baseline is captured when the cache is prepared. After changing world files or textures, back up your editing JSON before updating the configuration from the same game folder. Game files are not uploaded.
Update a configuration from the game folder
Valitse konfiguraatio Configuration management -kohdasta ja paina Päivitä kokoonpano. Päivitys alkaa välittömästi, kun muistettu pelikansio on käytettävissä. Sinua pyydetään valitsemaan speed.exe sisältävä kansio vain, jos sijainti puuttuu tai ei ole käytettävissä. Muokkaukset ja määritystunnus säilytetään. Lisää erillinen määritys, kun maailma tai tien asettelu eroaa.
Avaa määritykset uudelleen tai vaihda niitä
Kun määritys avataan uudelleen tai sitä vaihdetaan, vain tallennettu pelihakemiston linkki ja kansion nimi palautetaan. Kansioita ei tarkisteta eikä tapahtumia tuoda. Jokaisella määrityksellä on oma tapahtumaluettelonsa.
Kun geometria on valmis
Editor 3D -esikatselutiedot valmistetaan, kun kokoonpano lisätään tai päivitetään. EventLoader rakentaa automaattisesti pelin geometrian vastaanottavasta asennuksesta tarvittaessa ennen kohdetapahtuman alkamista. Geometrian vientiä editorista ei vaadita.
2. Select or create an event
Event selection and top-bar actions
Tuo tapahtumat erikseen valitsemalla Määritysten hallinta → Lue tapahtumat pelistä. Editori käyttää linkitettyä kansiota ja pyytää valitsemaan sen uudelleen, jos siihen ei ole pääsyä. Voit tuoda myös toisen peli- tai tapahtumakansion tai jaetun ZIP-tiedoston. Tuonnissa tarkistetaan tiedostojen sisältö ja karttayhteensopivuus sekä säilytetään UUID-tunnukset ja sijoittelut. Tuonti muusta lähteestä ei muuta tämän määrityksen linkitettyä pelikansiota.
Correct native events and delete added events
To correct a native event, use Project → This course → Correct native event. Deletion affects the browser list; it does not uninstall files already written to the game. Undo deletion restores the last deletion.
3. Navigate the 3D view
3D camera controls and tool help
Tools are on the left, the 3D view is central, and Event, Selection and Validation are on the right. Hover or keyboard-focus a tool for illustrated help. Left-drag empty space to orbit, right-drag to pan, and scroll to zoom. PageUp/PageDown adjusts height; hold Shift for a larger step. Top view and Focus selection are also available.
Visible labels and display layers
Visible labels toggles text by category. Display layers toggles world geometry, roads, gate volumes, objects and the grid. Hiding labels never removes placed objects. Label preferences are stored in this browser.
4. Required gates and shortcuts
Gate key: START = starting grid; FINISH/LAP = finish or lap line; CP = required checkpoint; SC = optional shortcut.
Gate types, colors and required markers
Green START, orange FINISH/LAP and cyan CP carry a small ! badge. Pink SC is an optional shortcut, not a checkpoint. Reset gates are red. Tool colors match the labels.
Place, orient and order gates
Choose a placement tool and click the road. Select an object and adjust it with 3D handles or numeric position, rotation and size. Face it along the route and cover the road width. Reorder CPs with Order up/down. Start and finish map icons are automatic.
Circuits starting on a branch
For a circuit starting on a branch, check both the initial entry and the merge on later laps. Start and lap line can be separate. Alternatives and shortcuts must not skip checkpoints.
5. Routes, barriers and AI
Route diagram: yellow MAIN is the main route, pink SHORTCUT is a shortcut, and green FREE CURVE is Fill / AI optimization. Secondary routes, exclusions, walls and right-panel settings are explained separately below.
Main route (yellow)
Trace the blue road lines defined by the game to select the main route. Complete the route. Placed gates determine its direction automatically. This route appears on the map.
Secondary route (orange)
Trace the blue road lines defined by the game to select a secondary route. Connect it to the yellow main route. Placed gates determine its direction automatically. This route appears on the map.
Shortcut (pink)
Trace the blue road lines to define an optional shortcut for NeoAI. Placed gates determine its direction automatically. Shortcuts do not appear on the map. Placing shortcut gates as well is recommended.
Fill / AI optimization (green)
Use this for routes without blue road lines. The curve inherits its role from the connected route. Draw it in place of the corresponding colored route to optimize the NeoAI driving line.
AI discouraged (brown): exclude from route choices
Exclude routes from NeoAI route choices. No connection to the main route is required. These lines do not appear on the map.
Barrier walls: block a path
Click to place one barrier wall, or drag to place a continuous run. Edit individual walls after confirming. Check their facing and orientation. A wall crossing a blue road line prevents NeoAI from choosing that path.
AI obstacle markers: assist avoidance
Effective, but still being tuned. Place over indestructible objects such as central dividers that AI struggles to avoid, giving it more time to anticipate avoidance. This does not guarantee complete control.
Replace the race map
Generate a dedicated race map by drawing the configured routes onto the extracted world map.
Guide NeoAI with map lines
Guide AI along the configured routes. When enabled, Event Loader’s NeoAI controls the vehicles instead of the original game AI. When disabled, the original game AI controls them.
Select cars similar to the player
Set the vehicle regulations: select rival cars with a similar price range and performance to the player’s car. When disabled, selection follows the blacklist rank.
Objects and passage order reviewed
Optional self-check switch. It has no effect on the game.
6. Race-specific editing
Speedtrap: measurement points
Speedtrap uses the speed trap tool. Measurement points are separate from CPs, up to 16, with a count card on the left. Select points to edit radius and order.
Tollbooth: toll locations and bonus time
In Tollbooth mode, click a 3D tollbooth candidate and assign Start, timed Passage or Finish. Check order and bonus time in the list. Use free passage-point placement where no native tollbooth exists.
Lap Knockout: participants and laps
Lap Knockout eliminates one racer per lap; four participants require at least three laps. Check participants and laps. Drag and other modes expose their own settings.
7. Properties and cutscenes
Select Arms Race (prototype)
Select Arms Race under Combat mode in Event Properties. Sprint, Circuit, Lap Knockout and Speed Trap can be used as the racing rules. Compatible Event Loader, MWArsenal and ArmsAssist are required. Without them, the editor disables the option and the game does not register the event.
Select Hot Pursuit (prototype)
Maximum eight racers. Pursuit starts individually after 25% race progress, with up to two chase cars per racer. Roadblocks and helicopters are separate. With survival-reward builds, any genuine finish is a clear and reward equals configured cash x survivors / finish position. A racer destroying Cross at heat 5 or higher restores 15% HP to surviving racers, and finished AI keep fleeing. Event Properties shows the rules supported by the connected MOD builds. Older supported builds do not gain these new rules.
Hot Pursuit requirements and settings
Connect the game folder containing MWArsenal and the validated Hot Pursuit builds of Event Loader and ArmsAssist. Older builds leave the option disabled. Choose Sprint or Speedtrap rules, starting heat, ammunition and cutscene. Police are always enabled.
Health, crash retirement and retry
Human and AI racers have 300 HP. EMP deals 25 damage, Spike 50 and Shockwave 15. An AI racer at zero HP retires through the native crash outcome while the remaining racers continue. A player at zero HP enters the native losing results screen with Restart available. Restart resets event health and ammunition. Arrests retain the native arrest scene.
Starting ammunition per weapon
Specify starting ammunition per weapon. Leave a field blank to use the ArmsAssist INI; zero disables that weapon. Specified counts are refilled at the start and on restart, and AI racers receive the same counts. Player equipment and INIs are preserved. Temporary event ammunition is released on exit.
Normal race behavior
Normal races lock weapons and hide the weapon HUD even with police enabled. Explicitly select a weapon-enabled event mode to use weapons. Drift Race remains unavailable.
Edit and apply event properties
Top-bar Properties and Open event properties on the right open the same dialog. Set name, ID, blacklist rank, type, participants, reward, traffic and police, then Apply. Cancel restores the state from when the dialog opened.
Select a cutscene and inspect its preview
Hover a scene or navigate with arrow keys for its image and grid diagram. Some Carbon previews show an actor pose with a layout diagram. Camera-only scenes are marked as having no actor. Slot 1 is the player. Scenes with a different participant count cannot be selected.
Starting-grid layout preview
The 3D grid follows the selected scene's countdown layout and road surface. Automatic and original-MW modes show an estimate; the final layout is chosen in game. Check that it fits the road.
Required resources for additional cutscenes
Additional scenes require resources converted locally from legitimate Carbon/Underground 2 files. Preview images alone cannot play a scene. Missing assets or unsuitable runtime conditions fall back to the original presentation.
8. Map card and rendering
Lower-left map card: switch its content with the tabs and resize the card with its top-right handle.
Lower-left map card: tabs and auto fit
Switch between World, Course map and After-edit preview at the lower left. World automatically fits placed objects, or the whole world when empty. Toggle Auto fit for whole-world bounds. Reset clears additional pan and zoom.
Map-card size and rendering properties
Drag the top-right handle to resize freely, or focus it and use arrow keys. Size is restored next time. Rendering properties controls VRAM budget, resolution and loading concurrency. The budget is not a guarantee of available VRAM.
9. Validate, save and install
Validation, warning markers and copying errors
Use Validation to check passage order, connections and foldbacks. Select a gap ! marker or issue to focus it. Error-card contents can be copied. Ctrl+Z undoes; Ctrl+Y redoes.
Browser storage and editing JSON backups
Tallenna selaimeen tallentaa muutokset nykyiseen kokoonpanoon. Muokattavaa varmuuskopiota varten lataa JSON käyttämällä Määritysten hallintaa / Tallenna kaikki muokkaustiedot. Tallennus- ja kansion käyttöoikeuksia ei jaeta selainten tai lähteiden välillä. Tallennus- ja välimuistitiedot näyttävät käytön ja jatkuvan tallennustilan. Käytä Tuo kaikki muokkaustiedot palauttaaksesi tallennettu JSON. Tapahtumat, joilla ei ole vastaavaa merkintää, lisätään. Kun olemassa oleva tapahtuma muuttuu, varoitus luettelee sen nimen. Peruuta jättää kaikki tapahtumat ennalleen.
Export to game and ZIP installation
Valitse Tapahtuman viennissä Vie nykyinen tapahtuma tai Vie kaikki tallennetut tapahtumat. Valitse luomisen jälkeen Tallenna luotu ZIP. Sulje peli ja käynnistysohjelmat ja kopioi sitten komentosarjakansio ZIP:stä kansioon, joka sisältää speed.exe:n. ZIP sisältää vain tapahtumatietoja, ilman ASI-moduuleja tai asennusohjelmaa. Suora kirjoittaminen on käytettävissä lisäasetuksilla samalla näytöllä.
Post-install checks and configuration fingerprint mismatches
After installation, playtest start, checkpoints, finish, exit and re-entry. Do not redistribute game files or converted scene resources. Close and reopen the app if old UI remains. For fingerprint mismatches, back up edits and update the configuration from the same game.
Options menu and bug reports
The upper-right … menu contains language, app installation and support. Include event name, reproduction steps and copied error details when reporting a problem. You do not need to send the entire game.
Recover from an unresponsive worker or failed generation
Export generation has a ten-minute response limit; configuration preparation has a fifteen-minute limit. A timeout terminates the worker; transfer failures can also be retried. Existing game files and configurations are not updated before generation/preparation succeeds.
10. Required mods and installation order
Normal-event prerequisites
Normal events require a supported English 1.3 speed.exe, an ASI loader and Event Loader. Preserve Japanese assets, existing INIs and saves. Do not install the same ASI both in the game root and scripts.
NeoAI and NFRR
Current NeoAI combines control inside Event Loader with the vehicle-scope adapter from a compatible NFRR. Native-AI events do not require NFRR. Performance matching also uses compatible NFRR calibration for the selected configuration.
Combat modes, expanded grids and HUD
Arms Race, Gauntlet and Hot Pursuit require compatible Event Loader and ArmsAssist plus a separately installed MWArsenal and its assets. Use compatible Limit Breaker for more than four participants and the suite HUD fixes for HP/HUD coexistence. MWArsenal alone does not register these modes.
Installation and verification order
Sulje peli ja käynnistysohjelmat ja asenna tarvittavat modit erikseen. Kopioi komentosarjakansio editorista ZIP peliin tai käytä suoraa kirjoittamista viennin lisäasetuksissa. Tarkista aloitus, tarkistuspisteet, maali, yritä uudelleen, poistu ja seuraava tapahtuma.
11. Game data and recorded SFX
Local resources and distributable files
The editor extracts world, map and model data locally. Do not add configuration caches, source executables, BUN files, audio banks, profiles or Shadow/vault to event distribution ZIPs. Users install the required mods and world separately. Bug reporting is a separate action with reviewed submission content.
ArmsAssist-paketin korvaavat äänet
Tarkista paketin tiedostot
ArmsAssist-jakelupaketti sisältää neljä korvaavaa äänitehostetta kansiossa scripts/MWArmsAssist: Drop.wav, PlayerDrop.wav, Lock_by_police.wav ja repair-complete.wav. Käytä kyseisen paketin mukana toimitettuja tiedostoja. Aiemmat kuvaukset, joissa niitä kutsuttiin NFSHP-lähdeääniksi, pelin äänen tallenteiksi tai alkuperäisiksi ääniksi, eivät kuvaa nykyistä korvaavaa äänisarjaa oikein.
Paketin tiedostoluettelo ja tarkistustiedot löytyvät sen manifest.json-tiedostoista. Sulje peli ja varmuuskopioi nykyiset tiedostot ennen äänien korvaamista olemassa olevassa asennuksessa. Äänipankkeja tai käyttämättömiä SFX-tiedostoja ei sisällytetä.
12. Local conversion of additional cutscenes
Conversion prerequisites and availability
Convert scenes locally from your legitimate Carbon/UG2 files. Current development scripts depend on verified input paths and versions; a general one-click converter is not yet available. Thumbnails alone cannot play a scene.
Verify the original files
Inputs include the selected NIS, matching GLOBAL camera assets and verified camera descriptions; UG2 also uses EvtTrk. Read only the required files, preserve the source game and record sizes/SHA256. Convert normal race intros without mixing in story-only scenes.
Convert and validate each scene
In the development tree tools/CarbonIntro, Carbon uses prepare_variants and export_variant; UG2 uses prepare_ug2_one, prepare_ug2_batch and the matching export_ug2 scripts. Validate actors, car layout, camera and GO timing separately. Do not add actor assets to camera-only scenes.
Install into your own game
Install only the runtimeFiles listed by runtime_manifest under scripts/EventLoader/CustomCutscenes/scene-ID. camera.cic, cars.cic, actor-clock.bin, scene-timing.bin and other files must match that scene manifest. Exclude camera.raw, original BUN/EXE files and research NPZ files.
Keep scene decoding and recording distinct
Scene audio is a separate step. Validate a confirmed PCM16 WAV and audio-timing.bin together with scene_audio. Current limits are mono/stereo, 8–96 kHz, 60 seconds and 8 MiB. export_scene_wav decodes a local ABK; it does not record audio. Do not claim original-audio fidelity for unidentified samples.
Selection and gameplay checks
Select a scene matching the participant count and playtest intro-to-GO, cancel, retry and transition to another event. Missing assets fall back to the original MW intro. Do not include converted source-game assets in general event distributions.
W Chrome lub Edge otwórz Zarządzanie grą/konfiguracją. W obszarze Dodaj konfigurację gry wprowadź nazwę, wybierz typ z listy rozwijanej, a następnie wybierz opcję Przeczytaj folder gry i wybierz folder zawierający speed.exe. Wstępne przygotowanie może zająć kilka minut. Nie jest wymagany zewnętrzny interfejs graficzny ani przygotowany folder konfiguracyjny. Pliki gry nie są przesyłane.
Supported worlds and baseline
The original Rockport world is supported. W2C events require the matching W2C world. The baseline is captured when the cache is prepared. After changing world files or textures, back up your editing JSON before updating the configuration from the same game folder. Game files are not uploaded.
Update a configuration from the game folder
Wybierz konfigurację w Zarządzanie konfiguracją i naciśnij Aktualizuj konfigurację. Aktualizacja rozpoczyna się natychmiast po udostępnieniu folderu z zapamiętaną grą. Zostaniesz poproszony o wybranie folderu zawierającego speed.exe tylko wtedy, gdy lokalizacji brakuje lub jest ona niedostępna. Zmiany i identyfikator konfiguracji zostaną zachowane. Dodaj osobną konfigurację, jeśli świat lub układ dróg jest inny.
Ponowne otwieranie konfiguracji lub przełączanie między nimi
Po ponownym otwarciu lub przełączeniu konfiguracji przywracane jest tylko zapisane łącze do folderu gry i jego nazwa. Folder nie jest skanowany i wydarzenia nie są importowane. Każda konfiguracja ma własną listę wydarzeń.
Gdy przygotowywana jest geometria
Dane podglądu edytora 3D są przygotowywane w momencie dodania lub aktualizacji konfiguracji. EventLoader automatycznie buduje geometrię gry z instalacji odbiorczej, jeśli jest to potrzebne, przed rozpoczęciem docelowego wydarzenia. Nie jest wymagany eksport geometrii z edytora.
2. Select or create an event
Event selection and top-bar actions
Importuj wydarzenia jawnie, wybierając Zarządzanie konfiguracją → Wczytaj wydarzenia z gry. Edytor użyje połączonego folderu i poprosi o jego wskazanie, jeśli jest niedostępny. Możesz też zaimportować inny folder gry lub wydarzeń albo udostępnione archiwum ZIP. Import sprawdza zawartość plików i zgodność mapy, zachowując identyfikatory UUID i rozmieszczenie. Import z innego źródła nie zmienia połączonego folderu gry tej konfiguracji.
Correct native events and delete added events
To correct a native event, use Project → This course → Correct native event. Deletion affects the browser list; it does not uninstall files already written to the game. Undo deletion restores the last deletion.
3. Navigate the 3D view
3D camera controls and tool help
Tools are on the left, the 3D view is central, and Event, Selection and Validation are on the right. Hover or keyboard-focus a tool for illustrated help. Left-drag empty space to orbit, right-drag to pan, and scroll to zoom. PageUp/PageDown adjusts height; hold Shift for a larger step. Top view and Focus selection are also available.
Visible labels and display layers
Visible labels toggles text by category. Display layers toggles world geometry, roads, gate volumes, objects and the grid. Hiding labels never removes placed objects. Label preferences are stored in this browser.
4. Required gates and shortcuts
Gate key: START = starting grid; FINISH/LAP = finish or lap line; CP = required checkpoint; SC = optional shortcut.
Gate types, colors and required markers
Green START, orange FINISH/LAP and cyan CP carry a small ! badge. Pink SC is an optional shortcut, not a checkpoint. Reset gates are red. Tool colors match the labels.
Place, orient and order gates
Choose a placement tool and click the road. Select an object and adjust it with 3D handles or numeric position, rotation and size. Face it along the route and cover the road width. Reorder CPs with Order up/down. Start and finish map icons are automatic.
Circuits starting on a branch
For a circuit starting on a branch, check both the initial entry and the merge on later laps. Start and lap line can be separate. Alternatives and shortcuts must not skip checkpoints.
5. Routes, barriers and AI
Route diagram: yellow MAIN is the main route, pink SHORTCUT is a shortcut, and green FREE CURVE is Fill / AI optimization. Secondary routes, exclusions, walls and right-panel settings are explained separately below.
Main route (yellow)
Trace the blue road lines defined by the game to select the main route. Complete the route. Placed gates determine its direction automatically. This route appears on the map.
Secondary route (orange)
Trace the blue road lines defined by the game to select a secondary route. Connect it to the yellow main route. Placed gates determine its direction automatically. This route appears on the map.
Shortcut (pink)
Trace the blue road lines to define an optional shortcut for NeoAI. Placed gates determine its direction automatically. Shortcuts do not appear on the map. Placing shortcut gates as well is recommended.
Fill / AI optimization (green)
Use this for routes without blue road lines. The curve inherits its role from the connected route. Draw it in place of the corresponding colored route to optimize the NeoAI driving line.
AI discouraged (brown): exclude from route choices
Exclude routes from NeoAI route choices. No connection to the main route is required. These lines do not appear on the map.
Barrier walls: block a path
Click to place one barrier wall, or drag to place a continuous run. Edit individual walls after confirming. Check their facing and orientation. A wall crossing a blue road line prevents NeoAI from choosing that path.
AI obstacle markers: assist avoidance
Effective, but still being tuned. Place over indestructible objects such as central dividers that AI struggles to avoid, giving it more time to anticipate avoidance. This does not guarantee complete control.
Replace the race map
Generate a dedicated race map by drawing the configured routes onto the extracted world map.
Guide NeoAI with map lines
Guide AI along the configured routes. When enabled, Event Loader’s NeoAI controls the vehicles instead of the original game AI. When disabled, the original game AI controls them.
Select cars similar to the player
Set the vehicle regulations: select rival cars with a similar price range and performance to the player’s car. When disabled, selection follows the blacklist rank.
Objects and passage order reviewed
Optional self-check switch. It has no effect on the game.
6. Race-specific editing
Speedtrap: measurement points
Speedtrap uses the speed trap tool. Measurement points are separate from CPs, up to 16, with a count card on the left. Select points to edit radius and order.
Tollbooth: toll locations and bonus time
In Tollbooth mode, click a 3D tollbooth candidate and assign Start, timed Passage or Finish. Check order and bonus time in the list. Use free passage-point placement where no native tollbooth exists.
Lap Knockout: participants and laps
Lap Knockout eliminates one racer per lap; four participants require at least three laps. Check participants and laps. Drag and other modes expose their own settings.
7. Properties and cutscenes
Select Arms Race (prototype)
Select Arms Race under Combat mode in Event Properties. Sprint, Circuit, Lap Knockout and Speed Trap can be used as the racing rules. Compatible Event Loader, MWArsenal and ArmsAssist are required. Without them, the editor disables the option and the game does not register the event.
Select Hot Pursuit (prototype)
Maximum eight racers. Pursuit starts individually after 25% race progress, with up to two chase cars per racer. Roadblocks and helicopters are separate. With survival-reward builds, any genuine finish is a clear and reward equals configured cash x survivors / finish position. A racer destroying Cross at heat 5 or higher restores 15% HP to surviving racers, and finished AI keep fleeing. Event Properties shows the rules supported by the connected MOD builds. Older supported builds do not gain these new rules.
Hot Pursuit requirements and settings
Connect the game folder containing MWArsenal and the validated Hot Pursuit builds of Event Loader and ArmsAssist. Older builds leave the option disabled. Choose Sprint or Speedtrap rules, starting heat, ammunition and cutscene. Police are always enabled.
Health, crash retirement and retry
Human and AI racers have 300 HP. EMP deals 25 damage, Spike 50 and Shockwave 15. An AI racer at zero HP retires through the native crash outcome while the remaining racers continue. A player at zero HP enters the native losing results screen with Restart available. Restart resets event health and ammunition. Arrests retain the native arrest scene.
Starting ammunition per weapon
Specify starting ammunition per weapon. Leave a field blank to use the ArmsAssist INI; zero disables that weapon. Specified counts are refilled at the start and on restart, and AI racers receive the same counts. Player equipment and INIs are preserved. Temporary event ammunition is released on exit.
Normal race behavior
Normal races lock weapons and hide the weapon HUD even with police enabled. Explicitly select a weapon-enabled event mode to use weapons. Drift Race remains unavailable.
Edit and apply event properties
Top-bar Properties and Open event properties on the right open the same dialog. Set name, ID, blacklist rank, type, participants, reward, traffic and police, then Apply. Cancel restores the state from when the dialog opened.
Select a cutscene and inspect its preview
Hover a scene or navigate with arrow keys for its image and grid diagram. Some Carbon previews show an actor pose with a layout diagram. Camera-only scenes are marked as having no actor. Slot 1 is the player. Scenes with a different participant count cannot be selected.
Starting-grid layout preview
The 3D grid follows the selected scene's countdown layout and road surface. Automatic and original-MW modes show an estimate; the final layout is chosen in game. Check that it fits the road.
Required resources for additional cutscenes
Additional scenes require resources converted locally from legitimate Carbon/Underground 2 files. Preview images alone cannot play a scene. Missing assets or unsuitable runtime conditions fall back to the original presentation.
8. Map card and rendering
Lower-left map card: switch its content with the tabs and resize the card with its top-right handle.
Lower-left map card: tabs and auto fit
Switch between World, Course map and After-edit preview at the lower left. World automatically fits placed objects, or the whole world when empty. Toggle Auto fit for whole-world bounds. Reset clears additional pan and zoom.
Map-card size and rendering properties
Drag the top-right handle to resize freely, or focus it and use arrow keys. Size is restored next time. Rendering properties controls VRAM budget, resolution and loading concurrency. The budget is not a guarantee of available VRAM.
9. Validate, save and install
Validation, warning markers and copying errors
Use Validation to check passage order, connections and foldbacks. Select a gap ! marker or issue to focus it. Error-card contents can be copied. Ctrl+Z undoes; Ctrl+Y redoes.
Browser storage and editing JSON backups
Zapisz w przeglądarce przechowuje zmiany w bieżącej konfiguracji. Aby uzyskać edytowalną kopię zapasową, użyj opcji Zarządzanie konfiguracją / Zapisz wszystkie dane do edycji, aby pobrać JSON. Uprawnienia do przechowywania i folderów nie są współdzielone pomiędzy przeglądarkami ani źródłami. Szczegóły pamięci i pamięci podręcznej pokazują użycie i stan pamięci trwałej. Użyj opcji Importuj wszystkie dane edycyjne, aby przywrócić zapisany JSON. Dodawane są wydarzenia bez pasującego wpisu. Gdy istniejące wydarzenie ulegnie zmianie, ostrzeżenie wyświetli jego nazwę. Anuluj pozostawia wszystkie zdarzenia bez zmian.
Export to game and ZIP installation
W Eksportowaniu zdarzeń wybierz Eksportuj bieżące wydarzenie lub Eksportuj wszystkie zapisane zdarzenia. Po wygenerowaniu wybierz Zapisz wygenerowany ZIP. Zamknij grę i programy uruchamiające, a następnie skopiuj folder skryptów z ZIP do folderu zawierającego speed.exe. ZIP zawiera tylko dane o zdarzeniach, bez modułów ASI i instalatora. Zapis bezpośredni jest dostępny w opcjach zaawansowanych na tym samym ekranie.
Post-install checks and configuration fingerprint mismatches
After installation, playtest start, checkpoints, finish, exit and re-entry. Do not redistribute game files or converted scene resources. Close and reopen the app if old UI remains. For fingerprint mismatches, back up edits and update the configuration from the same game.
Options menu and bug reports
The upper-right … menu contains language, app installation and support. Include event name, reproduction steps and copied error details when reporting a problem. You do not need to send the entire game.
Recover from an unresponsive worker or failed generation
Export generation has a ten-minute response limit; configuration preparation has a fifteen-minute limit. A timeout terminates the worker; transfer failures can also be retried. Existing game files and configurations are not updated before generation/preparation succeeds.
10. Required mods and installation order
Normal-event prerequisites
Normal events require a supported English 1.3 speed.exe, an ASI loader and Event Loader. Preserve Japanese assets, existing INIs and saves. Do not install the same ASI both in the game root and scripts.
NeoAI and NFRR
Current NeoAI combines control inside Event Loader with the vehicle-scope adapter from a compatible NFRR. Native-AI events do not require NFRR. Performance matching also uses compatible NFRR calibration for the selected configuration.
Combat modes, expanded grids and HUD
Arms Race, Gauntlet and Hot Pursuit require compatible Event Loader and ArmsAssist plus a separately installed MWArsenal and its assets. Use compatible Limit Breaker for more than four participants and the suite HUD fixes for HP/HUD coexistence. MWArsenal alone does not register these modes.
Installation and verification order
Zamknij grę i programy uruchamiające i osobno zainstaluj wymagane mody. Skopiuj folder skryptów z edytora ZIP do gry lub użyj bezpośredniego zapisu w zaawansowanych opcjach eksportu. Sprawdź początek, punkty kontrolne, zakończenie, ponowną próbę, wyjście i następne wydarzenie.
11. Game data and recorded SFX
Local resources and distributable files
The editor extracts world, map and model data locally. Do not add configuration caches, source executables, BUN files, audio banks, profiles or Shadow/vault to event distribution ZIPs. Users install the required mods and world separately. Bug reporting is a separate action with reviewed submission content.
Dźwięki zastępcze w pakiecie ArmsAssist
Sprawdź pliki pakietu
Pakiet dystrybucyjny ArmsAssist zawiera cztery zastępcze efekty w scripts/MWArmsAssist: Drop.wav, PlayerDrop.wav, Lock_by_police.wav i repair-complete.wav. Używaj plików dostarczonych z tym pakietem. Wcześniejsze opisy tych plików jako źródłowych dźwięków NFSHP, nagrań dźwięku z gry lub oryginalnych dźwięków nie opisują poprawnie obecnego zestawu zastępczego.
Lista plików i dane weryfikacyjne znajdują się w plikach manifest.json pakietu. Przed wymianą dźwięków w istniejącej instalacji zamknij grę i wykonaj kopię zapasową obecnych plików. Banki dźwięków i nieużywane efekty SFX nie są dołączane.
12. Local conversion of additional cutscenes
Conversion prerequisites and availability
Convert scenes locally from your legitimate Carbon/UG2 files. Current development scripts depend on verified input paths and versions; a general one-click converter is not yet available. Thumbnails alone cannot play a scene.
Verify the original files
Inputs include the selected NIS, matching GLOBAL camera assets and verified camera descriptions; UG2 also uses EvtTrk. Read only the required files, preserve the source game and record sizes/SHA256. Convert normal race intros without mixing in story-only scenes.
Convert and validate each scene
In the development tree tools/CarbonIntro, Carbon uses prepare_variants and export_variant; UG2 uses prepare_ug2_one, prepare_ug2_batch and the matching export_ug2 scripts. Validate actors, car layout, camera and GO timing separately. Do not add actor assets to camera-only scenes.
Install into your own game
Install only the runtimeFiles listed by runtime_manifest under scripts/EventLoader/CustomCutscenes/scene-ID. camera.cic, cars.cic, actor-clock.bin, scene-timing.bin and other files must match that scene manifest. Exclude camera.raw, original BUN/EXE files and research NPZ files.
Keep scene decoding and recording distinct
Scene audio is a separate step. Validate a confirmed PCM16 WAV and audio-timing.bin together with scene_audio. Current limits are mono/stereo, 8–96 kHz, 60 seconds and 8 MiB. export_scene_wav decodes a local ABK; it does not record audio. Do not claim original-audio fidelity for unidentified samples.
Selection and gameplay checks
Select a scene matching the participant count and playtest intro-to-GO, cancel, retry and transition to another event. Missing assets fall back to the original MW intro. Do not include converted source-game assets in general event distributions.
В Chrome или Edge откройте Управление игрой/конфигурацией. В разделе «Добавить конфигурацию игры» введите имя, выберите тип из раскрывающегося списка, затем выберите «Прочитать папку игры» и выберите папку, содержащую speed.exe. Первоначальная подготовка может занять несколько минут. Никакого внешнего графического интерфейса или подготовленной папки конфигурации не требуется. Файлы игры не загружаются.
Supported worlds and baseline
The original Rockport world is supported. W2C events require the matching W2C world. The baseline is captured when the cache is prepared. After changing world files or textures, back up your editing JSON before updating the configuration from the same game folder. Game files are not uploaded.
Update a configuration from the game folder
Выберите конфигурацию в разделе «Управление конфигурацией» и нажмите «Обновить конфигурацию». Обновление начинается сразу, как только запомненная папка с игрой станет доступна. Вам будет предложено выбрать папку, содержащую speed.exe, только если местоположение отсутствует или недоступно. Изменения и идентификатор конфигурации сохраняются. Добавьте отдельную конфигурацию, если расположение мира или дороги отличается.
Повторное открытие или переключение конфигураций
При повторном открытии или переключении конфигурации восстанавливаются только сохранённая ссылка на папку игры и её имя. Папка не сканируется, а события не импортируются. У каждой конфигурации собственный список событий.
Когда геометрия подготовлена
Данные предварительного просмотра редактора 3D подготавливаются при добавлении или обновлении конфигурации. EventLoader автоматически создает игровую геометрию из принимающей установки, когда это необходимо, до начала целевого события. Экспорт геометрии из редактора не требуется.
2. Select or create an event
Event selection and top-bar actions
Импортируйте события явно: Управление конфигурациями → Прочитать события из игры. Редактор использует связанную папку и попросит выбрать её, если доступ отсутствует. Также можно импортировать другую папку игры или событий либо общий ZIP-архив. При импорте проверяются содержимое файлов и совместимость карты, UUID и размещение сохраняются. Импорт из другого источника не меняет папку игры, связанную с этой конфигурацией.
Correct native events and delete added events
To correct a native event, use Project → This course → Correct native event. Deletion affects the browser list; it does not uninstall files already written to the game. Undo deletion restores the last deletion.
3. Navigate the 3D view
3D camera controls and tool help
Tools are on the left, the 3D view is central, and Event, Selection and Validation are on the right. Hover or keyboard-focus a tool for illustrated help. Left-drag empty space to orbit, right-drag to pan, and scroll to zoom. PageUp/PageDown adjusts height; hold Shift for a larger step. Top view and Focus selection are also available.
Visible labels and display layers
Visible labels toggles text by category. Display layers toggles world geometry, roads, gate volumes, objects and the grid. Hiding labels never removes placed objects. Label preferences are stored in this browser.
4. Required gates and shortcuts
Gate key: START = starting grid; FINISH/LAP = finish or lap line; CP = required checkpoint; SC = optional shortcut.
Gate types, colors and required markers
Green START, orange FINISH/LAP and cyan CP carry a small ! badge. Pink SC is an optional shortcut, not a checkpoint. Reset gates are red. Tool colors match the labels.
Place, orient and order gates
Choose a placement tool and click the road. Select an object and adjust it with 3D handles or numeric position, rotation and size. Face it along the route and cover the road width. Reorder CPs with Order up/down. Start and finish map icons are automatic.
Circuits starting on a branch
For a circuit starting on a branch, check both the initial entry and the merge on later laps. Start and lap line can be separate. Alternatives and shortcuts must not skip checkpoints.
5. Routes, barriers and AI
Route diagram: yellow MAIN is the main route, pink SHORTCUT is a shortcut, and green FREE CURVE is Fill / AI optimization. Secondary routes, exclusions, walls and right-panel settings are explained separately below.
Main route (yellow)
Trace the blue road lines defined by the game to select the main route. Complete the route. Placed gates determine its direction automatically. This route appears on the map.
Secondary route (orange)
Trace the blue road lines defined by the game to select a secondary route. Connect it to the yellow main route. Placed gates determine its direction automatically. This route appears on the map.
Shortcut (pink)
Trace the blue road lines to define an optional shortcut for NeoAI. Placed gates determine its direction automatically. Shortcuts do not appear on the map. Placing shortcut gates as well is recommended.
Fill / AI optimization (green)
Use this for routes without blue road lines. The curve inherits its role from the connected route. Draw it in place of the corresponding colored route to optimize the NeoAI driving line.
AI discouraged (brown): exclude from route choices
Exclude routes from NeoAI route choices. No connection to the main route is required. These lines do not appear on the map.
Barrier walls: block a path
Click to place one barrier wall, or drag to place a continuous run. Edit individual walls after confirming. Check their facing and orientation. A wall crossing a blue road line prevents NeoAI from choosing that path.
AI obstacle markers: assist avoidance
Effective, but still being tuned. Place over indestructible objects such as central dividers that AI struggles to avoid, giving it more time to anticipate avoidance. This does not guarantee complete control.
Replace the race map
Generate a dedicated race map by drawing the configured routes onto the extracted world map.
Guide NeoAI with map lines
Guide AI along the configured routes. When enabled, Event Loader’s NeoAI controls the vehicles instead of the original game AI. When disabled, the original game AI controls them.
Select cars similar to the player
Set the vehicle regulations: select rival cars with a similar price range and performance to the player’s car. When disabled, selection follows the blacklist rank.
Objects and passage order reviewed
Optional self-check switch. It has no effect on the game.
6. Race-specific editing
Speedtrap: measurement points
Speedtrap uses the speed trap tool. Measurement points are separate from CPs, up to 16, with a count card on the left. Select points to edit radius and order.
Tollbooth: toll locations and bonus time
In Tollbooth mode, click a 3D tollbooth candidate and assign Start, timed Passage or Finish. Check order and bonus time in the list. Use free passage-point placement where no native tollbooth exists.
Lap Knockout: participants and laps
Lap Knockout eliminates one racer per lap; four participants require at least three laps. Check participants and laps. Drag and other modes expose their own settings.
7. Properties and cutscenes
Select Arms Race (prototype)
Select Arms Race under Combat mode in Event Properties. Sprint, Circuit, Lap Knockout and Speed Trap can be used as the racing rules. Compatible Event Loader, MWArsenal and ArmsAssist are required. Without them, the editor disables the option and the game does not register the event.
Select Hot Pursuit (prototype)
Maximum eight racers. Pursuit starts individually after 25% race progress, with up to two chase cars per racer. Roadblocks and helicopters are separate. With survival-reward builds, any genuine finish is a clear and reward equals configured cash x survivors / finish position. A racer destroying Cross at heat 5 or higher restores 15% HP to surviving racers, and finished AI keep fleeing. Event Properties shows the rules supported by the connected MOD builds. Older supported builds do not gain these new rules.
Hot Pursuit requirements and settings
Connect the game folder containing MWArsenal and the validated Hot Pursuit builds of Event Loader and ArmsAssist. Older builds leave the option disabled. Choose Sprint or Speedtrap rules, starting heat, ammunition and cutscene. Police are always enabled.
Health, crash retirement and retry
Human and AI racers have 300 HP. EMP deals 25 damage, Spike 50 and Shockwave 15. An AI racer at zero HP retires through the native crash outcome while the remaining racers continue. A player at zero HP enters the native losing results screen with Restart available. Restart resets event health and ammunition. Arrests retain the native arrest scene.
Starting ammunition per weapon
Specify starting ammunition per weapon. Leave a field blank to use the ArmsAssist INI; zero disables that weapon. Specified counts are refilled at the start and on restart, and AI racers receive the same counts. Player equipment and INIs are preserved. Temporary event ammunition is released on exit.
Normal race behavior
Normal races lock weapons and hide the weapon HUD even with police enabled. Explicitly select a weapon-enabled event mode to use weapons. Drift Race remains unavailable.
Edit and apply event properties
Top-bar Properties and Open event properties on the right open the same dialog. Set name, ID, blacklist rank, type, participants, reward, traffic and police, then Apply. Cancel restores the state from when the dialog opened.
Select a cutscene and inspect its preview
Hover a scene or navigate with arrow keys for its image and grid diagram. Some Carbon previews show an actor pose with a layout diagram. Camera-only scenes are marked as having no actor. Slot 1 is the player. Scenes with a different participant count cannot be selected.
Starting-grid layout preview
The 3D grid follows the selected scene's countdown layout and road surface. Automatic and original-MW modes show an estimate; the final layout is chosen in game. Check that it fits the road.
Required resources for additional cutscenes
Additional scenes require resources converted locally from legitimate Carbon/Underground 2 files. Preview images alone cannot play a scene. Missing assets or unsuitable runtime conditions fall back to the original presentation.
8. Map card and rendering
Lower-left map card: switch its content with the tabs and resize the card with its top-right handle.
Lower-left map card: tabs and auto fit
Switch between World, Course map and After-edit preview at the lower left. World automatically fits placed objects, or the whole world when empty. Toggle Auto fit for whole-world bounds. Reset clears additional pan and zoom.
Map-card size and rendering properties
Drag the top-right handle to resize freely, or focus it and use arrow keys. Size is restored next time. Rendering properties controls VRAM budget, resolution and loading concurrency. The budget is not a guarantee of available VRAM.
9. Validate, save and install
Validation, warning markers and copying errors
Use Validation to check passage order, connections and foldbacks. Select a gap ! marker or issue to focus it. Error-card contents can be copied. Ctrl+Z undoes; Ctrl+Y redoes.
Browser storage and editing JSON backups
Сохранение в браузере сохраняет изменения в текущей конфигурации. Для редактируемой резервной копии используйте «Управление конфигурацией» / «Сохранить все данные редактирования», чтобы загрузить JSON. Разрешения на хранилище и папки не распределяются между браузерами и источниками. Сведения о хранилище и кэше показывают использование и состояние постоянного хранилища. Используйте «Импортировать все данные редактирования», чтобы восстановить сохраненный JSON. Добавляются события без соответствующей записи. Если существующее событие изменится, в предупреждении будет указано его имя. Отмена оставляет все события без изменений.
Export to game and ZIP installation
В разделе «Экспорт событий» выберите «Экспортировать текущее событие» или «Экспортировать все сохраненные события». После генерации выберите «Сохранить сгенерированный ZIP». Закройте игру и лаунчеры, затем скопируйте папку со скриптами из ZIP в папку, содержащую speed.exe. ZIP содержит только данные о событиях, без модулей или установщика ASI. Прямое написание доступно в дополнительных параметрах на том же экране.
Post-install checks and configuration fingerprint mismatches
After installation, playtest start, checkpoints, finish, exit and re-entry. Do not redistribute game files or converted scene resources. Close and reopen the app if old UI remains. For fingerprint mismatches, back up edits and update the configuration from the same game.
Options menu and bug reports
The upper-right … menu contains language, app installation and support. Include event name, reproduction steps and copied error details when reporting a problem. You do not need to send the entire game.
Recover from an unresponsive worker or failed generation
Export generation has a ten-minute response limit; configuration preparation has a fifteen-minute limit. A timeout terminates the worker; transfer failures can also be retried. Existing game files and configurations are not updated before generation/preparation succeeds.
10. Required mods and installation order
Normal-event prerequisites
Normal events require a supported English 1.3 speed.exe, an ASI loader and Event Loader. Preserve Japanese assets, existing INIs and saves. Do not install the same ASI both in the game root and scripts.
NeoAI and NFRR
Current NeoAI combines control inside Event Loader with the vehicle-scope adapter from a compatible NFRR. Native-AI events do not require NFRR. Performance matching also uses compatible NFRR calibration for the selected configuration.
Combat modes, expanded grids and HUD
Arms Race, Gauntlet and Hot Pursuit require compatible Event Loader and ArmsAssist plus a separately installed MWArsenal and its assets. Use compatible Limit Breaker for more than four participants and the suite HUD fixes for HP/HUD coexistence. MWArsenal alone does not register these modes.
Installation and verification order
Закройте игру и программу запуска и установите необходимые моды отдельно. Скопируйте папку скриптов из редактора ZIP в игру или используйте прямую запись в расширенных параметрах экспорта. Проверьте начало, контрольные точки, финиш, повтор, выход и следующее событие.
11. Game data and recorded SFX
Local resources and distributable files
The editor extracts world, map and model data locally. Do not add configuration caches, source executables, BUN files, audio banks, profiles or Shadow/vault to event distribution ZIPs. Users install the required mods and world separately. Bug reporting is a separate action with reviewed submission content.
Звуки-замены в пакете ArmsAssist
Проверка файлов пакета
Пакет ArmsAssist включает четыре эффекта-замены в папке scripts/MWArmsAssist: Drop.wav, PlayerDrop.wav, Lock_by_police.wav и repair-complete.wav. Используйте файлы из этого пакета. Прежние описания этих файлов как исходных звуков NFSHP, записей игрового звука или оригинальных звуков не соответствуют текущему набору замен.
Список файлов и данные для проверки приведены в manifest.json внутри пакета. Перед заменой звуков в существующей установке закройте игру и сохраните резервные копии текущих файлов. Звуковые банки и неиспользуемые SFX не включены.
12. Local conversion of additional cutscenes
Conversion prerequisites and availability
Convert scenes locally from your legitimate Carbon/UG2 files. Current development scripts depend on verified input paths and versions; a general one-click converter is not yet available. Thumbnails alone cannot play a scene.
Verify the original files
Inputs include the selected NIS, matching GLOBAL camera assets and verified camera descriptions; UG2 also uses EvtTrk. Read only the required files, preserve the source game and record sizes/SHA256. Convert normal race intros without mixing in story-only scenes.
Convert and validate each scene
In the development tree tools/CarbonIntro, Carbon uses prepare_variants and export_variant; UG2 uses prepare_ug2_one, prepare_ug2_batch and the matching export_ug2 scripts. Validate actors, car layout, camera and GO timing separately. Do not add actor assets to camera-only scenes.
Install into your own game
Install only the runtimeFiles listed by runtime_manifest under scripts/EventLoader/CustomCutscenes/scene-ID. camera.cic, cars.cic, actor-clock.bin, scene-timing.bin and other files must match that scene manifest. Exclude camera.raw, original BUN/EXE files and research NPZ files.
Keep scene decoding and recording distinct
Scene audio is a separate step. Validate a confirmed PCM16 WAV and audio-timing.bin together with scene_audio. Current limits are mono/stereo, 8–96 kHz, 60 seconds and 8 MiB. export_scene_wav decodes a local ABK; it does not record audio. Do not claim original-audio fidelity for unidentified samples.
Selection and gameplay checks
Select a scene matching the participant count and playtest intro-to-GO, cancel, retry and transition to another event. Missing assets fall back to the original MW intro. Do not include converted source-game assets in general event distributions.
Chrome 또는 Edge에서 게임/구성 관리를 엽니다. 게임 구성 추가에서 이름을 입력하고 드롭다운에서 유형을 선택한 다음 게임 폴더 읽기를 선택하고 speed.exe가 포함된 폴더를 선택합니다. 초기 준비에는 몇 분 정도 걸릴 수 있습니다. 외부 GUI나 준비된 구성 폴더가 필요하지 않습니다. 게임 파일이 업로드되지 않습니다.
Supported worlds and baseline
The original Rockport world is supported. W2C events require the matching W2C world. The baseline is captured when the cache is prepared. After changing world files or textures, back up your editing JSON before updating the configuration from the same game folder. Game files are not uploaded.
Update a configuration from the game folder
구성 관리에서 구성을 선택하고 구성 업데이트를 누릅니다. 기억된 게임 폴더에 접근할 수 있게 되면 즉시 업데이트가 시작됩니다. 위치가 없거나 사용할 수 없는 경우에만 speed.exe가 포함된 폴더를 선택하라는 메시지가 표시됩니다. 편집 내용과 구성 ID는 유지됩니다. 세계나 도로 레이아웃이 다를 경우 별도의 구성을 추가하세요.
구성을 다시 열거나 전환하기
구성을 다시 열거나 전환하면 저장된 게임 폴더 연결과 폴더 이름만 복원됩니다. 폴더를 검색하거나 이벤트를 가져오지 않습니다. 구성마다 이벤트 목록이 따로 유지됩니다.
기하학이 준비되면
Editor 3D 미리보기 데이터는 구성이 추가되거나 업데이트될 때 준비됩니다. EventLoader는 대상 이벤트가 시작되기 전에 필요할 때 수신 설치로부터 게임 지오메트리를 자동으로 구축합니다. 편집기에서 형상을 내보낼 필요가 없습니다.
2. Select or create an event
Event selection and top-bar actions
이벤트를 가져오려면 구성 관리 → 게임 이벤트 읽기를 명시적으로 선택하세요. 편집기는 연결된 폴더를 사용하며, 접근할 수 없으면 폴더를 다시 선택하도록 안내합니다. 다른 게임/이벤트 폴더나 공유 ZIP도 가져올 수 있습니다. 가져올 때 파일 내용과 맵 호환성을 확인하고 UUID와 배치를 유지합니다. 다른 위치에서 가져와도 이 구성에 연결된 게임 폴더는 바뀌지 않습니다.
Correct native events and delete added events
To correct a native event, use Project → This course → Correct native event. Deletion affects the browser list; it does not uninstall files already written to the game. Undo deletion restores the last deletion.
3. Navigate the 3D view
3D camera controls and tool help
Tools are on the left, the 3D view is central, and Event, Selection and Validation are on the right. Hover or keyboard-focus a tool for illustrated help. Left-drag empty space to orbit, right-drag to pan, and scroll to zoom. PageUp/PageDown adjusts height; hold Shift for a larger step. Top view and Focus selection are also available.
Visible labels and display layers
Visible labels toggles text by category. Display layers toggles world geometry, roads, gate volumes, objects and the grid. Hiding labels never removes placed objects. Label preferences are stored in this browser.
4. Required gates and shortcuts
Gate key: START = starting grid; FINISH/LAP = finish or lap line; CP = required checkpoint; SC = optional shortcut.
Gate types, colors and required markers
Green START, orange FINISH/LAP and cyan CP carry a small ! badge. Pink SC is an optional shortcut, not a checkpoint. Reset gates are red. Tool colors match the labels.
Place, orient and order gates
Choose a placement tool and click the road. Select an object and adjust it with 3D handles or numeric position, rotation and size. Face it along the route and cover the road width. Reorder CPs with Order up/down. Start and finish map icons are automatic.
Circuits starting on a branch
For a circuit starting on a branch, check both the initial entry and the merge on later laps. Start and lap line can be separate. Alternatives and shortcuts must not skip checkpoints.
5. Routes, barriers and AI
Route diagram: yellow MAIN is the main route, pink SHORTCUT is a shortcut, and green FREE CURVE is Fill / AI optimization. Secondary routes, exclusions, walls and right-panel settings are explained separately below.
Main route (yellow)
Trace the blue road lines defined by the game to select the main route. Complete the route. Placed gates determine its direction automatically. This route appears on the map.
Secondary route (orange)
Trace the blue road lines defined by the game to select a secondary route. Connect it to the yellow main route. Placed gates determine its direction automatically. This route appears on the map.
Shortcut (pink)
Trace the blue road lines to define an optional shortcut for NeoAI. Placed gates determine its direction automatically. Shortcuts do not appear on the map. Placing shortcut gates as well is recommended.
Fill / AI optimization (green)
Use this for routes without blue road lines. The curve inherits its role from the connected route. Draw it in place of the corresponding colored route to optimize the NeoAI driving line.
AI discouraged (brown): exclude from route choices
Exclude routes from NeoAI route choices. No connection to the main route is required. These lines do not appear on the map.
Barrier walls: block a path
Click to place one barrier wall, or drag to place a continuous run. Edit individual walls after confirming. Check their facing and orientation. A wall crossing a blue road line prevents NeoAI from choosing that path.
AI obstacle markers: assist avoidance
Effective, but still being tuned. Place over indestructible objects such as central dividers that AI struggles to avoid, giving it more time to anticipate avoidance. This does not guarantee complete control.
Replace the race map
Generate a dedicated race map by drawing the configured routes onto the extracted world map.
Guide NeoAI with map lines
Guide AI along the configured routes. When enabled, Event Loader’s NeoAI controls the vehicles instead of the original game AI. When disabled, the original game AI controls them.
Select cars similar to the player
Set the vehicle regulations: select rival cars with a similar price range and performance to the player’s car. When disabled, selection follows the blacklist rank.
Objects and passage order reviewed
Optional self-check switch. It has no effect on the game.
6. Race-specific editing
Speedtrap: measurement points
Speedtrap uses the speed trap tool. Measurement points are separate from CPs, up to 16, with a count card on the left. Select points to edit radius and order.
Tollbooth: toll locations and bonus time
In Tollbooth mode, click a 3D tollbooth candidate and assign Start, timed Passage or Finish. Check order and bonus time in the list. Use free passage-point placement where no native tollbooth exists.
Lap Knockout: participants and laps
Lap Knockout eliminates one racer per lap; four participants require at least three laps. Check participants and laps. Drag and other modes expose their own settings.
7. Properties and cutscenes
Select Arms Race (prototype)
Select Arms Race under Combat mode in Event Properties. Sprint, Circuit, Lap Knockout and Speed Trap can be used as the racing rules. Compatible Event Loader, MWArsenal and ArmsAssist are required. Without them, the editor disables the option and the game does not register the event.
Select Hot Pursuit (prototype)
Maximum eight racers. Pursuit starts individually after 25% race progress, with up to two chase cars per racer. Roadblocks and helicopters are separate. With survival-reward builds, any genuine finish is a clear and reward equals configured cash x survivors / finish position. A racer destroying Cross at heat 5 or higher restores 15% HP to surviving racers, and finished AI keep fleeing. Event Properties shows the rules supported by the connected MOD builds. Older supported builds do not gain these new rules.
Hot Pursuit requirements and settings
Connect the game folder containing MWArsenal and the validated Hot Pursuit builds of Event Loader and ArmsAssist. Older builds leave the option disabled. Choose Sprint or Speedtrap rules, starting heat, ammunition and cutscene. Police are always enabled.
Health, crash retirement and retry
Human and AI racers have 300 HP. EMP deals 25 damage, Spike 50 and Shockwave 15. An AI racer at zero HP retires through the native crash outcome while the remaining racers continue. A player at zero HP enters the native losing results screen with Restart available. Restart resets event health and ammunition. Arrests retain the native arrest scene.
Starting ammunition per weapon
Specify starting ammunition per weapon. Leave a field blank to use the ArmsAssist INI; zero disables that weapon. Specified counts are refilled at the start and on restart, and AI racers receive the same counts. Player equipment and INIs are preserved. Temporary event ammunition is released on exit.
Normal race behavior
Normal races lock weapons and hide the weapon HUD even with police enabled. Explicitly select a weapon-enabled event mode to use weapons. Drift Race remains unavailable.
Edit and apply event properties
Top-bar Properties and Open event properties on the right open the same dialog. Set name, ID, blacklist rank, type, participants, reward, traffic and police, then Apply. Cancel restores the state from when the dialog opened.
Select a cutscene and inspect its preview
Hover a scene or navigate with arrow keys for its image and grid diagram. Some Carbon previews show an actor pose with a layout diagram. Camera-only scenes are marked as having no actor. Slot 1 is the player. Scenes with a different participant count cannot be selected.
Starting-grid layout preview
The 3D grid follows the selected scene's countdown layout and road surface. Automatic and original-MW modes show an estimate; the final layout is chosen in game. Check that it fits the road.
Required resources for additional cutscenes
Additional scenes require resources converted locally from legitimate Carbon/Underground 2 files. Preview images alone cannot play a scene. Missing assets or unsuitable runtime conditions fall back to the original presentation.
8. Map card and rendering
Lower-left map card: switch its content with the tabs and resize the card with its top-right handle.
Lower-left map card: tabs and auto fit
Switch between World, Course map and After-edit preview at the lower left. World automatically fits placed objects, or the whole world when empty. Toggle Auto fit for whole-world bounds. Reset clears additional pan and zoom.
Map-card size and rendering properties
Drag the top-right handle to resize freely, or focus it and use arrow keys. Size is restored next time. Rendering properties controls VRAM budget, resolution and loading concurrency. The budget is not a guarantee of available VRAM.
9. Validate, save and install
Validation, warning markers and copying errors
Use Validation to check passage order, connections and foldbacks. Select a gap ! marker or issue to focus it. Error-card contents can be copied. Ctrl+Z undoes; Ctrl+Y redoes.
Browser storage and editing JSON backups
브라우저에 저장은 현재 구성의 편집 내용을 저장합니다. 편집 가능한 백업의 경우 구성 관리/모든 편집 데이터 저장을 사용하여 JSON를 다운로드하세요. 저장소 및 폴더 권한은 브라우저나 원본 간에 공유되지 않습니다. 스토리지 및 캐시 세부정보에는 사용량과 영구 스토리지 상태가 표시됩니다. 저장된 JSON를 복원하려면 모든 편집 데이터 가져오기를 사용하세요. 일치하는 항목이 없는 이벤트가 추가됩니다. 기존 이벤트가 변경되면 경고에 해당 이름이 나열됩니다. 취소하면 모든 이벤트가 변경되지 않습니다.
Export to game and ZIP installation
이벤트 내보내기에서 현재 이벤트 내보내기 또는 저장된 모든 이벤트 내보내기를 선택합니다. 생성 후 생성된 ZIP 저장을 선택합니다. 게임과 런처를 닫은 다음 ZIP의 스크립트 폴더를 speed.exe가 포함된 폴더로 복사하세요. ZIP에는 ASI 모듈이나 설치 프로그램 없이 이벤트 데이터만 포함됩니다. 동일한 화면의 고급 옵션에서 직접 쓰기가 가능합니다.
Post-install checks and configuration fingerprint mismatches
After installation, playtest start, checkpoints, finish, exit and re-entry. Do not redistribute game files or converted scene resources. Close and reopen the app if old UI remains. For fingerprint mismatches, back up edits and update the configuration from the same game.
Options menu and bug reports
The upper-right … menu contains language, app installation and support. Include event name, reproduction steps and copied error details when reporting a problem. You do not need to send the entire game.
Recover from an unresponsive worker or failed generation
Export generation has a ten-minute response limit; configuration preparation has a fifteen-minute limit. A timeout terminates the worker; transfer failures can also be retried. Existing game files and configurations are not updated before generation/preparation succeeds.
10. Required mods and installation order
Normal-event prerequisites
Normal events require a supported English 1.3 speed.exe, an ASI loader and Event Loader. Preserve Japanese assets, existing INIs and saves. Do not install the same ASI both in the game root and scripts.
NeoAI and NFRR
Current NeoAI combines control inside Event Loader with the vehicle-scope adapter from a compatible NFRR. Native-AI events do not require NFRR. Performance matching also uses compatible NFRR calibration for the selected configuration.
Combat modes, expanded grids and HUD
Arms Race, Gauntlet and Hot Pursuit require compatible Event Loader and ArmsAssist plus a separately installed MWArsenal and its assets. Use compatible Limit Breaker for more than four participants and the suite HUD fixes for HP/HUD coexistence. MWArsenal alone does not register these modes.
Installation and verification order
게임과 런처를 닫고 필요한 모드를 별도로 설치하세요. 편집기 ZIP의 스크립트 폴더를 게임에 복사하거나 고급 내보내기 옵션에서 직접 쓰기를 사용하세요. 시작, 체크포인트, 종료, 재시도, 종료 및 다음 이벤트를 확인하세요.
11. Game data and recorded SFX
Local resources and distributable files
The editor extracts world, map and model data locally. Do not add configuration caches, source executables, BUN files, audio banks, profiles or Shadow/vault to event distribution ZIPs. Users install the required mods and world separately. Bug reporting is a separate action with reviewed submission content.
ArmsAssist 배포본에 포함된 대체 음원
패키지 파일 확인
ArmsAssist 배포 패키지에는 scripts/MWArmsAssist에 대체 효과음 4개가 포함됩니다: Drop.wav, PlayerDrop.wav, Lock_by_police.wav, repair-complete.wav. 해당 패키지에 포함된 파일을 사용하세요. 이 파일들을 NFSHP 원본 음원, 게임 음원 녹음 또는 오리지널 음원으로 설명한 이전 표기는 현재 대체 음원 세트를 정확히 설명하지 않습니다.
배포 파일 목록과 검증 정보는 패키지의 manifest.json에서 확인하세요. 기존 설치의 음원을 바꾸기 전에 게임을 종료하고 현재 파일을 백업하세요. 사운드 뱅크와 미사용 SFX는 포함되지 않습니다.
12. Local conversion of additional cutscenes
Conversion prerequisites and availability
Convert scenes locally from your legitimate Carbon/UG2 files. Current development scripts depend on verified input paths and versions; a general one-click converter is not yet available. Thumbnails alone cannot play a scene.
Verify the original files
Inputs include the selected NIS, matching GLOBAL camera assets and verified camera descriptions; UG2 also uses EvtTrk. Read only the required files, preserve the source game and record sizes/SHA256. Convert normal race intros without mixing in story-only scenes.
Convert and validate each scene
In the development tree tools/CarbonIntro, Carbon uses prepare_variants and export_variant; UG2 uses prepare_ug2_one, prepare_ug2_batch and the matching export_ug2 scripts. Validate actors, car layout, camera and GO timing separately. Do not add actor assets to camera-only scenes.
Install into your own game
Install only the runtimeFiles listed by runtime_manifest under scripts/EventLoader/CustomCutscenes/scene-ID. camera.cic, cars.cic, actor-clock.bin, scene-timing.bin and other files must match that scene manifest. Exclude camera.raw, original BUN/EXE files and research NPZ files.
Keep scene decoding and recording distinct
Scene audio is a separate step. Validate a confirmed PCM16 WAV and audio-timing.bin together with scene_audio. Current limits are mono/stereo, 8–96 kHz, 60 seconds and 8 MiB. export_scene_wav decodes a local ABK; it does not record audio. Do not claim original-audio fidelity for unidentified samples.
Selection and gameplay checks
Select a scene matching the participant count and playtest intro-to-GO, cancel, retry and transition to another event. Missing assets fall back to the original MW intro. Do not include converted source-game assets in general event distributions.
The original Rockport world is supported. W2C events require the matching W2C world. The baseline is captured when the cache is prepared. After changing world files or textures, back up your editing JSON before updating the configuration from the same game folder. Game files are not uploaded.
Update a configuration from the game folder
在配置管理中选择配置,然后按更新配置。当可以访问记住的游戏文件夹时,更新立即开始。仅当该位置丢失或不可用时,系统才会要求您选择包含 speed.exe 的文件夹。编辑和配置 ID 将保留。当世界或道路布局不同时添加单独的配置。
To correct a native event, use Project → This course → Correct native event. Deletion affects the browser list; it does not uninstall files already written to the game. Undo deletion restores the last deletion.
3. Navigate the 3D view
3D camera controls and tool help
Tools are on the left, the 3D view is central, and Event, Selection and Validation are on the right. Hover or keyboard-focus a tool for illustrated help. Left-drag empty space to orbit, right-drag to pan, and scroll to zoom. PageUp/PageDown adjusts height; hold Shift for a larger step. Top view and Focus selection are also available.
Visible labels and display layers
Visible labels toggles text by category. Display layers toggles world geometry, roads, gate volumes, objects and the grid. Hiding labels never removes placed objects. Label preferences are stored in this browser.
4. Required gates and shortcuts
Gate key: START = starting grid; FINISH/LAP = finish or lap line; CP = required checkpoint; SC = optional shortcut.
Gate types, colors and required markers
Green START, orange FINISH/LAP and cyan CP carry a small ! badge. Pink SC is an optional shortcut, not a checkpoint. Reset gates are red. Tool colors match the labels.
Place, orient and order gates
Choose a placement tool and click the road. Select an object and adjust it with 3D handles or numeric position, rotation and size. Face it along the route and cover the road width. Reorder CPs with Order up/down. Start and finish map icons are automatic.
Circuits starting on a branch
For a circuit starting on a branch, check both the initial entry and the merge on later laps. Start and lap line can be separate. Alternatives and shortcuts must not skip checkpoints.
5. Routes, barriers and AI
Route diagram: yellow MAIN is the main route, pink SHORTCUT is a shortcut, and green FREE CURVE is Fill / AI optimization. Secondary routes, exclusions, walls and right-panel settings are explained separately below.
Main route (yellow)
Trace the blue road lines defined by the game to select the main route. Complete the route. Placed gates determine its direction automatically. This route appears on the map.
Secondary route (orange)
Trace the blue road lines defined by the game to select a secondary route. Connect it to the yellow main route. Placed gates determine its direction automatically. This route appears on the map.
Shortcut (pink)
Trace the blue road lines to define an optional shortcut for NeoAI. Placed gates determine its direction automatically. Shortcuts do not appear on the map. Placing shortcut gates as well is recommended.
Fill / AI optimization (green)
Use this for routes without blue road lines. The curve inherits its role from the connected route. Draw it in place of the corresponding colored route to optimize the NeoAI driving line.
AI discouraged (brown): exclude from route choices
Exclude routes from NeoAI route choices. No connection to the main route is required. These lines do not appear on the map.
Barrier walls: block a path
Click to place one barrier wall, or drag to place a continuous run. Edit individual walls after confirming. Check their facing and orientation. A wall crossing a blue road line prevents NeoAI from choosing that path.
AI obstacle markers: assist avoidance
Effective, but still being tuned. Place over indestructible objects such as central dividers that AI struggles to avoid, giving it more time to anticipate avoidance. This does not guarantee complete control.
Replace the race map
Generate a dedicated race map by drawing the configured routes onto the extracted world map.
Guide NeoAI with map lines
Guide AI along the configured routes. When enabled, Event Loader’s NeoAI controls the vehicles instead of the original game AI. When disabled, the original game AI controls them.
Select cars similar to the player
Set the vehicle regulations: select rival cars with a similar price range and performance to the player’s car. When disabled, selection follows the blacklist rank.
Objects and passage order reviewed
Optional self-check switch. It has no effect on the game.
6. Race-specific editing
Speedtrap: measurement points
Speedtrap uses the speed trap tool. Measurement points are separate from CPs, up to 16, with a count card on the left. Select points to edit radius and order.
Tollbooth: toll locations and bonus time
In Tollbooth mode, click a 3D tollbooth candidate and assign Start, timed Passage or Finish. Check order and bonus time in the list. Use free passage-point placement where no native tollbooth exists.
Lap Knockout: participants and laps
Lap Knockout eliminates one racer per lap; four participants require at least three laps. Check participants and laps. Drag and other modes expose their own settings.
7. Properties and cutscenes
Select Arms Race (prototype)
Select Arms Race under Combat mode in Event Properties. Sprint, Circuit, Lap Knockout and Speed Trap can be used as the racing rules. Compatible Event Loader, MWArsenal and ArmsAssist are required. Without them, the editor disables the option and the game does not register the event.
Select Hot Pursuit (prototype)
Maximum eight racers. Pursuit starts individually after 25% race progress, with up to two chase cars per racer. Roadblocks and helicopters are separate. With survival-reward builds, any genuine finish is a clear and reward equals configured cash x survivors / finish position. A racer destroying Cross at heat 5 or higher restores 15% HP to surviving racers, and finished AI keep fleeing. Event Properties shows the rules supported by the connected MOD builds. Older supported builds do not gain these new rules.
Hot Pursuit requirements and settings
Connect the game folder containing MWArsenal and the validated Hot Pursuit builds of Event Loader and ArmsAssist. Older builds leave the option disabled. Choose Sprint or Speedtrap rules, starting heat, ammunition and cutscene. Police are always enabled.
Health, crash retirement and retry
Human and AI racers have 300 HP. EMP deals 25 damage, Spike 50 and Shockwave 15. An AI racer at zero HP retires through the native crash outcome while the remaining racers continue. A player at zero HP enters the native losing results screen with Restart available. Restart resets event health and ammunition. Arrests retain the native arrest scene.
Starting ammunition per weapon
Specify starting ammunition per weapon. Leave a field blank to use the ArmsAssist INI; zero disables that weapon. Specified counts are refilled at the start and on restart, and AI racers receive the same counts. Player equipment and INIs are preserved. Temporary event ammunition is released on exit.
Normal race behavior
Normal races lock weapons and hide the weapon HUD even with police enabled. Explicitly select a weapon-enabled event mode to use weapons. Drift Race remains unavailable.
Edit and apply event properties
Top-bar Properties and Open event properties on the right open the same dialog. Set name, ID, blacklist rank, type, participants, reward, traffic and police, then Apply. Cancel restores the state from when the dialog opened.
Select a cutscene and inspect its preview
Hover a scene or navigate with arrow keys for its image and grid diagram. Some Carbon previews show an actor pose with a layout diagram. Camera-only scenes are marked as having no actor. Slot 1 is the player. Scenes with a different participant count cannot be selected.
Starting-grid layout preview
The 3D grid follows the selected scene's countdown layout and road surface. Automatic and original-MW modes show an estimate; the final layout is chosen in game. Check that it fits the road.
Required resources for additional cutscenes
Additional scenes require resources converted locally from legitimate Carbon/Underground 2 files. Preview images alone cannot play a scene. Missing assets or unsuitable runtime conditions fall back to the original presentation.
8. Map card and rendering
Lower-left map card: switch its content with the tabs and resize the card with its top-right handle.
Lower-left map card: tabs and auto fit
Switch between World, Course map and After-edit preview at the lower left. World automatically fits placed objects, or the whole world when empty. Toggle Auto fit for whole-world bounds. Reset clears additional pan and zoom.
Map-card size and rendering properties
Drag the top-right handle to resize freely, or focus it and use arrow keys. Size is restored next time. Rendering properties controls VRAM budget, resolution and loading concurrency. The budget is not a guarantee of available VRAM.
9. Validate, save and install
Validation, warning markers and copying errors
Use Validation to check passage order, connections and foldbacks. Select a gap ! marker or issue to focus it. Error-card contents can be copied. Ctrl+Z undoes; Ctrl+Y redoes.
在事件导出中,选择导出当前事件或导出所有已保存的事件。生成后,选择保存生成的ZIP。关闭游戏和启动器,然后将 ZIP 中的脚本文件夹复制到包含 speed.exe 的文件夹中。 ZIP 仅包含事件数据,没有 ASI 模块或安装程序。在同一屏幕上的高级选项下可以直接写入。
Post-install checks and configuration fingerprint mismatches
After installation, playtest start, checkpoints, finish, exit and re-entry. Do not redistribute game files or converted scene resources. Close and reopen the app if old UI remains. For fingerprint mismatches, back up edits and update the configuration from the same game.
Options menu and bug reports
The upper-right … menu contains language, app installation and support. Include event name, reproduction steps and copied error details when reporting a problem. You do not need to send the entire game.
Recover from an unresponsive worker or failed generation
Export generation has a ten-minute response limit; configuration preparation has a fifteen-minute limit. A timeout terminates the worker; transfer failures can also be retried. Existing game files and configurations are not updated before generation/preparation succeeds.
10. Required mods and installation order
Normal-event prerequisites
Normal events require a supported English 1.3 speed.exe, an ASI loader and Event Loader. Preserve Japanese assets, existing INIs and saves. Do not install the same ASI both in the game root and scripts.
NeoAI and NFRR
Current NeoAI combines control inside Event Loader with the vehicle-scope adapter from a compatible NFRR. Native-AI events do not require NFRR. Performance matching also uses compatible NFRR calibration for the selected configuration.
Combat modes, expanded grids and HUD
Arms Race, Gauntlet and Hot Pursuit require compatible Event Loader and ArmsAssist plus a separately installed MWArsenal and its assets. Use compatible Limit Breaker for more than four participants and the suite HUD fixes for HP/HUD coexistence. MWArsenal alone does not register these modes.
Installation and verification order
关闭游戏和启动器并单独安装所需的模组。将编辑器 ZIP 中的脚本文件夹复制到游戏中,或在高级导出选项下使用直接写入。检查开始、检查点、完成、重试、退出和下一个事件。
11. Game data and recorded SFX
Local resources and distributable files
The editor extracts world, map and model data locally. Do not add configuration caches, source executables, BUN files, audio banks, profiles or Shadow/vault to event distribution ZIPs. Users install the required mods and world separately. Bug reporting is a separate action with reviewed submission content.
Convert scenes locally from your legitimate Carbon/UG2 files. Current development scripts depend on verified input paths and versions; a general one-click converter is not yet available. Thumbnails alone cannot play a scene.
Verify the original files
Inputs include the selected NIS, matching GLOBAL camera assets and verified camera descriptions; UG2 also uses EvtTrk. Read only the required files, preserve the source game and record sizes/SHA256. Convert normal race intros without mixing in story-only scenes.
Convert and validate each scene
In the development tree tools/CarbonIntro, Carbon uses prepare_variants and export_variant; UG2 uses prepare_ug2_one, prepare_ug2_batch and the matching export_ug2 scripts. Validate actors, car layout, camera and GO timing separately. Do not add actor assets to camera-only scenes.
Install into your own game
Install only the runtimeFiles listed by runtime_manifest under scripts/EventLoader/CustomCutscenes/scene-ID. camera.cic, cars.cic, actor-clock.bin, scene-timing.bin and other files must match that scene manifest. Exclude camera.raw, original BUN/EXE files and research NPZ files.
Keep scene decoding and recording distinct
Scene audio is a separate step. Validate a confirmed PCM16 WAV and audio-timing.bin together with scene_audio. Current limits are mono/stereo, 8–96 kHz, 60 seconds and 8 MiB. export_scene_wav decodes a local ABK; it does not record audio. Do not claim original-audio fidelity for unidentified samples.
Selection and gameplay checks
Select a scene matching the participant count and playtest intro-to-GO, cancel, retry and transition to another event. Missing assets fall back to the original MW intro. Do not include converted source-game assets in general event distributions.
The original Rockport world is supported. W2C events require the matching W2C world. The baseline is captured when the cache is prepared. After changing world files or textures, back up your editing JSON before updating the configuration from the same game folder. Game files are not uploaded.
Update a configuration from the game folder
在配置管理中选择配置,然后按更新配置。当可以访问记住的游戏文件夹时,更新立即开始。仅当该位置丢失或不可用时,系统才会要求您选择包含 speed.exe 的文件夹。編輯和配置 ID 將保留。当世界或道路布局不同时添加单独的配置。
To correct a native event, use Project → This course → Correct native event. Deletion affects the browser list; it does not uninstall files already written to the game. Undo deletion restores the last deletion.
3. Navigate the 3D view
3D camera controls and tool help
Tools are on the left, the 3D view is central, and Event, Selection and Validation are on the right. Hover or keyboard-focus a tool for illustrated help. Left-drag empty space to orbit, right-drag to pan, and scroll to zoom. PageUp/PageDown adjusts height; hold Shift for a larger step. Top view and Focus selection are also available.
Visible labels and display layers
Visible labels toggles text by category. Display layers toggles world geometry, roads, gate volumes, objects and the grid. Hiding labels never removes placed objects. Label preferences are stored in this browser.
4. Required gates and shortcuts
Gate key: START = starting grid; FINISH/LAP = finish or lap line; CP = required checkpoint; SC = optional shortcut.
Gate types, colors and required markers
Green START, orange FINISH/LAP and cyan CP carry a small ! badge. Pink SC is an optional shortcut, not a checkpoint. Reset gates are red. Tool colors match the labels.
Place, orient and order gates
Choose a placement tool and click the road. Select an object and adjust it with 3D handles or numeric position, rotation and size. Face it along the route and cover the road width. Reorder CPs with Order up/down. Start and finish map icons are automatic.
Circuits starting on a branch
For a circuit starting on a branch, check both the initial entry and the merge on later laps. Start and lap line can be separate. Alternatives and shortcuts must not skip checkpoints.
5. Routes, barriers and AI
Route diagram: yellow MAIN is the main route, pink SHORTCUT is a shortcut, and green FREE CURVE is Fill / AI optimization. Secondary routes, exclusions, walls and right-panel settings are explained separately below.
Main route (yellow)
Trace the blue road lines defined by the game to select the main route. Complete the route. Placed gates determine its direction automatically. This route appears on the map.
Secondary route (orange)
Trace the blue road lines defined by the game to select a secondary route. Connect it to the yellow main route. Placed gates determine its direction automatically. This route appears on the map.
Shortcut (pink)
Trace the blue road lines to define an optional shortcut for NeoAI. Placed gates determine its direction automatically. Shortcuts do not appear on the map. Placing shortcut gates as well is recommended.
Fill / AI optimization (green)
Use this for routes without blue road lines. The curve inherits its role from the connected route. Draw it in place of the corresponding colored route to optimize the NeoAI driving line.
AI discouraged (brown): exclude from route choices
Exclude routes from NeoAI route choices. No connection to the main route is required. These lines do not appear on the map.
Barrier walls: block a path
Click to place one barrier wall, or drag to place a continuous run. Edit individual walls after confirming. Check their facing and orientation. A wall crossing a blue road line prevents NeoAI from choosing that path.
AI obstacle markers: assist avoidance
Effective, but still being tuned. Place over indestructible objects such as central dividers that AI struggles to avoid, giving it more time to anticipate avoidance. This does not guarantee complete control.
Replace the race map
Generate a dedicated race map by drawing the configured routes onto the extracted world map.
Guide NeoAI with map lines
Guide AI along the configured routes. When enabled, Event Loader’s NeoAI controls the vehicles instead of the original game AI. When disabled, the original game AI controls them.
Select cars similar to the player
Set the vehicle regulations: select rival cars with a similar price range and performance to the player’s car. When disabled, selection follows the blacklist rank.
Objects and passage order reviewed
Optional self-check switch. It has no effect on the game.
6. Race-specific editing
Speedtrap: measurement points
Speedtrap uses the speed trap tool. Measurement points are separate from CPs, up to 16, with a count card on the left. Select points to edit radius and order.
Tollbooth: toll locations and bonus time
In Tollbooth mode, click a 3D tollbooth candidate and assign Start, timed Passage or Finish. Check order and bonus time in the list. Use free passage-point placement where no native tollbooth exists.
Lap Knockout: participants and laps
Lap Knockout eliminates one racer per lap; four participants require at least three laps. Check participants and laps. Drag and other modes expose their own settings.
7. Properties and cutscenes
Select Arms Race (prototype)
Select Arms Race under Combat mode in Event Properties. Sprint, Circuit, Lap Knockout and Speed Trap can be used as the racing rules. Compatible Event Loader, MWArsenal and ArmsAssist are required. Without them, the editor disables the option and the game does not register the event.
Select Hot Pursuit (prototype)
Maximum eight racers. Pursuit starts individually after 25% race progress, with up to two chase cars per racer. Roadblocks and helicopters are separate. With survival-reward builds, any genuine finish is a clear and reward equals configured cash x survivors / finish position. A racer destroying Cross at heat 5 or higher restores 15% HP to surviving racers, and finished AI keep fleeing. Event Properties shows the rules supported by the connected MOD builds. Older supported builds do not gain these new rules.
Hot Pursuit requirements and settings
Connect the game folder containing MWArsenal and the validated Hot Pursuit builds of Event Loader and ArmsAssist. Older builds leave the option disabled. Choose Sprint or Speedtrap rules, starting heat, ammunition and cutscene. Police are always enabled.
Health, crash retirement and retry
Human and AI racers have 300 HP. EMP deals 25 damage, Spike 50 and Shockwave 15. An AI racer at zero HP retires through the native crash outcome while the remaining racers continue. A player at zero HP enters the native losing results screen with Restart available. Restart resets event health and ammunition. Arrests retain the native arrest scene.
Starting ammunition per weapon
Specify starting ammunition per weapon. Leave a field blank to use the ArmsAssist INI; zero disables that weapon. Specified counts are refilled at the start and on restart, and AI racers receive the same counts. Player equipment and INIs are preserved. Temporary event ammunition is released on exit.
Normal race behavior
Normal races lock weapons and hide the weapon HUD even with police enabled. Explicitly select a weapon-enabled event mode to use weapons. Drift Race remains unavailable.
Edit and apply event properties
Top-bar Properties and Open event properties on the right open the same dialog. Set name, ID, blacklist rank, type, participants, reward, traffic and police, then Apply. Cancel restores the state from when the dialog opened.
Select a cutscene and inspect its preview
Hover a scene or navigate with arrow keys for its image and grid diagram. Some Carbon previews show an actor pose with a layout diagram. Camera-only scenes are marked as having no actor. Slot 1 is the player. Scenes with a different participant count cannot be selected.
Starting-grid layout preview
The 3D grid follows the selected scene's countdown layout and road surface. Automatic and original-MW modes show an estimate; the final layout is chosen in game. Check that it fits the road.
Required resources for additional cutscenes
Additional scenes require resources converted locally from legitimate Carbon/Underground 2 files. Preview images alone cannot play a scene. Missing assets or unsuitable runtime conditions fall back to the original presentation.
8. Map card and rendering
Lower-left map card: switch its content with the tabs and resize the card with its top-right handle.
Lower-left map card: tabs and auto fit
Switch between World, Course map and After-edit preview at the lower left. World automatically fits placed objects, or the whole world when empty. Toggle Auto fit for whole-world bounds. Reset clears additional pan and zoom.
Map-card size and rendering properties
Drag the top-right handle to resize freely, or focus it and use arrow keys. Size is restored next time. Rendering properties controls VRAM budget, resolution and loading concurrency. The budget is not a guarantee of available VRAM.
9. Validate, save and install
Validation, warning markers and copying errors
Use Validation to check passage order, connections and foldbacks. Select a gap ! marker or issue to focus it. Error-card contents can be copied. Ctrl+Z undoes; Ctrl+Y redoes.
在事件匯出中,選擇匯出目前事件或匯出所有已儲存的事件。生成後,選擇儲存生成的ZIP。關閉遊戲和啟動器,然後將 ZIP 中的腳本資料夾複製到包含 speed.exe 的資料夾中。 ZIP 僅包含事件數據,沒有 ASI 模組或安裝程式。在同一螢幕上的進階選項下可以直接寫入。
Post-install checks and configuration fingerprint mismatches
After installation, playtest start, checkpoints, finish, exit and re-entry. Do not redistribute game files or converted scene resources. Close and reopen the app if old UI remains. For fingerprint mismatches, back up edits and update the configuration from the same game.
Options menu and bug reports
The upper-right … menu contains language, app installation and support. Include event name, reproduction steps and copied error details when reporting a problem. You do not need to send the entire game.
Recover from an unresponsive worker or failed generation
Export generation has a ten-minute response limit; configuration preparation has a fifteen-minute limit. A timeout terminates the worker; transfer failures can also be retried. Existing game files and configurations are not updated before generation/preparation succeeds.
10. Required mods and installation order
Normal-event prerequisites
Normal events require a supported English 1.3 speed.exe, an ASI loader and Event Loader. Preserve Japanese assets, existing INIs and saves. Do not install the same ASI both in the game root and scripts.
NeoAI and NFRR
Current NeoAI combines control inside Event Loader with the vehicle-scope adapter from a compatible NFRR. Native-AI events do not require NFRR. Performance matching also uses compatible NFRR calibration for the selected configuration.
Combat modes, expanded grids and HUD
Arms Race, Gauntlet and Hot Pursuit require compatible Event Loader and ArmsAssist plus a separately installed MWArsenal and its assets. Use compatible Limit Breaker for more than four participants and the suite HUD fixes for HP/HUD coexistence. MWArsenal alone does not register these modes.
Installation and verification order
關閉遊戲和啟動器並單獨安裝所需的模組。將編輯器 ZIP 中的腳本資料夾複製到遊戲中,或在進階匯出選項下使用直接寫入。檢查開始、檢查點、完成、重試、退出和下一個事件。
11. Game data and recorded SFX
Local resources and distributable files
The editor extracts world, map and model data locally. Do not add configuration caches, source executables, BUN files, audio banks, profiles or Shadow/vault to event distribution ZIPs. Users install the required mods and world separately. Bug reporting is a separate action with reviewed submission content.
Convert scenes locally from your legitimate Carbon/UG2 files. Current development scripts depend on verified input paths and versions; a general one-click converter is not yet available. Thumbnails alone cannot play a scene.
Verify the original files
Inputs include the selected NIS, matching GLOBAL camera assets and verified camera descriptions; UG2 also uses EvtTrk. Read only the required files, preserve the source game and record sizes/SHA256. Convert normal race intros without mixing in story-only scenes.
Convert and validate each scene
In the development tree tools/CarbonIntro, Carbon uses prepare_variants and export_variant; UG2 uses prepare_ug2_one, prepare_ug2_batch and the matching export_ug2 scripts. Validate actors, car layout, camera and GO timing separately. Do not add actor assets to camera-only scenes.
Install into your own game
Install only the runtimeFiles listed by runtime_manifest under scripts/EventLoader/CustomCutscenes/scene-ID. camera.cic, cars.cic, actor-clock.bin, scene-timing.bin and other files must match that scene manifest. Exclude camera.raw, original BUN/EXE files and research NPZ files.
Keep scene decoding and recording distinct
Scene audio is a separate step. Validate a confirmed PCM16 WAV and audio-timing.bin together with scene_audio. Current limits are mono/stereo, 8–96 kHz, 60 seconds and 8 MiB. export_scene_wav decodes a local ABK; it does not record audio. Do not claim original-audio fidelity for unidentified samples.
Selection and gameplay checks
Select a scene matching the participant count and playtest intro-to-GO, cancel, retry and transition to another event. Missing assets fall back to the original MW intro. Do not include converted source-game assets in general event distributions.
V Chrome nebo Edge otevřete Game / Configuration management. V části Přidat konfiguraci hry zadejte název, z rozevíracího seznamu vyberte typ, poté vyberte Číst složku hry a vyberte složku obsahující speed.exe. Počáteční příprava může trvat několik minut. Není potřeba žádné externí GUI ani připravená konfigurační složka. Herní soubory nejsou nahrány.
Supported worlds and baseline
The original Rockport world is supported. W2C events require the matching W2C world. The baseline is captured when the cache is prepared. After changing world files or textures, back up your editing JSON before updating the configuration from the same game folder. Game files are not uploaded.
Update a configuration from the game folder
Vyberte konfiguraci v Configuration management a stiskněte Update configuration. Aktualizace se spustí okamžitě, když je přístupná zapamatovaná složka hry. Budete požádáni o výběr složky obsahující speed.exe pouze v případě, že umístění chybí nebo není k dispozici. Úpravy a ID konfigurace zůstanou zachovány. Pokud se rozvržení světa nebo silnice liší, přidejte samostatnou konfiguraci.
Znovu otevřít nebo přepnout konfigurace
Opětovné otevření nebo přepnutí konfigurace obnoví pouze uložené propojení složky hry a její název. Složka se nekontroluje a události se nenačítají. Každá konfigurace má vlastní seznam událostí.
Když je geometrie připravena
Editor náhledových dat 3D je připraven při přidání nebo aktualizaci konfigurace. EventLoader automaticky vytvoří herní geometrii z přijímající instalace, když je to potřeba před začátkem cílové události. Není vyžadován žádný export geometrie z editoru.
2. Select or create an event
Event selection and top-bar actions
Události načtěte ručně přes Správa konfigurací → Načíst události ze hry. Editor použije propojenou složku; pokud k ní nemá přístup, vyzve vás k jejímu výběru. Lze také importovat jinou složku hry či událostí nebo sdílený ZIP. Při importu se ověří obsah souborů a kompatibilita mapy a zachovají se UUID i umístění. Import z jiného zdroje nezmění propojenou složku této konfigurace.
Correct native events and delete added events
To correct a native event, use Project → This course → Correct native event. Deletion affects the browser list; it does not uninstall files already written to the game. Undo deletion restores the last deletion.
3. Navigate the 3D view
3D camera controls and tool help
Tools are on the left, the 3D view is central, and Event, Selection and Validation are on the right. Hover or keyboard-focus a tool for illustrated help. Left-drag empty space to orbit, right-drag to pan, and scroll to zoom. PageUp/PageDown adjusts height; hold Shift for a larger step. Top view and Focus selection are also available.
Visible labels and display layers
Visible labels toggles text by category. Display layers toggles world geometry, roads, gate volumes, objects and the grid. Hiding labels never removes placed objects. Label preferences are stored in this browser.
4. Required gates and shortcuts
Gate key: START = starting grid; FINISH/LAP = finish or lap line; CP = required checkpoint; SC = optional shortcut.
Gate types, colors and required markers
Green START, orange FINISH/LAP and cyan CP carry a small ! badge. Pink SC is an optional shortcut, not a checkpoint. Reset gates are red. Tool colors match the labels.
Place, orient and order gates
Choose a placement tool and click the road. Select an object and adjust it with 3D handles or numeric position, rotation and size. Face it along the route and cover the road width. Reorder CPs with Order up/down. Start and finish map icons are automatic.
Circuits starting on a branch
For a circuit starting on a branch, check both the initial entry and the merge on later laps. Start and lap line can be separate. Alternatives and shortcuts must not skip checkpoints.
5. Routes, barriers and AI
Route diagram: yellow MAIN is the main route, pink SHORTCUT is a shortcut, and green FREE CURVE is Fill / AI optimization. Secondary routes, exclusions, walls and right-panel settings are explained separately below.
Main route (yellow)
Trace the blue road lines defined by the game to select the main route. Complete the route. Placed gates determine its direction automatically. This route appears on the map.
Secondary route (orange)
Trace the blue road lines defined by the game to select a secondary route. Connect it to the yellow main route. Placed gates determine its direction automatically. This route appears on the map.
Shortcut (pink)
Trace the blue road lines to define an optional shortcut for NeoAI. Placed gates determine its direction automatically. Shortcuts do not appear on the map. Placing shortcut gates as well is recommended.
Fill / AI optimization (green)
Use this for routes without blue road lines. The curve inherits its role from the connected route. Draw it in place of the corresponding colored route to optimize the NeoAI driving line.
AI discouraged (brown): exclude from route choices
Exclude routes from NeoAI route choices. No connection to the main route is required. These lines do not appear on the map.
Barrier walls: block a path
Click to place one barrier wall, or drag to place a continuous run. Edit individual walls after confirming. Check their facing and orientation. A wall crossing a blue road line prevents NeoAI from choosing that path.
AI obstacle markers: assist avoidance
Effective, but still being tuned. Place over indestructible objects such as central dividers that AI struggles to avoid, giving it more time to anticipate avoidance. This does not guarantee complete control.
Replace the race map
Generate a dedicated race map by drawing the configured routes onto the extracted world map.
Guide NeoAI with map lines
Guide AI along the configured routes. When enabled, Event Loader’s NeoAI controls the vehicles instead of the original game AI. When disabled, the original game AI controls them.
Select cars similar to the player
Set the vehicle regulations: select rival cars with a similar price range and performance to the player’s car. When disabled, selection follows the blacklist rank.
Objects and passage order reviewed
Optional self-check switch. It has no effect on the game.
6. Race-specific editing
Speedtrap: measurement points
Speedtrap uses the speed trap tool. Measurement points are separate from CPs, up to 16, with a count card on the left. Select points to edit radius and order.
Tollbooth: toll locations and bonus time
In Tollbooth mode, click a 3D tollbooth candidate and assign Start, timed Passage or Finish. Check order and bonus time in the list. Use free passage-point placement where no native tollbooth exists.
Lap Knockout: participants and laps
Lap Knockout eliminates one racer per lap; four participants require at least three laps. Check participants and laps. Drag and other modes expose their own settings.
7. Properties and cutscenes
Select Arms Race (prototype)
Select Arms Race under Combat mode in Event Properties. Sprint, Circuit, Lap Knockout and Speed Trap can be used as the racing rules. Compatible Event Loader, MWArsenal and ArmsAssist are required. Without them, the editor disables the option and the game does not register the event.
Select Hot Pursuit (prototype)
Maximum eight racers. Pursuit starts individually after 25% race progress, with up to two chase cars per racer. Roadblocks and helicopters are separate. With survival-reward builds, any genuine finish is a clear and reward equals configured cash x survivors / finish position. A racer destroying Cross at heat 5 or higher restores 15% HP to surviving racers, and finished AI keep fleeing. Event Properties shows the rules supported by the connected MOD builds. Older supported builds do not gain these new rules.
Hot Pursuit requirements and settings
Connect the game folder containing MWArsenal and the validated Hot Pursuit builds of Event Loader and ArmsAssist. Older builds leave the option disabled. Choose Sprint or Speedtrap rules, starting heat, ammunition and cutscene. Police are always enabled.
Health, crash retirement and retry
Human and AI racers have 300 HP. EMP deals 25 damage, Spike 50 and Shockwave 15. An AI racer at zero HP retires through the native crash outcome while the remaining racers continue. A player at zero HP enters the native losing results screen with Restart available. Restart resets event health and ammunition. Arrests retain the native arrest scene.
Starting ammunition per weapon
Specify starting ammunition per weapon. Leave a field blank to use the ArmsAssist INI; zero disables that weapon. Specified counts are refilled at the start and on restart, and AI racers receive the same counts. Player equipment and INIs are preserved. Temporary event ammunition is released on exit.
Normal race behavior
Normal races lock weapons and hide the weapon HUD even with police enabled. Explicitly select a weapon-enabled event mode to use weapons. Drift Race remains unavailable.
Edit and apply event properties
Top-bar Properties and Open event properties on the right open the same dialog. Set name, ID, blacklist rank, type, participants, reward, traffic and police, then Apply. Cancel restores the state from when the dialog opened.
Select a cutscene and inspect its preview
Hover a scene or navigate with arrow keys for its image and grid diagram. Some Carbon previews show an actor pose with a layout diagram. Camera-only scenes are marked as having no actor. Slot 1 is the player. Scenes with a different participant count cannot be selected.
Starting-grid layout preview
The 3D grid follows the selected scene's countdown layout and road surface. Automatic and original-MW modes show an estimate; the final layout is chosen in game. Check that it fits the road.
Required resources for additional cutscenes
Additional scenes require resources converted locally from legitimate Carbon/Underground 2 files. Preview images alone cannot play a scene. Missing assets or unsuitable runtime conditions fall back to the original presentation.
8. Map card and rendering
Lower-left map card: switch its content with the tabs and resize the card with its top-right handle.
Lower-left map card: tabs and auto fit
Switch between World, Course map and After-edit preview at the lower left. World automatically fits placed objects, or the whole world when empty. Toggle Auto fit for whole-world bounds. Reset clears additional pan and zoom.
Map-card size and rendering properties
Drag the top-right handle to resize freely, or focus it and use arrow keys. Size is restored next time. Rendering properties controls VRAM budget, resolution and loading concurrency. The budget is not a guarantee of available VRAM.
9. Validate, save and install
Validation, warning markers and copying errors
Use Validation to check passage order, connections and foldbacks. Select a gap ! marker or issue to focus it. Error-card contents can be copied. Ctrl+Z undoes; Ctrl+Y redoes.
Browser storage and editing JSON backups
Save in browser stores edits in the current configuration. Pro editovatelnou zálohu použijte Configuration management / Save all edited data pro stažení JSON. Oprávnění úložiště a složky nejsou sdíleny mezi prohlížeči ani zdroji. Podrobnosti o úložišti a mezipaměti ukazují využití a stav trvalého úložiště. Use Import all editing data to restore saved JSON. Události bez odpovídající položky jsou přidány. When an existing event would change, a warning lists its name. Storno ponechá všechny události beze změny.
Export to game and ZIP installation
V Export událostí vyberte Exportovat aktuální událost nebo Exportovat všechny uložené události. Po vygenerování vyberte Uložit vygenerovaný ZIP. Zavřete hru a spouštěče a zkopírujte složku skriptů ze ZIP do složky obsahující speed.exe. ZIP obsahuje pouze data událostí, bez modulů ASI nebo instalačního programu. Přímý zápis je dostupný v rámci pokročilých možností na stejné obrazovce.
Post-install checks and configuration fingerprint mismatches
After installation, playtest start, checkpoints, finish, exit and re-entry. Do not redistribute game files or converted scene resources. Close and reopen the app if old UI remains. For fingerprint mismatches, back up edits and update the configuration from the same game.
Options menu and bug reports
The upper-right … menu contains language, app installation and support. Include event name, reproduction steps and copied error details when reporting a problem. You do not need to send the entire game.
Recover from an unresponsive worker or failed generation
Export generation has a ten-minute response limit; configuration preparation has a fifteen-minute limit. A timeout terminates the worker; transfer failures can also be retried. Existing game files and configurations are not updated before generation/preparation succeeds.
10. Required mods and installation order
Normal-event prerequisites
Normal events require a supported English 1.3 speed.exe, an ASI loader and Event Loader. Preserve Japanese assets, existing INIs and saves. Do not install the same ASI both in the game root and scripts.
NeoAI and NFRR
Current NeoAI combines control inside Event Loader with the vehicle-scope adapter from a compatible NFRR. Native-AI events do not require NFRR. Performance matching also uses compatible NFRR calibration for the selected configuration.
Combat modes, expanded grids and HUD
Arms Race, Gauntlet and Hot Pursuit require compatible Event Loader and ArmsAssist plus a separately installed MWArsenal and its assets. Use compatible Limit Breaker for more than four participants and the suite HUD fixes for HP/HUD coexistence. MWArsenal alone does not register these modes.
Installation and verification order
Zavřete hru a spouštěče a nainstalujte požadované mody samostatně. Zkopírujte složku skriptů z editoru ZIP do hry nebo použijte přímý zápis v rámci pokročilých možností exportu. Zkontrolujte začátek, kontrolní body, konec, opakujte pokus, odchod a další událost.
11. Game data and recorded SFX
Local resources and distributable files
The editor extracts world, map and model data locally. Do not add configuration caches, source executables, BUN files, audio banks, profiles or Shadow/vault to event distribution ZIPs. Users install the required mods and world separately. Bug reporting is a separate action with reviewed submission content.
Náhradní zvuky v balíčku ArmsAssist
Kontrola souborů balíčku
Distribuční balíček ArmsAssist obsahuje čtyři náhradní efekty ve složce scripts/MWArmsAssist: Drop.wav, PlayerDrop.wav, Lock_by_police.wav a repair-complete.wav. Použijte soubory dodané s tímto balíčkem. Starší popisy, které je označovaly za zvuk z NFSHP, nahrávku herního zvuku nebo originální zvuk, nepopisují přesně aktuální sadu náhradních zvuků.
Seznam dodaných souborů a ověřovací údaje najdete v souborech manifest.json v balíčku. Před výměnou zvuků v existující instalaci ukončete hru a zálohujte aktuální soubory. Zvukové banky ani nepoužívané zvuky nejsou součástí balíčku.
12. Local conversion of additional cutscenes
Conversion prerequisites and availability
Convert scenes locally from your legitimate Carbon/UG2 files. Current development scripts depend on verified input paths and versions; a general one-click converter is not yet available. Thumbnails alone cannot play a scene.
Verify the original files
Inputs include the selected NIS, matching GLOBAL camera assets and verified camera descriptions; UG2 also uses EvtTrk. Read only the required files, preserve the source game and record sizes/SHA256. Convert normal race intros without mixing in story-only scenes.
Convert and validate each scene
In the development tree tools/CarbonIntro, Carbon uses prepare_variants and export_variant; UG2 uses prepare_ug2_one, prepare_ug2_batch and the matching export_ug2 scripts. Validate actors, car layout, camera and GO timing separately. Do not add actor assets to camera-only scenes.
Install into your own game
Install only the runtimeFiles listed by runtime_manifest under scripts/EventLoader/CustomCutscenes/scene-ID. camera.cic, cars.cic, actor-clock.bin, scene-timing.bin and other files must match that scene manifest. Exclude camera.raw, original BUN/EXE files and research NPZ files.
Keep scene decoding and recording distinct
Scene audio is a separate step. Validate a confirmed PCM16 WAV and audio-timing.bin together with scene_audio. Current limits are mono/stereo, 8–96 kHz, 60 seconds and 8 MiB. export_scene_wav decodes a local ABK; it does not record audio. Do not claim original-audio fidelity for unidentified samples.
Selection and gameplay checks
Select a scene matching the participant count and playtest intro-to-GO, cancel, retry and transition to another event. Missing assets fall back to the original MW intro. Do not include converted source-game assets in general event distributions.
Chrome vagy Edge esetén nyissa meg a Játék-/Konfigurációkezelést. A Játékkonfiguráció hozzáadása alatt írjon be egy nevet, válassza ki a típust a legördülő menüből, majd válassza a Játékmappa olvasása lehetőséget, és válassza ki a speed.exe-t tartalmazó mappát. Az első előkészítés több percig is eltarthat. Nincs szükség külső grafikus felületre vagy előkészített konfigurációs mappára. A játékfájlok nincsenek feltöltve.
Supported worlds and baseline
The original Rockport world is supported. W2C events require the matching W2C world. The baseline is captured when the cache is prepared. After changing world files or textures, back up your editing JSON before updating the configuration from the same game folder. Game files are not uploaded.
Update a configuration from the game folder
Válassza ki a konfigurációt a Konfigurációkezelésben, és nyomja meg a Konfiguráció frissítése gombot. A frissítés azonnal megkezdődik, amikor az emlékezett játékmappa elérhető. Csak akkor kéri, hogy válassza ki a speed.exe mappát, ha a hely hiányzik vagy nem érhető el. A módosítások és a konfigurációs azonosító megmarad. Adjon hozzá külön konfigurációt, ha a világ vagy az út elrendezése eltér.
Konfigurációk újbóli megnyitása vagy váltása
Egy konfiguráció újbóli megnyitásakor vagy kiválasztásakor csak a mentett játékmappa-hivatkozás és a mappa neve áll vissza. A rendszer nem vizsgálja át a mappát, és nem importál eseményeket. Minden konfiguráció saját eseménylistát használ.
A geometria előkészítésekor
A 3D szerkesztő előnézeti adatai a konfiguráció hozzáadásakor vagy frissítésekor készülnek el. A EventLoader szükség esetén automatikusan felépíti a játék geometriáját a fogadó telepítésből, mielőtt a célesemény elindulna. Nincs szükség geometria exportálásra a szerkesztőből.
2. Select or create an event
Event selection and top-bar actions
Az eseményeket kifejezetten a Konfigurációkezelés → Események beolvasása a játékból paranccsal importálja. A szerkesztő a kapcsolt mappát használja, és kéri annak kiválasztását, ha az nem érhető el. Másik játék- vagy eseménymappa, illetve megosztott ZIP is importálható. Az import ellenőrzi a fájlok tartalmát és a térkép kompatibilitását, miközben megőrzi az UUID-ket és az elhelyezéseket. Más forrásból történő import nem módosítja ennek a konfigurációnak a kapcsolt játékmappáját.
Correct native events and delete added events
To correct a native event, use Project → This course → Correct native event. Deletion affects the browser list; it does not uninstall files already written to the game. Undo deletion restores the last deletion.
3. Navigate the 3D view
3D camera controls and tool help
Tools are on the left, the 3D view is central, and Event, Selection and Validation are on the right. Hover or keyboard-focus a tool for illustrated help. Left-drag empty space to orbit, right-drag to pan, and scroll to zoom. PageUp/PageDown adjusts height; hold Shift for a larger step. Top view and Focus selection are also available.
Visible labels and display layers
Visible labels toggles text by category. Display layers toggles world geometry, roads, gate volumes, objects and the grid. Hiding labels never removes placed objects. Label preferences are stored in this browser.
4. Required gates and shortcuts
Gate key: START = starting grid; FINISH/LAP = finish or lap line; CP = required checkpoint; SC = optional shortcut.
Gate types, colors and required markers
Green START, orange FINISH/LAP and cyan CP carry a small ! badge. Pink SC is an optional shortcut, not a checkpoint. Reset gates are red. Tool colors match the labels.
Place, orient and order gates
Choose a placement tool and click the road. Select an object and adjust it with 3D handles or numeric position, rotation and size. Face it along the route and cover the road width. Reorder CPs with Order up/down. Start and finish map icons are automatic.
Circuits starting on a branch
For a circuit starting on a branch, check both the initial entry and the merge on later laps. Start and lap line can be separate. Alternatives and shortcuts must not skip checkpoints.
5. Routes, barriers and AI
Route diagram: yellow MAIN is the main route, pink SHORTCUT is a shortcut, and green FREE CURVE is Fill / AI optimization. Secondary routes, exclusions, walls and right-panel settings are explained separately below.
Main route (yellow)
Trace the blue road lines defined by the game to select the main route. Complete the route. Placed gates determine its direction automatically. This route appears on the map.
Secondary route (orange)
Trace the blue road lines defined by the game to select a secondary route. Connect it to the yellow main route. Placed gates determine its direction automatically. This route appears on the map.
Shortcut (pink)
Trace the blue road lines to define an optional shortcut for NeoAI. Placed gates determine its direction automatically. Shortcuts do not appear on the map. Placing shortcut gates as well is recommended.
Fill / AI optimization (green)
Use this for routes without blue road lines. The curve inherits its role from the connected route. Draw it in place of the corresponding colored route to optimize the NeoAI driving line.
AI discouraged (brown): exclude from route choices
Exclude routes from NeoAI route choices. No connection to the main route is required. These lines do not appear on the map.
Barrier walls: block a path
Click to place one barrier wall, or drag to place a continuous run. Edit individual walls after confirming. Check their facing and orientation. A wall crossing a blue road line prevents NeoAI from choosing that path.
AI obstacle markers: assist avoidance
Effective, but still being tuned. Place over indestructible objects such as central dividers that AI struggles to avoid, giving it more time to anticipate avoidance. This does not guarantee complete control.
Replace the race map
Generate a dedicated race map by drawing the configured routes onto the extracted world map.
Guide NeoAI with map lines
Guide AI along the configured routes. When enabled, Event Loader’s NeoAI controls the vehicles instead of the original game AI. When disabled, the original game AI controls them.
Select cars similar to the player
Set the vehicle regulations: select rival cars with a similar price range and performance to the player’s car. When disabled, selection follows the blacklist rank.
Objects and passage order reviewed
Optional self-check switch. It has no effect on the game.
6. Race-specific editing
Speedtrap: measurement points
Speedtrap uses the speed trap tool. Measurement points are separate from CPs, up to 16, with a count card on the left. Select points to edit radius and order.
Tollbooth: toll locations and bonus time
In Tollbooth mode, click a 3D tollbooth candidate and assign Start, timed Passage or Finish. Check order and bonus time in the list. Use free passage-point placement where no native tollbooth exists.
Lap Knockout: participants and laps
Lap Knockout eliminates one racer per lap; four participants require at least three laps. Check participants and laps. Drag and other modes expose their own settings.
7. Properties and cutscenes
Select Arms Race (prototype)
Select Arms Race under Combat mode in Event Properties. Sprint, Circuit, Lap Knockout and Speed Trap can be used as the racing rules. Compatible Event Loader, MWArsenal and ArmsAssist are required. Without them, the editor disables the option and the game does not register the event.
Select Hot Pursuit (prototype)
Maximum eight racers. Pursuit starts individually after 25% race progress, with up to two chase cars per racer. Roadblocks and helicopters are separate. With survival-reward builds, any genuine finish is a clear and reward equals configured cash x survivors / finish position. A racer destroying Cross at heat 5 or higher restores 15% HP to surviving racers, and finished AI keep fleeing. Event Properties shows the rules supported by the connected MOD builds. Older supported builds do not gain these new rules.
Hot Pursuit requirements and settings
Connect the game folder containing MWArsenal and the validated Hot Pursuit builds of Event Loader and ArmsAssist. Older builds leave the option disabled. Choose Sprint or Speedtrap rules, starting heat, ammunition and cutscene. Police are always enabled.
Health, crash retirement and retry
Human and AI racers have 300 HP. EMP deals 25 damage, Spike 50 and Shockwave 15. An AI racer at zero HP retires through the native crash outcome while the remaining racers continue. A player at zero HP enters the native losing results screen with Restart available. Restart resets event health and ammunition. Arrests retain the native arrest scene.
Starting ammunition per weapon
Specify starting ammunition per weapon. Leave a field blank to use the ArmsAssist INI; zero disables that weapon. Specified counts are refilled at the start and on restart, and AI racers receive the same counts. Player equipment and INIs are preserved. Temporary event ammunition is released on exit.
Normal race behavior
Normal races lock weapons and hide the weapon HUD even with police enabled. Explicitly select a weapon-enabled event mode to use weapons. Drift Race remains unavailable.
Edit and apply event properties
Top-bar Properties and Open event properties on the right open the same dialog. Set name, ID, blacklist rank, type, participants, reward, traffic and police, then Apply. Cancel restores the state from when the dialog opened.
Select a cutscene and inspect its preview
Hover a scene or navigate with arrow keys for its image and grid diagram. Some Carbon previews show an actor pose with a layout diagram. Camera-only scenes are marked as having no actor. Slot 1 is the player. Scenes with a different participant count cannot be selected.
Starting-grid layout preview
The 3D grid follows the selected scene's countdown layout and road surface. Automatic and original-MW modes show an estimate; the final layout is chosen in game. Check that it fits the road.
Required resources for additional cutscenes
Additional scenes require resources converted locally from legitimate Carbon/Underground 2 files. Preview images alone cannot play a scene. Missing assets or unsuitable runtime conditions fall back to the original presentation.
8. Map card and rendering
Lower-left map card: switch its content with the tabs and resize the card with its top-right handle.
Lower-left map card: tabs and auto fit
Switch between World, Course map and After-edit preview at the lower left. World automatically fits placed objects, or the whole world when empty. Toggle Auto fit for whole-world bounds. Reset clears additional pan and zoom.
Map-card size and rendering properties
Drag the top-right handle to resize freely, or focus it and use arrow keys. Size is restored next time. Rendering properties controls VRAM budget, resolution and loading concurrency. The budget is not a guarantee of available VRAM.
9. Validate, save and install
Validation, warning markers and copying errors
Use Validation to check passage order, connections and foldbacks. Select a gap ! marker or issue to focus it. Error-card contents can be copied. Ctrl+Z undoes; Ctrl+Y redoes.
Browser storage and editing JSON backups
Mentés a böngészőben tárolja a módosításokat az aktuális konfigurációban. Szerkeszthető biztonsági mentéshez használja a Konfigurációkezelés / Minden szerkesztési adat mentése lehetőséget a JSON letöltéséhez. A tárhely- és mappaengedélyek nincsenek megosztva a böngészők vagy a források között. A tárhely és a gyorsítótár adatai a használatot és a tartós tárolás állapotát mutatják. A mentett JSON visszaállításához használja az Összes szerkesztési adat importálása lehetőséget. A megfelelő bejegyzés nélküli események hozzáadásra kerülnek. Ha egy meglévő esemény megváltozik, egy figyelmeztetés listázza a nevét. A törlés az összes eseményt változatlanul hagyja.
Export to game and ZIP installation
Az Esemény exportálásnál válassza az Aktuális esemény exportálása vagy az Összes mentett esemény exportálása lehetőséget. A generálás után válassza a Generált ZIP mentése lehetőséget. Zárja be a játékot és az indítókat, majd másolja a szkriptek mappáját a ZIP-ből a speed.exe-t tartalmazó mappába. A ZIP csak eseményadatokat tartalmaz, ASI modulok vagy telepítő nélkül. A közvetlen írás a speciális beállítások alatt érhető el ugyanazon a képernyőn.
Post-install checks and configuration fingerprint mismatches
After installation, playtest start, checkpoints, finish, exit and re-entry. Do not redistribute game files or converted scene resources. Close and reopen the app if old UI remains. For fingerprint mismatches, back up edits and update the configuration from the same game.
Options menu and bug reports
The upper-right … menu contains language, app installation and support. Include event name, reproduction steps and copied error details when reporting a problem. You do not need to send the entire game.
Recover from an unresponsive worker or failed generation
Export generation has a ten-minute response limit; configuration preparation has a fifteen-minute limit. A timeout terminates the worker; transfer failures can also be retried. Existing game files and configurations are not updated before generation/preparation succeeds.
10. Required mods and installation order
Normal-event prerequisites
Normal events require a supported English 1.3 speed.exe, an ASI loader and Event Loader. Preserve Japanese assets, existing INIs and saves. Do not install the same ASI both in the game root and scripts.
NeoAI and NFRR
Current NeoAI combines control inside Event Loader with the vehicle-scope adapter from a compatible NFRR. Native-AI events do not require NFRR. Performance matching also uses compatible NFRR calibration for the selected configuration.
Combat modes, expanded grids and HUD
Arms Race, Gauntlet and Hot Pursuit require compatible Event Loader and ArmsAssist plus a separately installed MWArsenal and its assets. Use compatible Limit Breaker for more than four participants and the suite HUD fixes for HP/HUD coexistence. MWArsenal alone does not register these modes.
Installation and verification order
Zárd be a játékot és az indítókat, és külön telepítsd a szükséges modokat. Másolja be a szkriptek mappáját a ZIP szerkesztőből a játékba, vagy használja a közvetlen írást a speciális exportálási beállítások alatt. Ellenőrizze a rajtot, az ellenőrző pontokat, a célt, az újrapróbálkozást, a kilépést és a következő eseményt.
11. Game data and recorded SFX
Local resources and distributable files
The editor extracts world, map and model data locally. Do not add configuration caches, source executables, BUN files, audio banks, profiles or Shadow/vault to event distribution ZIPs. Users install the required mods and world separately. Bug reporting is a separate action with reviewed submission content.
Az ArmsAssist csomagban lévő cserehangok
A csomagfájlok ellenőrzése
Az ArmsAssist terjesztési csomagja négy cserehangot tartalmaz a scripts/MWArmsAssist mappában: Drop.wav, PlayerDrop.wav, Lock_by_police.wav és repair-complete.wav. A csomagban lévő fájlokat használja. A korábbi leírások, amelyek NFSHP-forráshangként, játékhang-felvételként vagy eredeti hangként jelölték őket, nem írják le pontosan a jelenlegi cserehang-készletet.
A mellékelt fájlok listáját és ellenőrzési adatait a csomag manifest.json fájlja tartalmazza. Meglévő telepítés hangjainak cseréje előtt zárja be a játékot, és készítsen biztonsági másolatot a jelenlegi fájlokról. Hangbankok és nem használt SFX-ek nincsenek a csomagban.
12. Local conversion of additional cutscenes
Conversion prerequisites and availability
Convert scenes locally from your legitimate Carbon/UG2 files. Current development scripts depend on verified input paths and versions; a general one-click converter is not yet available. Thumbnails alone cannot play a scene.
Verify the original files
Inputs include the selected NIS, matching GLOBAL camera assets and verified camera descriptions; UG2 also uses EvtTrk. Read only the required files, preserve the source game and record sizes/SHA256. Convert normal race intros without mixing in story-only scenes.
Convert and validate each scene
In the development tree tools/CarbonIntro, Carbon uses prepare_variants and export_variant; UG2 uses prepare_ug2_one, prepare_ug2_batch and the matching export_ug2 scripts. Validate actors, car layout, camera and GO timing separately. Do not add actor assets to camera-only scenes.
Install into your own game
Install only the runtimeFiles listed by runtime_manifest under scripts/EventLoader/CustomCutscenes/scene-ID. camera.cic, cars.cic, actor-clock.bin, scene-timing.bin and other files must match that scene manifest. Exclude camera.raw, original BUN/EXE files and research NPZ files.
Keep scene decoding and recording distinct
Scene audio is a separate step. Validate a confirmed PCM16 WAV and audio-timing.bin together with scene_audio. Current limits are mono/stereo, 8–96 kHz, 60 seconds and 8 MiB. export_scene_wav decodes a local ABK; it does not record audio. Do not claim original-audio fidelity for unidentified samples.
Selection and gameplay checks
Select a scene matching the participant count and playtest intro-to-GO, cancel, retry and transition to another event. Missing assets fall back to the original MW intro. Do not include converted source-game assets in general event distributions.
Στο Chrome ή Edge, ανοίξτε τη Διαχείριση Παιχνιδιού / Διαμόρφωσης. Στην περιοχή Προσθήκη διαμόρφωσης παιχνιδιού, πληκτρολογήστε ένα όνομα, επιλέξτε τον τύπο από το αναπτυσσόμενο μενού και, στη συνέχεια, επιλέξτε Ανάγνωση φακέλου παιχνιδιού και επιλέξτε το φάκελο που περιέχει το speed.exe. Η αρχική προετοιμασία μπορεί να διαρκέσει αρκετά λεπτά. Δεν απαιτείται εξωτερικό GUI ή προετοιμασμένος φάκελος διαμόρφωσης. Τα αρχεία παιχνιδιού δεν μεταφορτώνονται.
Supported worlds and baseline
The original Rockport world is supported. W2C events require the matching W2C world. The baseline is captured when the cache is prepared. After changing world files or textures, back up your editing JSON before updating the configuration from the same game folder. Game files are not uploaded.
Update a configuration from the game folder
Επιλέξτε τη διαμόρφωση στη Διαχείριση διαμόρφωσης και πατήστε Ενημέρωση διαμόρφωσης. Η ενημέρωση ξεκινά αμέσως όταν είναι προσβάσιμος ο φάκελος του απομνημονευμένου παιχνιδιού. Σας ζητείται να επιλέξετε το φάκελο που περιέχει το speed.exe μόνο εάν η τοποθεσία λείπει ή δεν είναι διαθέσιμη. Οι τροποποιήσεις και το αναγνωριστικό διαμόρφωσης διατηρούνται. Προσθέστε μια ξεχωριστή διαμόρφωση όταν ο κόσμος ή η διάταξη του δρόμου διαφέρει.
Επανάνοιγμα ή εναλλαγή διαμορφώσεων
Όταν ανοίγετε ξανά ή αλλάζετε διαμόρφωση, επαναφέρεται μόνο ο αποθηκευμένος σύνδεσμος και το όνομα του φακέλου παιχνιδιού. Ο φάκελος δεν σαρώνονται και δεν εισάγονται συμβάντα. Κάθε διαμόρφωση διατηρεί τη δική της λίστα συμβάντων.
Όταν προετοιμαστεί η γεωμετρία
Επεξεργαστής Τα δεδομένα προεπισκόπησης 3D προετοιμάζονται όταν προστίθεται ή ενημερώνεται μια διαμόρφωση. Το EventLoader δημιουργεί αυτόματα τη γεωμετρία του παιχνιδιού από την εγκατάσταση λήψης όταν χρειάζεται πριν από την έναρξη του συμβάντος στόχου. Δεν απαιτείται εξαγωγή γεωμετρίας από το πρόγραμμα επεξεργασίας.
2. Select or create an event
Event selection and top-bar actions
Εισαγάγετε συμβάντα ρητά από τη Διαχείριση διαμορφώσεων → Ανάγνωση συμβάντων από το παιχνίδι. Ο επεξεργαστής χρησιμοποιεί τον συνδεδεμένο φάκελο και σας ζητά να τον επιλέξετε αν δεν είναι προσβάσιμος. Μπορείτε επίσης να εισαγάγετε άλλον φάκελο παιχνιδιού ή συμβάντων ή ένα κοινόχρηστο ZIP. Η εισαγωγή ελέγχει τα περιεχόμενα των αρχείων και τη συμβατότητα του χάρτη, διατηρώντας UUID και τοποθετήσεις. Η εισαγωγή από άλλη πηγή δεν αλλάζει τον συνδεδεμένο φάκελο παιχνιδιού αυτής της διαμόρφωσης.
Correct native events and delete added events
To correct a native event, use Project → This course → Correct native event. Deletion affects the browser list; it does not uninstall files already written to the game. Undo deletion restores the last deletion.
3. Navigate the 3D view
3D camera controls and tool help
Tools are on the left, the 3D view is central, and Event, Selection and Validation are on the right. Hover or keyboard-focus a tool for illustrated help. Left-drag empty space to orbit, right-drag to pan, and scroll to zoom. PageUp/PageDown adjusts height; hold Shift for a larger step. Top view and Focus selection are also available.
Visible labels and display layers
Visible labels toggles text by category. Display layers toggles world geometry, roads, gate volumes, objects and the grid. Hiding labels never removes placed objects. Label preferences are stored in this browser.
4. Required gates and shortcuts
Gate key: START = starting grid; FINISH/LAP = finish or lap line; CP = required checkpoint; SC = optional shortcut.
Gate types, colors and required markers
Green START, orange FINISH/LAP and cyan CP carry a small ! badge. Pink SC is an optional shortcut, not a checkpoint. Reset gates are red. Tool colors match the labels.
Place, orient and order gates
Choose a placement tool and click the road. Select an object and adjust it with 3D handles or numeric position, rotation and size. Face it along the route and cover the road width. Reorder CPs with Order up/down. Start and finish map icons are automatic.
Circuits starting on a branch
For a circuit starting on a branch, check both the initial entry and the merge on later laps. Start and lap line can be separate. Alternatives and shortcuts must not skip checkpoints.
5. Routes, barriers and AI
Route diagram: yellow MAIN is the main route, pink SHORTCUT is a shortcut, and green FREE CURVE is Fill / AI optimization. Secondary routes, exclusions, walls and right-panel settings are explained separately below.
Main route (yellow)
Trace the blue road lines defined by the game to select the main route. Complete the route. Placed gates determine its direction automatically. This route appears on the map.
Secondary route (orange)
Trace the blue road lines defined by the game to select a secondary route. Connect it to the yellow main route. Placed gates determine its direction automatically. This route appears on the map.
Shortcut (pink)
Trace the blue road lines to define an optional shortcut for NeoAI. Placed gates determine its direction automatically. Shortcuts do not appear on the map. Placing shortcut gates as well is recommended.
Fill / AI optimization (green)
Use this for routes without blue road lines. The curve inherits its role from the connected route. Draw it in place of the corresponding colored route to optimize the NeoAI driving line.
AI discouraged (brown): exclude from route choices
Exclude routes from NeoAI route choices. No connection to the main route is required. These lines do not appear on the map.
Barrier walls: block a path
Click to place one barrier wall, or drag to place a continuous run. Edit individual walls after confirming. Check their facing and orientation. A wall crossing a blue road line prevents NeoAI from choosing that path.
AI obstacle markers: assist avoidance
Effective, but still being tuned. Place over indestructible objects such as central dividers that AI struggles to avoid, giving it more time to anticipate avoidance. This does not guarantee complete control.
Replace the race map
Generate a dedicated race map by drawing the configured routes onto the extracted world map.
Guide NeoAI with map lines
Guide AI along the configured routes. When enabled, Event Loader’s NeoAI controls the vehicles instead of the original game AI. When disabled, the original game AI controls them.
Select cars similar to the player
Set the vehicle regulations: select rival cars with a similar price range and performance to the player’s car. When disabled, selection follows the blacklist rank.
Objects and passage order reviewed
Optional self-check switch. It has no effect on the game.
6. Race-specific editing
Speedtrap: measurement points
Speedtrap uses the speed trap tool. Measurement points are separate from CPs, up to 16, with a count card on the left. Select points to edit radius and order.
Tollbooth: toll locations and bonus time
In Tollbooth mode, click a 3D tollbooth candidate and assign Start, timed Passage or Finish. Check order and bonus time in the list. Use free passage-point placement where no native tollbooth exists.
Lap Knockout: participants and laps
Lap Knockout eliminates one racer per lap; four participants require at least three laps. Check participants and laps. Drag and other modes expose their own settings.
7. Properties and cutscenes
Select Arms Race (prototype)
Select Arms Race under Combat mode in Event Properties. Sprint, Circuit, Lap Knockout and Speed Trap can be used as the racing rules. Compatible Event Loader, MWArsenal and ArmsAssist are required. Without them, the editor disables the option and the game does not register the event.
Select Hot Pursuit (prototype)
Maximum eight racers. Pursuit starts individually after 25% race progress, with up to two chase cars per racer. Roadblocks and helicopters are separate. With survival-reward builds, any genuine finish is a clear and reward equals configured cash x survivors / finish position. A racer destroying Cross at heat 5 or higher restores 15% HP to surviving racers, and finished AI keep fleeing. Event Properties shows the rules supported by the connected MOD builds. Older supported builds do not gain these new rules.
Hot Pursuit requirements and settings
Connect the game folder containing MWArsenal and the validated Hot Pursuit builds of Event Loader and ArmsAssist. Older builds leave the option disabled. Choose Sprint or Speedtrap rules, starting heat, ammunition and cutscene. Police are always enabled.
Health, crash retirement and retry
Human and AI racers have 300 HP. EMP deals 25 damage, Spike 50 and Shockwave 15. An AI racer at zero HP retires through the native crash outcome while the remaining racers continue. A player at zero HP enters the native losing results screen with Restart available. Restart resets event health and ammunition. Arrests retain the native arrest scene.
Starting ammunition per weapon
Specify starting ammunition per weapon. Leave a field blank to use the ArmsAssist INI; zero disables that weapon. Specified counts are refilled at the start and on restart, and AI racers receive the same counts. Player equipment and INIs are preserved. Temporary event ammunition is released on exit.
Normal race behavior
Normal races lock weapons and hide the weapon HUD even with police enabled. Explicitly select a weapon-enabled event mode to use weapons. Drift Race remains unavailable.
Edit and apply event properties
Top-bar Properties and Open event properties on the right open the same dialog. Set name, ID, blacklist rank, type, participants, reward, traffic and police, then Apply. Cancel restores the state from when the dialog opened.
Select a cutscene and inspect its preview
Hover a scene or navigate with arrow keys for its image and grid diagram. Some Carbon previews show an actor pose with a layout diagram. Camera-only scenes are marked as having no actor. Slot 1 is the player. Scenes with a different participant count cannot be selected.
Starting-grid layout preview
The 3D grid follows the selected scene's countdown layout and road surface. Automatic and original-MW modes show an estimate; the final layout is chosen in game. Check that it fits the road.
Required resources for additional cutscenes
Additional scenes require resources converted locally from legitimate Carbon/Underground 2 files. Preview images alone cannot play a scene. Missing assets or unsuitable runtime conditions fall back to the original presentation.
8. Map card and rendering
Lower-left map card: switch its content with the tabs and resize the card with its top-right handle.
Lower-left map card: tabs and auto fit
Switch between World, Course map and After-edit preview at the lower left. World automatically fits placed objects, or the whole world when empty. Toggle Auto fit for whole-world bounds. Reset clears additional pan and zoom.
Map-card size and rendering properties
Drag the top-right handle to resize freely, or focus it and use arrow keys. Size is restored next time. Rendering properties controls VRAM budget, resolution and loading concurrency. The budget is not a guarantee of available VRAM.
9. Validate, save and install
Validation, warning markers and copying errors
Use Validation to check passage order, connections and foldbacks. Select a gap ! marker or issue to focus it. Error-card contents can be copied. Ctrl+Z undoes; Ctrl+Y redoes.
Browser storage and editing JSON backups
Αποθήκευση στο πρόγραμμα περιήγησης αποθηκεύει τροποποιήσεις στην τρέχουσα διαμόρφωση. Για επεξεργάσιμο αντίγραφο ασφαλείας, χρησιμοποιήστε τη Διαχείριση διαμόρφωσης / Αποθήκευση όλων των δεδομένων επεξεργασίας για λήψη του JSON. Τα δικαιώματα αποθήκευσης και φακέλων δεν μοιράζονται μεταξύ προγραμμάτων περιήγησης ή προέλευσης. Οι λεπτομέρειες αποθήκευσης και κρυφής μνήμης δείχνουν τη χρήση και την κατάσταση μόνιμης αποθήκευσης. Χρησιμοποιήστε την Εισαγωγή όλων των δεδομένων επεξεργασίας για να επαναφέρετε το αποθηκευμένο JSON. Προστίθενται συμβάντα χωρίς αντίστοιχη καταχώριση. Όταν ένα υπάρχον συμβάν αλλάζει, μια προειδοποίηση αναφέρει το όνομά του. Η ακύρωση αφήνει όλα τα συμβάντα αμετάβλητα.
Export to game and ZIP installation
Στην Εξαγωγή συμβάντος, επιλέξτε Εξαγωγή τρέχοντος συμβάντος ή Εξαγωγή όλων των αποθηκευμένων συμβάντων. Μετά τη δημιουργία, επιλέξτε Αποθήκευση που δημιουργήθηκε ZIP. Κλείστε το παιχνίδι και τα προγράμματα εκκίνησης και, στη συνέχεια, αντιγράψτε το φάκελο σεναρίων από το ZIP στον φάκελο που περιέχει το speed.exe. Το ZIP περιέχει μόνο δεδομένα συμβάντων, χωρίς λειτουργικές μονάδες ή πρόγραμμα εγκατάστασης ASI. Η άμεση γραφή είναι διαθέσιμη στις προηγμένες επιλογές στην ίδια οθόνη.
Post-install checks and configuration fingerprint mismatches
After installation, playtest start, checkpoints, finish, exit and re-entry. Do not redistribute game files or converted scene resources. Close and reopen the app if old UI remains. For fingerprint mismatches, back up edits and update the configuration from the same game.
Options menu and bug reports
The upper-right … menu contains language, app installation and support. Include event name, reproduction steps and copied error details when reporting a problem. You do not need to send the entire game.
Recover from an unresponsive worker or failed generation
Export generation has a ten-minute response limit; configuration preparation has a fifteen-minute limit. A timeout terminates the worker; transfer failures can also be retried. Existing game files and configurations are not updated before generation/preparation succeeds.
10. Required mods and installation order
Normal-event prerequisites
Normal events require a supported English 1.3 speed.exe, an ASI loader and Event Loader. Preserve Japanese assets, existing INIs and saves. Do not install the same ASI both in the game root and scripts.
NeoAI and NFRR
Current NeoAI combines control inside Event Loader with the vehicle-scope adapter from a compatible NFRR. Native-AI events do not require NFRR. Performance matching also uses compatible NFRR calibration for the selected configuration.
Combat modes, expanded grids and HUD
Arms Race, Gauntlet and Hot Pursuit require compatible Event Loader and ArmsAssist plus a separately installed MWArsenal and its assets. Use compatible Limit Breaker for more than four participants and the suite HUD fixes for HP/HUD coexistence. MWArsenal alone does not register these modes.
Installation and verification order
Κλείστε το παιχνίδι και τα προγράμματα εκκίνησης και εγκαταστήστε τα απαιτούμενα mods ξεχωριστά. Αντιγράψτε το φάκελο scripts από το πρόγραμμα επεξεργασίας ZIP στο παιχνίδι ή χρησιμοποιήστε απευθείας γραφή στις προηγμένες επιλογές εξαγωγής. Ελέγξτε την έναρξη, τα σημεία ελέγχου, το τέλος, την επανάληψη, την έξοδο και το επόμενο συμβάν.
11. Game data and recorded SFX
Local resources and distributable files
The editor extracts world, map and model data locally. Do not add configuration caches, source executables, BUN files, audio banks, profiles or Shadow/vault to event distribution ZIPs. Users install the required mods and world separately. Bug reporting is a separate action with reviewed submission content.
Ήχοι αντικατάστασης στο πακέτο ArmsAssist
Έλεγχος αρχείων πακέτου
Το πακέτο διανομής του ArmsAssist περιλαμβάνει τέσσερα εφέ αντικατάστασης στον φάκελο scripts/MWArmsAssist: Drop.wav, PlayerDrop.wav, Lock_by_police.wav και repair-complete.wav. Χρησιμοποιήστε τα αρχεία που παρέχονται με αυτό το πακέτο. Οι παλιότερες περιγραφές τους ως ήχοι NFSHP, ηχογραφήσεις ήχων παιχνιδιού ή πρωτότυποι ήχοι δεν περιγράφουν με ακρίβεια το τρέχον σύνολο αντικατάστασης.
Για τη λίστα των παρεχόμενων αρχείων και τα στοιχεία επαλήθευσης, ανατρέξτε στα manifest.json του πακέτου. Πριν αντικαταστήσετε ήχους σε υπάρχουσα εγκατάσταση, κλείστε το παιχνίδι και δημιουργήστε αντίγραφα ασφαλείας των τρεχόντων αρχείων. Δεν περιλαμβάνονται τράπεζες ήχων ή αχρησιμοποίητα SFX.
12. Local conversion of additional cutscenes
Conversion prerequisites and availability
Convert scenes locally from your legitimate Carbon/UG2 files. Current development scripts depend on verified input paths and versions; a general one-click converter is not yet available. Thumbnails alone cannot play a scene.
Verify the original files
Inputs include the selected NIS, matching GLOBAL camera assets and verified camera descriptions; UG2 also uses EvtTrk. Read only the required files, preserve the source game and record sizes/SHA256. Convert normal race intros without mixing in story-only scenes.
Convert and validate each scene
In the development tree tools/CarbonIntro, Carbon uses prepare_variants and export_variant; UG2 uses prepare_ug2_one, prepare_ug2_batch and the matching export_ug2 scripts. Validate actors, car layout, camera and GO timing separately. Do not add actor assets to camera-only scenes.
Install into your own game
Install only the runtimeFiles listed by runtime_manifest under scripts/EventLoader/CustomCutscenes/scene-ID. camera.cic, cars.cic, actor-clock.bin, scene-timing.bin and other files must match that scene manifest. Exclude camera.raw, original BUN/EXE files and research NPZ files.
Keep scene decoding and recording distinct
Scene audio is a separate step. Validate a confirmed PCM16 WAV and audio-timing.bin together with scene_audio. Current limits are mono/stereo, 8–96 kHz, 60 seconds and 8 MiB. export_scene_wav decodes a local ABK; it does not record audio. Do not claim original-audio fidelity for unidentified samples.
Selection and gameplay checks
Select a scene matching the participant count and playtest intro-to-GO, cancel, retry and transition to another event. Missing assets fall back to the original MW intro. Do not include converted source-game assets in general event distributions.
I Chrome eller Edge åpner du Spill-/konfigurasjonsadministrasjon. Under Legg til spillkonfigurasjon, skriv inn et navn, velg typen fra rullegardinmenyen, velg deretter Les spillmappe og velg mappen som inneholder speed.exe. Den første forberedelsen kan ta flere minutter. Ingen ekstern GUI eller forberedt konfigurasjonsmappe er nødvendig. Spillfiler lastes ikke opp.
Supported worlds and baseline
The original Rockport world is supported. W2C events require the matching W2C world. The baseline is captured when the cache is prepared. After changing world files or textures, back up your editing JSON before updating the configuration from the same game folder. Game files are not uploaded.
Update a configuration from the game folder
Velg konfigurasjonen i Konfigurasjonsadministrasjon og trykk Oppdater konfigurasjon. Oppdatering starter umiddelbart når den huskede spillmappen er tilgjengelig. Du blir bedt om å velge mappen som inneholder speed.exe bare hvis plasseringen mangler eller er utilgjengelig. Endringer og konfigurasjons-IDen beholdes. Legg til en egen konfigurasjon når verden eller veioppsettet er annerledes.
Åpne konfigurasjoner på nytt eller bytt
Når du åpner eller bytter konfigurasjon, gjenopprettes bare den lagrede koblingen til spillmappen og mappenavnet. Mappen skannes ikke, og hendelser importeres ikke. Hver konfigurasjon har sin egen hendelsesliste.
Når geometri er forberedt
Editor 3D forhåndsvisningsdata forberedes når en konfigurasjon legges til eller oppdateres. EventLoader bygger automatisk spillgeometri fra mottaksinstallasjonen ved behov før målhendelsen starter. Ingen geometrieksport fra editoren er nødvendig.
2. Select or create an event
Event selection and top-bar actions
Importer hendelser eksplisitt fra Konfigurasjonsadministrasjon → Les hendelser fra spillet. Editor bruker den tilknyttede mappen og ber deg velge den hvis den ikke er tilgjengelig. Du kan også importere en annen spill- eller hendelsesmappe eller en delt ZIP-fil. Importen kontrollerer filinnhold og kartkompatibilitet og beholder UUID-er og plasseringer. Import fra en annen kilde endrer ikke den tilknyttede spillmappen for denne konfigurasjonen.
Correct native events and delete added events
To correct a native event, use Project → This course → Correct native event. Deletion affects the browser list; it does not uninstall files already written to the game. Undo deletion restores the last deletion.
3. Navigate the 3D view
3D camera controls and tool help
Tools are on the left, the 3D view is central, and Event, Selection and Validation are on the right. Hover or keyboard-focus a tool for illustrated help. Left-drag empty space to orbit, right-drag to pan, and scroll to zoom. PageUp/PageDown adjusts height; hold Shift for a larger step. Top view and Focus selection are also available.
Visible labels and display layers
Visible labels toggles text by category. Display layers toggles world geometry, roads, gate volumes, objects and the grid. Hiding labels never removes placed objects. Label preferences are stored in this browser.
4. Required gates and shortcuts
Gate key: START = starting grid; FINISH/LAP = finish or lap line; CP = required checkpoint; SC = optional shortcut.
Gate types, colors and required markers
Green START, orange FINISH/LAP and cyan CP carry a small ! badge. Pink SC is an optional shortcut, not a checkpoint. Reset gates are red. Tool colors match the labels.
Place, orient and order gates
Choose a placement tool and click the road. Select an object and adjust it with 3D handles or numeric position, rotation and size. Face it along the route and cover the road width. Reorder CPs with Order up/down. Start and finish map icons are automatic.
Circuits starting on a branch
For a circuit starting on a branch, check both the initial entry and the merge on later laps. Start and lap line can be separate. Alternatives and shortcuts must not skip checkpoints.
5. Routes, barriers and AI
Route diagram: yellow MAIN is the main route, pink SHORTCUT is a shortcut, and green FREE CURVE is Fill / AI optimization. Secondary routes, exclusions, walls and right-panel settings are explained separately below.
Main route (yellow)
Trace the blue road lines defined by the game to select the main route. Complete the route. Placed gates determine its direction automatically. This route appears on the map.
Secondary route (orange)
Trace the blue road lines defined by the game to select a secondary route. Connect it to the yellow main route. Placed gates determine its direction automatically. This route appears on the map.
Shortcut (pink)
Trace the blue road lines to define an optional shortcut for NeoAI. Placed gates determine its direction automatically. Shortcuts do not appear on the map. Placing shortcut gates as well is recommended.
Fill / AI optimization (green)
Use this for routes without blue road lines. The curve inherits its role from the connected route. Draw it in place of the corresponding colored route to optimize the NeoAI driving line.
AI discouraged (brown): exclude from route choices
Exclude routes from NeoAI route choices. No connection to the main route is required. These lines do not appear on the map.
Barrier walls: block a path
Click to place one barrier wall, or drag to place a continuous run. Edit individual walls after confirming. Check their facing and orientation. A wall crossing a blue road line prevents NeoAI from choosing that path.
AI obstacle markers: assist avoidance
Effective, but still being tuned. Place over indestructible objects such as central dividers that AI struggles to avoid, giving it more time to anticipate avoidance. This does not guarantee complete control.
Replace the race map
Generate a dedicated race map by drawing the configured routes onto the extracted world map.
Guide NeoAI with map lines
Guide AI along the configured routes. When enabled, Event Loader’s NeoAI controls the vehicles instead of the original game AI. When disabled, the original game AI controls them.
Select cars similar to the player
Set the vehicle regulations: select rival cars with a similar price range and performance to the player’s car. When disabled, selection follows the blacklist rank.
Objects and passage order reviewed
Optional self-check switch. It has no effect on the game.
6. Race-specific editing
Speedtrap: measurement points
Speedtrap uses the speed trap tool. Measurement points are separate from CPs, up to 16, with a count card on the left. Select points to edit radius and order.
Tollbooth: toll locations and bonus time
In Tollbooth mode, click a 3D tollbooth candidate and assign Start, timed Passage or Finish. Check order and bonus time in the list. Use free passage-point placement where no native tollbooth exists.
Lap Knockout: participants and laps
Lap Knockout eliminates one racer per lap; four participants require at least three laps. Check participants and laps. Drag and other modes expose their own settings.
7. Properties and cutscenes
Select Arms Race (prototype)
Select Arms Race under Combat mode in Event Properties. Sprint, Circuit, Lap Knockout and Speed Trap can be used as the racing rules. Compatible Event Loader, MWArsenal and ArmsAssist are required. Without them, the editor disables the option and the game does not register the event.
Select Hot Pursuit (prototype)
Maximum eight racers. Pursuit starts individually after 25% race progress, with up to two chase cars per racer. Roadblocks and helicopters are separate. With survival-reward builds, any genuine finish is a clear and reward equals configured cash x survivors / finish position. A racer destroying Cross at heat 5 or higher restores 15% HP to surviving racers, and finished AI keep fleeing. Event Properties shows the rules supported by the connected MOD builds. Older supported builds do not gain these new rules.
Hot Pursuit requirements and settings
Connect the game folder containing MWArsenal and the validated Hot Pursuit builds of Event Loader and ArmsAssist. Older builds leave the option disabled. Choose Sprint or Speedtrap rules, starting heat, ammunition and cutscene. Police are always enabled.
Health, crash retirement and retry
Human and AI racers have 300 HP. EMP deals 25 damage, Spike 50 and Shockwave 15. An AI racer at zero HP retires through the native crash outcome while the remaining racers continue. A player at zero HP enters the native losing results screen with Restart available. Restart resets event health and ammunition. Arrests retain the native arrest scene.
Starting ammunition per weapon
Specify starting ammunition per weapon. Leave a field blank to use the ArmsAssist INI; zero disables that weapon. Specified counts are refilled at the start and on restart, and AI racers receive the same counts. Player equipment and INIs are preserved. Temporary event ammunition is released on exit.
Normal race behavior
Normal races lock weapons and hide the weapon HUD even with police enabled. Explicitly select a weapon-enabled event mode to use weapons. Drift Race remains unavailable.
Edit and apply event properties
Top-bar Properties and Open event properties on the right open the same dialog. Set name, ID, blacklist rank, type, participants, reward, traffic and police, then Apply. Cancel restores the state from when the dialog opened.
Select a cutscene and inspect its preview
Hover a scene or navigate with arrow keys for its image and grid diagram. Some Carbon previews show an actor pose with a layout diagram. Camera-only scenes are marked as having no actor. Slot 1 is the player. Scenes with a different participant count cannot be selected.
Starting-grid layout preview
The 3D grid follows the selected scene's countdown layout and road surface. Automatic and original-MW modes show an estimate; the final layout is chosen in game. Check that it fits the road.
Required resources for additional cutscenes
Additional scenes require resources converted locally from legitimate Carbon/Underground 2 files. Preview images alone cannot play a scene. Missing assets or unsuitable runtime conditions fall back to the original presentation.
8. Map card and rendering
Lower-left map card: switch its content with the tabs and resize the card with its top-right handle.
Lower-left map card: tabs and auto fit
Switch between World, Course map and After-edit preview at the lower left. World automatically fits placed objects, or the whole world when empty. Toggle Auto fit for whole-world bounds. Reset clears additional pan and zoom.
Map-card size and rendering properties
Drag the top-right handle to resize freely, or focus it and use arrow keys. Size is restored next time. Rendering properties controls VRAM budget, resolution and loading concurrency. The budget is not a guarantee of available VRAM.
9. Validate, save and install
Validation, warning markers and copying errors
Use Validation to check passage order, connections and foldbacks. Select a gap ! marker or issue to focus it. Error-card contents can be copied. Ctrl+Z undoes; Ctrl+Y redoes.
Browser storage and editing JSON backups
Lagre endringer i nettleserbutikker i gjeldende konfigurasjon. For en redigerbar sikkerhetskopi, bruk Konfigurasjonsadministrasjon / Lagre alle redigeringsdata for å laste ned JSON. Lagrings- og mappetillatelser deles ikke mellom nettlesere eller opphav. Lagrings- og hurtigbufferdetaljer viser bruks- og vedvarende lagringsstatus. Bruk Importer alle redigeringsdata for å gjenopprette lagrede JSON. Events without a matching entry are added. Når en eksisterende hendelse endres, viser en advarsel navnet. Cancel leaves all events unchanged.
Export to game and ZIP installation
I Eksport av hendelser, velg Eksporter gjeldende hendelse eller Eksporter alle lagrede hendelser. Etter generering velger du Lagre generert ZIP. Lukk spillet og startprogrammet, og kopier deretter skriptmappen fra ZIP til mappen som inneholder speed.exe. ZIP inneholder kun hendelsesdata, uten ASI-moduler eller installasjonsprogram. Direkte skriving er tilgjengelig under avanserte alternativer på samme skjerm.
Post-install checks and configuration fingerprint mismatches
After installation, playtest start, checkpoints, finish, exit and re-entry. Do not redistribute game files or converted scene resources. Close and reopen the app if old UI remains. For fingerprint mismatches, back up edits and update the configuration from the same game.
Options menu and bug reports
The upper-right … menu contains language, app installation and support. Include event name, reproduction steps and copied error details when reporting a problem. You do not need to send the entire game.
Recover from an unresponsive worker or failed generation
Export generation has a ten-minute response limit; configuration preparation has a fifteen-minute limit. A timeout terminates the worker; transfer failures can also be retried. Existing game files and configurations are not updated before generation/preparation succeeds.
10. Required mods and installation order
Normal-event prerequisites
Normal events require a supported English 1.3 speed.exe, an ASI loader and Event Loader. Preserve Japanese assets, existing INIs and saves. Do not install the same ASI both in the game root and scripts.
NeoAI and NFRR
Current NeoAI combines control inside Event Loader with the vehicle-scope adapter from a compatible NFRR. Native-AI events do not require NFRR. Performance matching also uses compatible NFRR calibration for the selected configuration.
Combat modes, expanded grids and HUD
Arms Race, Gauntlet and Hot Pursuit require compatible Event Loader and ArmsAssist plus a separately installed MWArsenal and its assets. Use compatible Limit Breaker for more than four participants and the suite HUD fixes for HP/HUD coexistence. MWArsenal alone does not register these modes.
Installation and verification order
Lukk spillet og lanseringene og installer nødvendige mods separat. Kopier skriptmappen fra editoren ZIP inn i spillet, eller bruk direkteskriving under avanserte eksportalternativer. Sjekk start, sjekkpunkter, mål, prøv på nytt, avslutt og neste hendelse.
11. Game data and recorded SFX
Local resources and distributable files
The editor extracts world, map and model data locally. Do not add configuration caches, source executables, BUN files, audio banks, profiles or Shadow/vault to event distribution ZIPs. Users install the required mods and world separately. Bug reporting is a separate action with reviewed submission content.
Erstatningslyder i ArmsAssist-pakken
Kontroller pakkefilene
ArmsAssist-distribusjonspakken inneholder fire erstatningseffekter i scripts/MWArmsAssist: Drop.wav, PlayerDrop.wav, Lock_by_police.wav og repair-complete.wav. Bruk filene som følger med pakken. Tidligere beskrivelser av dem som NFSHP-kildelyd, opptak av spilllyd eller original lyd beskriver ikke det nåværende erstatningssettet korrekt.
Se manifest.json i pakken for listen over medfølgende filer og verifiseringsdata. Lukk spillet og sikkerhetskopier de nåværende filene før du erstatter lyder i en eksisterende installasjon. Lydbanker og ubrukte SFX er ikke inkludert.
12. Local conversion of additional cutscenes
Conversion prerequisites and availability
Convert scenes locally from your legitimate Carbon/UG2 files. Current development scripts depend on verified input paths and versions; a general one-click converter is not yet available. Thumbnails alone cannot play a scene.
Verify the original files
Inputs include the selected NIS, matching GLOBAL camera assets and verified camera descriptions; UG2 also uses EvtTrk. Read only the required files, preserve the source game and record sizes/SHA256. Convert normal race intros without mixing in story-only scenes.
Convert and validate each scene
In the development tree tools/CarbonIntro, Carbon uses prepare_variants and export_variant; UG2 uses prepare_ug2_one, prepare_ug2_batch and the matching export_ug2 scripts. Validate actors, car layout, camera and GO timing separately. Do not add actor assets to camera-only scenes.
Install into your own game
Install only the runtimeFiles listed by runtime_manifest under scripts/EventLoader/CustomCutscenes/scene-ID. camera.cic, cars.cic, actor-clock.bin, scene-timing.bin and other files must match that scene manifest. Exclude camera.raw, original BUN/EXE files and research NPZ files.
Keep scene decoding and recording distinct
Scene audio is a separate step. Validate a confirmed PCM16 WAV and audio-timing.bin together with scene_audio. Current limits are mono/stereo, 8–96 kHz, 60 seconds and 8 MiB. export_scene_wav decodes a local ABK; it does not record audio. Do not claim original-audio fidelity for unidentified samples.
Selection and gameplay checks
Select a scene matching the participant count and playtest intro-to-GO, cancel, retry and transition to another event. Missing assets fall back to the original MW intro. Do not include converted source-game assets in general event distributions.
Em Chrome ou Edge, abra Gerenciamento de Jogo/Configuração. Em Adicionar configuração do jogo, insira um nome, escolha o tipo no menu suspenso e selecione Ler pasta do jogo e escolha a pasta que contém speed.exe. A preparação inicial pode demorar vários minutos. Nenhuma GUI externa ou pasta de configuração preparada é necessária. Os arquivos do jogo não são carregados.
Supported worlds and baseline
The original Rockport world is supported. W2C events require the matching W2C world. The baseline is captured when the cache is prepared. After changing world files or textures, back up your editing JSON before updating the configuration from the same game folder. Game files are not uploaded.
Update a configuration from the game folder
Selecione a configuração em Gerenciamento de configuração e pressione Atualizar configuração. A atualização começa imediatamente quando a pasta do jogo lembrada está acessível. Você será solicitado a selecionar a pasta que contém speed.exe somente se o local estiver ausente ou indisponível. As edições e o ID de configuração são mantidos. Adicione uma configuração separada quando o layout do mundo ou da estrada for diferente.
Reabrir ou alternar configurações
Ao reabrir ou alternar uma configuração, apenas a ligação guardada à pasta do jogo e o nome da pasta são restaurados. A pasta não é analisada e os eventos não são importados. Cada configuração mantém a sua própria lista de eventos.
Quando a geometria é preparada
Os dados de visualização do editor 3D são preparados quando uma configuração é adicionada ou atualizada. EventLoader cria automaticamente a geometria do jogo a partir da instalação receptora quando necessário, antes do início do evento de destino. Nenhuma exportação de geometria do editor é necessária.
2. Select or create an event
Event selection and top-bar actions
Importe eventos explicitamente em Gestão de configurações → Ler eventos do jogo. O editor utiliza a pasta ligada e pede que a selecione se não estiver acessível. Também pode importar outra pasta de jogo ou de eventos, ou um ZIP partilhado. A importação verifica o conteúdo dos ficheiros e a compatibilidade do mapa, preservando UUIDs e posicionamentos. Importar de outra origem não altera a pasta de jogo ligada a esta configuração.
Correct native events and delete added events
To correct a native event, use Project → This course → Correct native event. Deletion affects the browser list; it does not uninstall files already written to the game. Undo deletion restores the last deletion.
3. Navigate the 3D view
3D camera controls and tool help
Tools are on the left, the 3D view is central, and Event, Selection and Validation are on the right. Hover or keyboard-focus a tool for illustrated help. Left-drag empty space to orbit, right-drag to pan, and scroll to zoom. PageUp/PageDown adjusts height; hold Shift for a larger step. Top view and Focus selection are also available.
Visible labels and display layers
Visible labels toggles text by category. Display layers toggles world geometry, roads, gate volumes, objects and the grid. Hiding labels never removes placed objects. Label preferences are stored in this browser.
4. Required gates and shortcuts
Gate key: START = starting grid; FINISH/LAP = finish or lap line; CP = required checkpoint; SC = optional shortcut.
Gate types, colors and required markers
Green START, orange FINISH/LAP and cyan CP carry a small ! badge. Pink SC is an optional shortcut, not a checkpoint. Reset gates are red. Tool colors match the labels.
Place, orient and order gates
Choose a placement tool and click the road. Select an object and adjust it with 3D handles or numeric position, rotation and size. Face it along the route and cover the road width. Reorder CPs with Order up/down. Start and finish map icons are automatic.
Circuits starting on a branch
For a circuit starting on a branch, check both the initial entry and the merge on later laps. Start and lap line can be separate. Alternatives and shortcuts must not skip checkpoints.
5. Routes, barriers and AI
Route diagram: yellow MAIN is the main route, pink SHORTCUT is a shortcut, and green FREE CURVE is Fill / AI optimization. Secondary routes, exclusions, walls and right-panel settings are explained separately below.
Main route (yellow)
Trace the blue road lines defined by the game to select the main route. Complete the route. Placed gates determine its direction automatically. This route appears on the map.
Secondary route (orange)
Trace the blue road lines defined by the game to select a secondary route. Connect it to the yellow main route. Placed gates determine its direction automatically. This route appears on the map.
Shortcut (pink)
Trace the blue road lines to define an optional shortcut for NeoAI. Placed gates determine its direction automatically. Shortcuts do not appear on the map. Placing shortcut gates as well is recommended.
Fill / AI optimization (green)
Use this for routes without blue road lines. The curve inherits its role from the connected route. Draw it in place of the corresponding colored route to optimize the NeoAI driving line.
AI discouraged (brown): exclude from route choices
Exclude routes from NeoAI route choices. No connection to the main route is required. These lines do not appear on the map.
Barrier walls: block a path
Click to place one barrier wall, or drag to place a continuous run. Edit individual walls after confirming. Check their facing and orientation. A wall crossing a blue road line prevents NeoAI from choosing that path.
AI obstacle markers: assist avoidance
Effective, but still being tuned. Place over indestructible objects such as central dividers that AI struggles to avoid, giving it more time to anticipate avoidance. This does not guarantee complete control.
Replace the race map
Generate a dedicated race map by drawing the configured routes onto the extracted world map.
Guide NeoAI with map lines
Guide AI along the configured routes. When enabled, Event Loader’s NeoAI controls the vehicles instead of the original game AI. When disabled, the original game AI controls them.
Select cars similar to the player
Set the vehicle regulations: select rival cars with a similar price range and performance to the player’s car. When disabled, selection follows the blacklist rank.
Objects and passage order reviewed
Optional self-check switch. It has no effect on the game.
6. Race-specific editing
Speedtrap: measurement points
Speedtrap uses the speed trap tool. Measurement points are separate from CPs, up to 16, with a count card on the left. Select points to edit radius and order.
Tollbooth: toll locations and bonus time
In Tollbooth mode, click a 3D tollbooth candidate and assign Start, timed Passage or Finish. Check order and bonus time in the list. Use free passage-point placement where no native tollbooth exists.
Lap Knockout: participants and laps
Lap Knockout eliminates one racer per lap; four participants require at least three laps. Check participants and laps. Drag and other modes expose their own settings.
7. Properties and cutscenes
Select Arms Race (prototype)
Select Arms Race under Combat mode in Event Properties. Sprint, Circuit, Lap Knockout and Speed Trap can be used as the racing rules. Compatible Event Loader, MWArsenal and ArmsAssist are required. Without them, the editor disables the option and the game does not register the event.
Select Hot Pursuit (prototype)
Maximum eight racers. Pursuit starts individually after 25% race progress, with up to two chase cars per racer. Roadblocks and helicopters are separate. With survival-reward builds, any genuine finish is a clear and reward equals configured cash x survivors / finish position. A racer destroying Cross at heat 5 or higher restores 15% HP to surviving racers, and finished AI keep fleeing. Event Properties shows the rules supported by the connected MOD builds. Older supported builds do not gain these new rules.
Hot Pursuit requirements and settings
Connect the game folder containing MWArsenal and the validated Hot Pursuit builds of Event Loader and ArmsAssist. Older builds leave the option disabled. Choose Sprint or Speedtrap rules, starting heat, ammunition and cutscene. Police are always enabled.
Health, crash retirement and retry
Human and AI racers have 300 HP. EMP deals 25 damage, Spike 50 and Shockwave 15. An AI racer at zero HP retires through the native crash outcome while the remaining racers continue. A player at zero HP enters the native losing results screen with Restart available. Restart resets event health and ammunition. Arrests retain the native arrest scene.
Starting ammunition per weapon
Specify starting ammunition per weapon. Leave a field blank to use the ArmsAssist INI; zero disables that weapon. Specified counts are refilled at the start and on restart, and AI racers receive the same counts. Player equipment and INIs are preserved. Temporary event ammunition is released on exit.
Normal race behavior
Normal races lock weapons and hide the weapon HUD even with police enabled. Explicitly select a weapon-enabled event mode to use weapons. Drift Race remains unavailable.
Edit and apply event properties
Top-bar Properties and Open event properties on the right open the same dialog. Set name, ID, blacklist rank, type, participants, reward, traffic and police, then Apply. Cancel restores the state from when the dialog opened.
Select a cutscene and inspect its preview
Hover a scene or navigate with arrow keys for its image and grid diagram. Some Carbon previews show an actor pose with a layout diagram. Camera-only scenes are marked as having no actor. Slot 1 is the player. Scenes with a different participant count cannot be selected.
Starting-grid layout preview
The 3D grid follows the selected scene's countdown layout and road surface. Automatic and original-MW modes show an estimate; the final layout is chosen in game. Check that it fits the road.
Required resources for additional cutscenes
Additional scenes require resources converted locally from legitimate Carbon/Underground 2 files. Preview images alone cannot play a scene. Missing assets or unsuitable runtime conditions fall back to the original presentation.
8. Map card and rendering
Lower-left map card: switch its content with the tabs and resize the card with its top-right handle.
Lower-left map card: tabs and auto fit
Switch between World, Course map and After-edit preview at the lower left. World automatically fits placed objects, or the whole world when empty. Toggle Auto fit for whole-world bounds. Reset clears additional pan and zoom.
Map-card size and rendering properties
Drag the top-right handle to resize freely, or focus it and use arrow keys. Size is restored next time. Rendering properties controls VRAM budget, resolution and loading concurrency. The budget is not a guarantee of available VRAM.
9. Validate, save and install
Validation, warning markers and copying errors
Use Validation to check passage order, connections and foldbacks. Select a gap ! marker or issue to focus it. Error-card contents can be copied. Ctrl+Z undoes; Ctrl+Y redoes.
Browser storage and editing JSON backups
Salvar no navegador armazena edições na configuração atual. Para um backup editável, use Gerenciamento de configuração / Salvar todos os dados de edição para baixar JSON. As permissões de armazenamento e pasta não são compartilhadas entre navegadores ou origens. Os detalhes de armazenamento e cache mostram o status de uso e armazenamento persistente. Use Importar todos os dados de edição para restaurar o JSON salvo. Os eventos sem uma entrada correspondente são adicionados. Quando um evento existente for alterado, um aviso listará seu nome. Cancelar deixa todos os eventos inalterados.
Export to game and ZIP installation
Em Exportação de eventos, escolha Exportar evento atual ou Exportar todos os eventos salvos. Após a geração, selecione Salvar ZIP gerado. Feche o jogo e os inicializadores e copie a pasta de scripts de ZIP para a pasta que contém speed.exe. O ZIP contém apenas dados de eventos, sem módulos ASI ou instalador. A escrita direta está disponível em opções avançadas na mesma tela.
Post-install checks and configuration fingerprint mismatches
After installation, playtest start, checkpoints, finish, exit and re-entry. Do not redistribute game files or converted scene resources. Close and reopen the app if old UI remains. For fingerprint mismatches, back up edits and update the configuration from the same game.
Options menu and bug reports
The upper-right … menu contains language, app installation and support. Include event name, reproduction steps and copied error details when reporting a problem. You do not need to send the entire game.
Recover from an unresponsive worker or failed generation
Export generation has a ten-minute response limit; configuration preparation has a fifteen-minute limit. A timeout terminates the worker; transfer failures can also be retried. Existing game files and configurations are not updated before generation/preparation succeeds.
10. Required mods and installation order
Normal-event prerequisites
Normal events require a supported English 1.3 speed.exe, an ASI loader and Event Loader. Preserve Japanese assets, existing INIs and saves. Do not install the same ASI both in the game root and scripts.
NeoAI and NFRR
Current NeoAI combines control inside Event Loader with the vehicle-scope adapter from a compatible NFRR. Native-AI events do not require NFRR. Performance matching also uses compatible NFRR calibration for the selected configuration.
Combat modes, expanded grids and HUD
Arms Race, Gauntlet and Hot Pursuit require compatible Event Loader and ArmsAssist plus a separately installed MWArsenal and its assets. Use compatible Limit Breaker for more than four participants and the suite HUD fixes for HP/HUD coexistence. MWArsenal alone does not register these modes.
Installation and verification order
Feche o jogo e os inicializadores e instale os mods necessários separadamente. Copie a pasta de scripts do editor ZIP para o jogo ou use a escrita direta nas opções avançadas de exportação. Verifique o início, os pontos de verificação, o término, a nova tentativa, a saída e o próximo evento.
11. Game data and recorded SFX
Local resources and distributable files
The editor extracts world, map and model data locally. Do not add configuration caches, source executables, BUN files, audio banks, profiles or Shadow/vault to event distribution ZIPs. Users install the required mods and world separately. Bug reporting is a separate action with reviewed submission content.
Áudio de substituição incluído no ArmsAssist
Verificar os ficheiros do pacote
O pacote de distribuição do ArmsAssist inclui quatro efeitos de substituição em scripts/MWArmsAssist: Drop.wav, PlayerDrop.wav, Lock_by_police.wav e repair-complete.wav. Utilize os ficheiros fornecidos com esse pacote. As descrições anteriores que os identificavam como áudio de origem do NFSHP, gravações de áudio do jogo ou áudio original não descrevem corretamente o conjunto de substituição atual.
Consulte manifest.json no pacote para ver a lista de ficheiros incluídos e os dados de verificação. Antes de substituir sons numa instalação existente, feche o jogo e faça uma cópia de segurança dos ficheiros atuais. Bancos de som e SFX não utilizados não estão incluídos.
12. Local conversion of additional cutscenes
Conversion prerequisites and availability
Convert scenes locally from your legitimate Carbon/UG2 files. Current development scripts depend on verified input paths and versions; a general one-click converter is not yet available. Thumbnails alone cannot play a scene.
Verify the original files
Inputs include the selected NIS, matching GLOBAL camera assets and verified camera descriptions; UG2 also uses EvtTrk. Read only the required files, preserve the source game and record sizes/SHA256. Convert normal race intros without mixing in story-only scenes.
Convert and validate each scene
In the development tree tools/CarbonIntro, Carbon uses prepare_variants and export_variant; UG2 uses prepare_ug2_one, prepare_ug2_batch and the matching export_ug2 scripts. Validate actors, car layout, camera and GO timing separately. Do not add actor assets to camera-only scenes.
Install into your own game
Install only the runtimeFiles listed by runtime_manifest under scripts/EventLoader/CustomCutscenes/scene-ID. camera.cic, cars.cic, actor-clock.bin, scene-timing.bin and other files must match that scene manifest. Exclude camera.raw, original BUN/EXE files and research NPZ files.
Keep scene decoding and recording distinct
Scene audio is a separate step. Validate a confirmed PCM16 WAV and audio-timing.bin together with scene_audio. Current limits are mono/stereo, 8–96 kHz, 60 seconds and 8 MiB. export_scene_wav decodes a local ABK; it does not record audio. Do not claim original-audio fidelity for unidentified samples.
Selection and gameplay checks
Select a scene matching the participant count and playtest intro-to-GO, cancel, retry and transition to another event. Missing assets fall back to the original MW intro. Do not include converted source-game assets in general event distributions.
Em Chrome ou Edge, abra Gerenciamento de Jogo/Configuração. Em Adicionar configuração do jogo, insira um nome, escolha o tipo no menu suspenso e selecione Ler pasta do jogo e escolha a pasta que contém speed.exe. A preparação inicial pode demorar vários minutos. Nenhuma GUI externa ou pasta de configuração preparada é necessária. Os arquivos do jogo não são carregados.
Supported worlds and baseline
The original Rockport world is supported. W2C events require the matching W2C world. The baseline is captured when the cache is prepared. After changing world files or textures, back up your editing JSON before updating the configuration from the same game folder. Game files are not uploaded.
Update a configuration from the game folder
Selecione a configuração em Gerenciamento de configuração e pressione Atualizar configuração. A atualização começa imediatamente quando a pasta do jogo lembrada está acessível. Você será solicitado a selecionar a pasta que contém speed.exe somente se o local estiver ausente ou indisponível. As edições e o ID de configuração são mantidos. Adicione uma configuração separada quando o layout do mundo ou da estrada for diferente.
Reabrir ou alternar configurações
Ao reabrir ou alternar uma configuração, somente o vínculo salvo com a pasta do jogo e o nome da pasta são restaurados. A pasta não é verificada e os eventos não são importados. Cada configuração mantém sua própria lista de eventos.
Quando a geometria é preparada
Os dados de visualização do editor 3D são preparados quando uma configuração é adicionada ou atualizada. EventLoader cria automaticamente a geometria do jogo a partir da instalação receptora quando necessário, antes do início do evento de destino. Nenhuma exportação de geometria do editor é necessária.
2. Select or create an event
Event selection and top-bar actions
Importe eventos explicitamente em Gerenciamento de configurações → Ler eventos do jogo. O editor usa a pasta vinculada e solicita que você a selecione se ela não estiver acessível. Você também pode importar outra pasta de jogo ou de eventos, ou um ZIP compartilhado. A importação verifica o conteúdo dos arquivos e a compatibilidade do mapa, preservando UUIDs e posicionamentos. Importar de outra origem não altera a pasta de jogo vinculada a esta configuração.
Correct native events and delete added events
To correct a native event, use Project → This course → Correct native event. Deletion affects the browser list; it does not uninstall files already written to the game. Undo deletion restores the last deletion.
3. Navigate the 3D view
3D camera controls and tool help
Tools are on the left, the 3D view is central, and Event, Selection and Validation are on the right. Hover or keyboard-focus a tool for illustrated help. Left-drag empty space to orbit, right-drag to pan, and scroll to zoom. PageUp/PageDown adjusts height; hold Shift for a larger step. Top view and Focus selection are also available.
Visible labels and display layers
Visible labels toggles text by category. Display layers toggles world geometry, roads, gate volumes, objects and the grid. Hiding labels never removes placed objects. Label preferences are stored in this browser.
4. Required gates and shortcuts
Gate key: START = starting grid; FINISH/LAP = finish or lap line; CP = required checkpoint; SC = optional shortcut.
Gate types, colors and required markers
Green START, orange FINISH/LAP and cyan CP carry a small ! badge. Pink SC is an optional shortcut, not a checkpoint. Reset gates are red. Tool colors match the labels.
Place, orient and order gates
Choose a placement tool and click the road. Select an object and adjust it with 3D handles or numeric position, rotation and size. Face it along the route and cover the road width. Reorder CPs with Order up/down. Start and finish map icons are automatic.
Circuits starting on a branch
For a circuit starting on a branch, check both the initial entry and the merge on later laps. Start and lap line can be separate. Alternatives and shortcuts must not skip checkpoints.
5. Routes, barriers and AI
Route diagram: yellow MAIN is the main route, pink SHORTCUT is a shortcut, and green FREE CURVE is Fill / AI optimization. Secondary routes, exclusions, walls and right-panel settings are explained separately below.
Main route (yellow)
Trace the blue road lines defined by the game to select the main route. Complete the route. Placed gates determine its direction automatically. This route appears on the map.
Secondary route (orange)
Trace the blue road lines defined by the game to select a secondary route. Connect it to the yellow main route. Placed gates determine its direction automatically. This route appears on the map.
Shortcut (pink)
Trace the blue road lines to define an optional shortcut for NeoAI. Placed gates determine its direction automatically. Shortcuts do not appear on the map. Placing shortcut gates as well is recommended.
Fill / AI optimization (green)
Use this for routes without blue road lines. The curve inherits its role from the connected route. Draw it in place of the corresponding colored route to optimize the NeoAI driving line.
AI discouraged (brown): exclude from route choices
Exclude routes from NeoAI route choices. No connection to the main route is required. These lines do not appear on the map.
Barrier walls: block a path
Click to place one barrier wall, or drag to place a continuous run. Edit individual walls after confirming. Check their facing and orientation. A wall crossing a blue road line prevents NeoAI from choosing that path.
AI obstacle markers: assist avoidance
Effective, but still being tuned. Place over indestructible objects such as central dividers that AI struggles to avoid, giving it more time to anticipate avoidance. This does not guarantee complete control.
Replace the race map
Generate a dedicated race map by drawing the configured routes onto the extracted world map.
Guide NeoAI with map lines
Guide AI along the configured routes. When enabled, Event Loader’s NeoAI controls the vehicles instead of the original game AI. When disabled, the original game AI controls them.
Select cars similar to the player
Set the vehicle regulations: select rival cars with a similar price range and performance to the player’s car. When disabled, selection follows the blacklist rank.
Objects and passage order reviewed
Optional self-check switch. It has no effect on the game.
6. Race-specific editing
Speedtrap: measurement points
Speedtrap uses the speed trap tool. Measurement points are separate from CPs, up to 16, with a count card on the left. Select points to edit radius and order.
Tollbooth: toll locations and bonus time
In Tollbooth mode, click a 3D tollbooth candidate and assign Start, timed Passage or Finish. Check order and bonus time in the list. Use free passage-point placement where no native tollbooth exists.
Lap Knockout: participants and laps
Lap Knockout eliminates one racer per lap; four participants require at least three laps. Check participants and laps. Drag and other modes expose their own settings.
7. Properties and cutscenes
Select Arms Race (prototype)
Select Arms Race under Combat mode in Event Properties. Sprint, Circuit, Lap Knockout and Speed Trap can be used as the racing rules. Compatible Event Loader, MWArsenal and ArmsAssist are required. Without them, the editor disables the option and the game does not register the event.
Select Hot Pursuit (prototype)
Maximum eight racers. Pursuit starts individually after 25% race progress, with up to two chase cars per racer. Roadblocks and helicopters are separate. With survival-reward builds, any genuine finish is a clear and reward equals configured cash x survivors / finish position. A racer destroying Cross at heat 5 or higher restores 15% HP to surviving racers, and finished AI keep fleeing. Event Properties shows the rules supported by the connected MOD builds. Older supported builds do not gain these new rules.
Hot Pursuit requirements and settings
Connect the game folder containing MWArsenal and the validated Hot Pursuit builds of Event Loader and ArmsAssist. Older builds leave the option disabled. Choose Sprint or Speedtrap rules, starting heat, ammunition and cutscene. Police are always enabled.
Health, crash retirement and retry
Human and AI racers have 300 HP. EMP deals 25 damage, Spike 50 and Shockwave 15. An AI racer at zero HP retires through the native crash outcome while the remaining racers continue. A player at zero HP enters the native losing results screen with Restart available. Restart resets event health and ammunition. Arrests retain the native arrest scene.
Starting ammunition per weapon
Specify starting ammunition per weapon. Leave a field blank to use the ArmsAssist INI; zero disables that weapon. Specified counts are refilled at the start and on restart, and AI racers receive the same counts. Player equipment and INIs are preserved. Temporary event ammunition is released on exit.
Normal race behavior
Normal races lock weapons and hide the weapon HUD even with police enabled. Explicitly select a weapon-enabled event mode to use weapons. Drift Race remains unavailable.
Edit and apply event properties
Top-bar Properties and Open event properties on the right open the same dialog. Set name, ID, blacklist rank, type, participants, reward, traffic and police, then Apply. Cancel restores the state from when the dialog opened.
Select a cutscene and inspect its preview
Hover a scene or navigate with arrow keys for its image and grid diagram. Some Carbon previews show an actor pose with a layout diagram. Camera-only scenes are marked as having no actor. Slot 1 is the player. Scenes with a different participant count cannot be selected.
Starting-grid layout preview
The 3D grid follows the selected scene's countdown layout and road surface. Automatic and original-MW modes show an estimate; the final layout is chosen in game. Check that it fits the road.
Required resources for additional cutscenes
Additional scenes require resources converted locally from legitimate Carbon/Underground 2 files. Preview images alone cannot play a scene. Missing assets or unsuitable runtime conditions fall back to the original presentation.
8. Map card and rendering
Lower-left map card: switch its content with the tabs and resize the card with its top-right handle.
Lower-left map card: tabs and auto fit
Switch between World, Course map and After-edit preview at the lower left. World automatically fits placed objects, or the whole world when empty. Toggle Auto fit for whole-world bounds. Reset clears additional pan and zoom.
Map-card size and rendering properties
Drag the top-right handle to resize freely, or focus it and use arrow keys. Size is restored next time. Rendering properties controls VRAM budget, resolution and loading concurrency. The budget is not a guarantee of available VRAM.
9. Validate, save and install
Validation, warning markers and copying errors
Use Validation to check passage order, connections and foldbacks. Select a gap ! marker or issue to focus it. Error-card contents can be copied. Ctrl+Z undoes; Ctrl+Y redoes.
Browser storage and editing JSON backups
Salvar no navegador armazena edições na configuração atual. Para um backup editável, use Gerenciamento de configuração / Salvar todos os dados de edição para baixar JSON. As permissões de armazenamento e pasta não são compartilhadas entre navegadores ou origens. Os detalhes de armazenamento e cache mostram o status de uso e armazenamento persistente. Use Importar todos os dados de edição para restaurar o JSON salvo. Os eventos sem uma entrada correspondente são adicionados. Quando um evento existente for alterado, um aviso listará seu nome. Cancelar deixa todos os eventos inalterados.
Export to game and ZIP installation
Em Exportação de eventos, escolha Exportar evento atual ou Exportar todos os eventos salvos. Após a geração, selecione Salvar ZIP gerado. Feche o jogo e os inicializadores e copie a pasta de scripts de ZIP para a pasta que contém speed.exe. O ZIP contém apenas dados de eventos, sem módulos ASI ou instalador. A escrita direta está disponível em opções avançadas na mesma tela.
Post-install checks and configuration fingerprint mismatches
After installation, playtest start, checkpoints, finish, exit and re-entry. Do not redistribute game files or converted scene resources. Close and reopen the app if old UI remains. For fingerprint mismatches, back up edits and update the configuration from the same game.
Options menu and bug reports
The upper-right … menu contains language, app installation and support. Include event name, reproduction steps and copied error details when reporting a problem. You do not need to send the entire game.
Recover from an unresponsive worker or failed generation
Export generation has a ten-minute response limit; configuration preparation has a fifteen-minute limit. A timeout terminates the worker; transfer failures can also be retried. Existing game files and configurations are not updated before generation/preparation succeeds.
10. Required mods and installation order
Normal-event prerequisites
Normal events require a supported English 1.3 speed.exe, an ASI loader and Event Loader. Preserve Japanese assets, existing INIs and saves. Do not install the same ASI both in the game root and scripts.
NeoAI and NFRR
Current NeoAI combines control inside Event Loader with the vehicle-scope adapter from a compatible NFRR. Native-AI events do not require NFRR. Performance matching also uses compatible NFRR calibration for the selected configuration.
Combat modes, expanded grids and HUD
Arms Race, Gauntlet and Hot Pursuit require compatible Event Loader and ArmsAssist plus a separately installed MWArsenal and its assets. Use compatible Limit Breaker for more than four participants and the suite HUD fixes for HP/HUD coexistence. MWArsenal alone does not register these modes.
Installation and verification order
Feche o jogo e os inicializadores e instale os mods necessários separadamente. Copie a pasta de scripts do editor ZIP para o jogo ou use a escrita direta nas opções avançadas de exportação. Verifique o início, os pontos de verificação, o término, a nova tentativa, a saída e o próximo evento.
11. Game data and recorded SFX
Local resources and distributable files
The editor extracts world, map and model data locally. Do not add configuration caches, source executables, BUN files, audio banks, profiles or Shadow/vault to event distribution ZIPs. Users install the required mods and world separately. Bug reporting is a separate action with reviewed submission content.
Áudios substitutos incluídos no ArmsAssist
Verificar os arquivos do pacote
O pacote de distribuição do ArmsAssist inclui quatro efeitos substitutos em scripts/MWArmsAssist: Drop.wav, PlayerDrop.wav, Lock_by_police.wav e repair-complete.wav. Use os arquivos fornecidos com esse pacote. As descrições anteriores que os identificavam como áudio de origem do NFSHP, gravações de áudio do jogo ou áudio original não descrevem corretamente o conjunto substituto atual.
Consulte manifest.json no pacote para ver a lista de arquivos incluídos e os dados de verificação. Antes de substituir sons em uma instalação existente, feche o jogo e faça backup dos arquivos atuais. Bancos de som e SFX não utilizados não estão incluídos.
12. Local conversion of additional cutscenes
Conversion prerequisites and availability
Convert scenes locally from your legitimate Carbon/UG2 files. Current development scripts depend on verified input paths and versions; a general one-click converter is not yet available. Thumbnails alone cannot play a scene.
Verify the original files
Inputs include the selected NIS, matching GLOBAL camera assets and verified camera descriptions; UG2 also uses EvtTrk. Read only the required files, preserve the source game and record sizes/SHA256. Convert normal race intros without mixing in story-only scenes.
Convert and validate each scene
In the development tree tools/CarbonIntro, Carbon uses prepare_variants and export_variant; UG2 uses prepare_ug2_one, prepare_ug2_batch and the matching export_ug2 scripts. Validate actors, car layout, camera and GO timing separately. Do not add actor assets to camera-only scenes.
Install into your own game
Install only the runtimeFiles listed by runtime_manifest under scripts/EventLoader/CustomCutscenes/scene-ID. camera.cic, cars.cic, actor-clock.bin, scene-timing.bin and other files must match that scene manifest. Exclude camera.raw, original BUN/EXE files and research NPZ files.
Keep scene decoding and recording distinct
Scene audio is a separate step. Validate a confirmed PCM16 WAV and audio-timing.bin together with scene_audio. Current limits are mono/stereo, 8–96 kHz, 60 seconds and 8 MiB. export_scene_wav decodes a local ABK; it does not record audio. Do not claim original-audio fidelity for unidentified samples.
Selection and gameplay checks
Select a scene matching the participant count and playtest intro-to-GO, cancel, retry and transition to another event. Missing assets fall back to the original MW intro. Do not include converted source-game assets in general event distributions.
ใน Chrome หรือ Edge ให้เปิด Game / Configuration management Under Add game configuration, enter a name, choose the type from the dropdown, then select Read game folder and choose the folder containing speed.exe. การเตรียมการเบื้องต้นอาจใช้เวลาหลายนาที ไม่จำเป็นต้องมี GUI ภายนอกหรือโฟลเดอร์การกำหนดค่าที่เตรียมไว้ ไฟล์เกมไม่ได้อัพโหลด
Supported worlds and baseline
The original Rockport world is supported. W2C events require the matching W2C world. The baseline is captured when the cache is prepared. After changing world files or textures, back up your editing JSON before updating the configuration from the same game folder. Game files are not uploaded.
To correct a native event, use Project → This course → Correct native event. Deletion affects the browser list; it does not uninstall files already written to the game. Undo deletion restores the last deletion.
3. Navigate the 3D view
3D camera controls and tool help
Tools are on the left, the 3D view is central, and Event, Selection and Validation are on the right. Hover or keyboard-focus a tool for illustrated help. Left-drag empty space to orbit, right-drag to pan, and scroll to zoom. PageUp/PageDown adjusts height; hold Shift for a larger step. Top view and Focus selection are also available.
Visible labels and display layers
Visible labels toggles text by category. Display layers toggles world geometry, roads, gate volumes, objects and the grid. Hiding labels never removes placed objects. Label preferences are stored in this browser.
4. Required gates and shortcuts
Gate key: START = starting grid; FINISH/LAP = finish or lap line; CP = required checkpoint; SC = optional shortcut.
Gate types, colors and required markers
Green START, orange FINISH/LAP and cyan CP carry a small ! badge. Pink SC is an optional shortcut, not a checkpoint. Reset gates are red. Tool colors match the labels.
Place, orient and order gates
Choose a placement tool and click the road. Select an object and adjust it with 3D handles or numeric position, rotation and size. Face it along the route and cover the road width. Reorder CPs with Order up/down. Start and finish map icons are automatic.
Circuits starting on a branch
For a circuit starting on a branch, check both the initial entry and the merge on later laps. Start and lap line can be separate. Alternatives and shortcuts must not skip checkpoints.
5. Routes, barriers and AI
Route diagram: yellow MAIN is the main route, pink SHORTCUT is a shortcut, and green FREE CURVE is Fill / AI optimization. Secondary routes, exclusions, walls and right-panel settings are explained separately below.
Main route (yellow)
Trace the blue road lines defined by the game to select the main route. Complete the route. Placed gates determine its direction automatically. This route appears on the map.
Secondary route (orange)
Trace the blue road lines defined by the game to select a secondary route. Connect it to the yellow main route. Placed gates determine its direction automatically. This route appears on the map.
Shortcut (pink)
Trace the blue road lines to define an optional shortcut for NeoAI. Placed gates determine its direction automatically. Shortcuts do not appear on the map. Placing shortcut gates as well is recommended.
Fill / AI optimization (green)
Use this for routes without blue road lines. The curve inherits its role from the connected route. Draw it in place of the corresponding colored route to optimize the NeoAI driving line.
AI discouraged (brown): exclude from route choices
Exclude routes from NeoAI route choices. No connection to the main route is required. These lines do not appear on the map.
Barrier walls: block a path
Click to place one barrier wall, or drag to place a continuous run. Edit individual walls after confirming. Check their facing and orientation. A wall crossing a blue road line prevents NeoAI from choosing that path.
AI obstacle markers: assist avoidance
Effective, but still being tuned. Place over indestructible objects such as central dividers that AI struggles to avoid, giving it more time to anticipate avoidance. This does not guarantee complete control.
Replace the race map
Generate a dedicated race map by drawing the configured routes onto the extracted world map.
Guide NeoAI with map lines
Guide AI along the configured routes. When enabled, Event Loader’s NeoAI controls the vehicles instead of the original game AI. When disabled, the original game AI controls them.
Select cars similar to the player
Set the vehicle regulations: select rival cars with a similar price range and performance to the player’s car. When disabled, selection follows the blacklist rank.
Objects and passage order reviewed
Optional self-check switch. It has no effect on the game.
6. Race-specific editing
Speedtrap: measurement points
Speedtrap uses the speed trap tool. Measurement points are separate from CPs, up to 16, with a count card on the left. Select points to edit radius and order.
Tollbooth: toll locations and bonus time
In Tollbooth mode, click a 3D tollbooth candidate and assign Start, timed Passage or Finish. Check order and bonus time in the list. Use free passage-point placement where no native tollbooth exists.
Lap Knockout: participants and laps
Lap Knockout eliminates one racer per lap; four participants require at least three laps. Check participants and laps. Drag and other modes expose their own settings.
7. Properties and cutscenes
Select Arms Race (prototype)
Select Arms Race under Combat mode in Event Properties. Sprint, Circuit, Lap Knockout and Speed Trap can be used as the racing rules. Compatible Event Loader, MWArsenal and ArmsAssist are required. Without them, the editor disables the option and the game does not register the event.
Select Hot Pursuit (prototype)
Maximum eight racers. Pursuit starts individually after 25% race progress, with up to two chase cars per racer. Roadblocks and helicopters are separate. With survival-reward builds, any genuine finish is a clear and reward equals configured cash x survivors / finish position. A racer destroying Cross at heat 5 or higher restores 15% HP to surviving racers, and finished AI keep fleeing. Event Properties shows the rules supported by the connected MOD builds. Older supported builds do not gain these new rules.
Hot Pursuit requirements and settings
Connect the game folder containing MWArsenal and the validated Hot Pursuit builds of Event Loader and ArmsAssist. Older builds leave the option disabled. Choose Sprint or Speedtrap rules, starting heat, ammunition and cutscene. Police are always enabled.
Health, crash retirement and retry
Human and AI racers have 300 HP. EMP deals 25 damage, Spike 50 and Shockwave 15. An AI racer at zero HP retires through the native crash outcome while the remaining racers continue. A player at zero HP enters the native losing results screen with Restart available. Restart resets event health and ammunition. Arrests retain the native arrest scene.
Starting ammunition per weapon
Specify starting ammunition per weapon. Leave a field blank to use the ArmsAssist INI; zero disables that weapon. Specified counts are refilled at the start and on restart, and AI racers receive the same counts. Player equipment and INIs are preserved. Temporary event ammunition is released on exit.
Normal race behavior
Normal races lock weapons and hide the weapon HUD even with police enabled. Explicitly select a weapon-enabled event mode to use weapons. Drift Race remains unavailable.
Edit and apply event properties
Top-bar Properties and Open event properties on the right open the same dialog. Set name, ID, blacklist rank, type, participants, reward, traffic and police, then Apply. Cancel restores the state from when the dialog opened.
Select a cutscene and inspect its preview
Hover a scene or navigate with arrow keys for its image and grid diagram. Some Carbon previews show an actor pose with a layout diagram. Camera-only scenes are marked as having no actor. Slot 1 is the player. Scenes with a different participant count cannot be selected.
Starting-grid layout preview
The 3D grid follows the selected scene's countdown layout and road surface. Automatic and original-MW modes show an estimate; the final layout is chosen in game. Check that it fits the road.
Required resources for additional cutscenes
Additional scenes require resources converted locally from legitimate Carbon/Underground 2 files. Preview images alone cannot play a scene. Missing assets or unsuitable runtime conditions fall back to the original presentation.
8. Map card and rendering
Lower-left map card: switch its content with the tabs and resize the card with its top-right handle.
Lower-left map card: tabs and auto fit
Switch between World, Course map and After-edit preview at the lower left. World automatically fits placed objects, or the whole world when empty. Toggle Auto fit for whole-world bounds. Reset clears additional pan and zoom.
Map-card size and rendering properties
Drag the top-right handle to resize freely, or focus it and use arrow keys. Size is restored next time. Rendering properties controls VRAM budget, resolution and loading concurrency. The budget is not a guarantee of available VRAM.
9. Validate, save and install
Validation, warning markers and copying errors
Use Validation to check passage order, connections and foldbacks. Select a gap ! marker or issue to focus it. Error-card contents can be copied. Ctrl+Z undoes; Ctrl+Y redoes.
ในการส่งออกเหตุการณ์ ให้เลือกส่งออกเหตุการณ์ปัจจุบันหรือส่งออกเหตุการณ์ที่บันทึกไว้ทั้งหมด หลังจากสร้าง ให้เลือก บันทึกที่สร้าง ZIP ปิดเกมและตัวเรียกใช้งาน จากนั้นคัดลอกโฟลเดอร์สคริปต์จาก ZIP ไปยังโฟลเดอร์ที่มี speed.exe ZIP มีเฉพาะข้อมูลเหตุการณ์เท่านั้น โดยไม่มีโมดูลหรือโปรแกรมติดตั้ง ASI การเขียนโดยตรงสามารถใช้ได้ภายใต้ตัวเลือกขั้นสูงบนหน้าจอเดียวกัน
Post-install checks and configuration fingerprint mismatches
After installation, playtest start, checkpoints, finish, exit and re-entry. Do not redistribute game files or converted scene resources. Close and reopen the app if old UI remains. For fingerprint mismatches, back up edits and update the configuration from the same game.
Options menu and bug reports
The upper-right … menu contains language, app installation and support. Include event name, reproduction steps and copied error details when reporting a problem. You do not need to send the entire game.
Recover from an unresponsive worker or failed generation
Export generation has a ten-minute response limit; configuration preparation has a fifteen-minute limit. A timeout terminates the worker; transfer failures can also be retried. Existing game files and configurations are not updated before generation/preparation succeeds.
10. Required mods and installation order
Normal-event prerequisites
Normal events require a supported English 1.3 speed.exe, an ASI loader and Event Loader. Preserve Japanese assets, existing INIs and saves. Do not install the same ASI both in the game root and scripts.
NeoAI and NFRR
Current NeoAI combines control inside Event Loader with the vehicle-scope adapter from a compatible NFRR. Native-AI events do not require NFRR. Performance matching also uses compatible NFRR calibration for the selected configuration.
Combat modes, expanded grids and HUD
Arms Race, Gauntlet and Hot Pursuit require compatible Event Loader and ArmsAssist plus a separately installed MWArsenal and its assets. Use compatible Limit Breaker for more than four participants and the suite HUD fixes for HP/HUD coexistence. MWArsenal alone does not register these modes.
Installation and verification order
ปิดเกมและตัวเรียกใช้งาน และติดตั้ง mod ที่จำเป็นแยกกัน คัดลอกโฟลเดอร์สคริปต์จากโปรแกรมแก้ไข ZIP ลงในเกม หรือใช้การเขียนโดยตรงภายใต้ตัวเลือกการส่งออกขั้นสูง ตรวจสอบจุดเริ่มต้น จุดตรวจ สิ้นสุด ลองใหม่ ออก และเหตุการณ์ถัดไป
11. Game data and recorded SFX
Local resources and distributable files
The editor extracts world, map and model data locally. Do not add configuration caches, source executables, BUN files, audio banks, profiles or Shadow/vault to event distribution ZIPs. Users install the required mods and world separately. Bug reporting is a separate action with reviewed submission content.
Convert scenes locally from your legitimate Carbon/UG2 files. Current development scripts depend on verified input paths and versions; a general one-click converter is not yet available. Thumbnails alone cannot play a scene.
Verify the original files
Inputs include the selected NIS, matching GLOBAL camera assets and verified camera descriptions; UG2 also uses EvtTrk. Read only the required files, preserve the source game and record sizes/SHA256. Convert normal race intros without mixing in story-only scenes.
Convert and validate each scene
In the development tree tools/CarbonIntro, Carbon uses prepare_variants and export_variant; UG2 uses prepare_ug2_one, prepare_ug2_batch and the matching export_ug2 scripts. Validate actors, car layout, camera and GO timing separately. Do not add actor assets to camera-only scenes.
Install into your own game
Install only the runtimeFiles listed by runtime_manifest under scripts/EventLoader/CustomCutscenes/scene-ID. camera.cic, cars.cic, actor-clock.bin, scene-timing.bin and other files must match that scene manifest. Exclude camera.raw, original BUN/EXE files and research NPZ files.
Keep scene decoding and recording distinct
Scene audio is a separate step. Validate a confirmed PCM16 WAV and audio-timing.bin together with scene_audio. Current limits are mono/stereo, 8–96 kHz, 60 seconds and 8 MiB. export_scene_wav decodes a local ABK; it does not record audio. Do not claim original-audio fidelity for unidentified samples.
Selection and gameplay checks
Select a scene matching the participant count and playtest intro-to-GO, cancel, retry and transition to another event. Missing assets fall back to the original MW intro. Do not include converted source-game assets in general event distributions.